by Charles Foster III
Hello, hobbyists, and welcome to another hobby Insider. Last week, we kicked off my Road to Warfaire Weekend Series with part 1, painting up Captain Firequill. This week, I’m back at it again and taking to the air by painting up the Sky Raider and Sky Bomber Battle Engines in part 2. Let’s grab some paint and get these models soaring.
To help with painting, I’ve decided to paint these models in four parts: The Lower Ship, Goblin Gunner, Pilots, and the Balloon, starting at the bottom and working my way up. So, we launch with the lower section of the ship.
Paints Used

Lower Sky Raider/Bomber
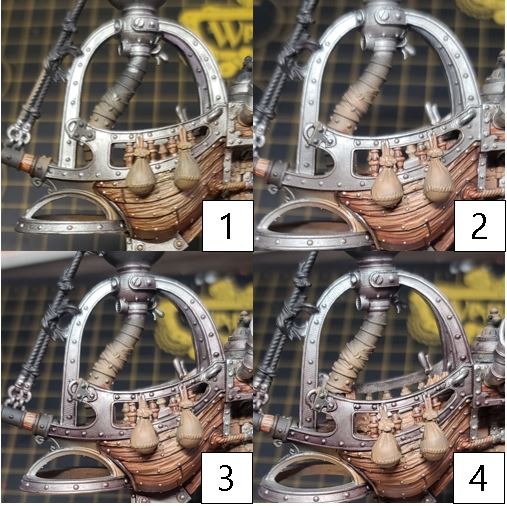
Woodgrain

Step 1) There is a lot of wood paneling on this model. To help out and speed up the process, I use an airbrush to lay down my basecoat of Gun Corps Brown. No worries, though, if you do not have an airbrush handy—you can easily apply this layer by hand with no real difference in results.
Step 2) Next, I line out the wood panels using Menoth White Base. I draw straight lines following the wood panels with the occasional lift to create uniqueness in the pattern.
Step 3) Just as in the previous step, I use Umbral Umber to line out the darker grain structure. I follow along the Menoth White Base, essentially making a sandwich of the three tones: Menoth White Base, Gun Corps Brown, and Umbral Umber.
Step 4) Next, I essentially stain the wood to give it a bright vibrant tone. I mix Bloodstone, Yellow Ink, and Brown Ink to create my glaze and blend this to about 75% of each wood panel.
Step 5) Once the previous step is dry, I repeat a blend using the same glaze but only go about 50% of the way up the wood panel this time.
Step 6) To create the final shading in the woodgrain, I add a drop of Blue Ink to the previous mixture and blend my highlight about 25% of the way up the wood panel this time.
Step 7) The final step is to bring it all together. Add a drop of Thamar Black to the previous mixture. Apply this color only to the breaks in the wood paneling. This will help the individual panels jump out, giving a great overall look to the wood areas.
Steam

Step 1) Next up, let’s tackle the clouds under the ship. Start off with a solid basecoat of Asheth Grey.
Step 2) Continue working your layers up on the clouds using Iron Hull Grey. Make sure to let the previous layer show through.
Step 3) For the second highlight, mix Bastion Grey with a drop of Frostbite. Thin out your layers with a little bit of water and slowly build up this layer with thin coats. The transparency of some of the layers will help sell the cloud-like look.
Step 4) Finally, add a drop of Morrow White to the mixture and apply some final layers to achieve that more vibrant white.
Silver Metals
Step 1) Moving onto the silvers of the ship, I start off with a base of Pig Iron.
Step 2) For my first shade, I mix Greatcoat Grey, Battlefield Brown, and Pig Iron together and apply this to areas of shadow. If you are new to blending and would like to simply apply this as a wash to the area, you will get a similar look without the extreme effort of two-brush blending.
Step 3) For the deepest shadow areas, I mix Thamar Black, Brown Ink, and Blue Ink together and apply as my final shade.
Step 4) For my first layer of highlights, I use Cold Steel and apply it to the raised areas and hard edges of the model.
Step 5) Finally, after sealing the model with matte sealant, I’ll return to the area with Quick Silver to brighten some of the areas muted by the matte sealant.
Golds

Step 1) Next up let’s get some gold on the boat. Start by laying down a solid basecoat of Rhulic Gold.
Step 2) To create the first shade for the golds, mix Brown Ink, Yellow Ink, and Rhulic Gold together. Blend this in as the first shade for the yellow metals.
Step 3) To darken the shade, mix Umbral Umber, Sanguine Base, and Brown Ink. Apply this color to the deepest shadows and recesses.
Step 4) With the shades applied, move on to your first highlight, using Solid Gold. Make sure to get this into all of the raised areas and hard edges.
Step 5) Finally, after the model is completely sealed with a matte varnish, return to the area for one final highlight using Solid Gold mixed with Cold Steel.
Ropes

Step 1) With the metals done, I move on to the ropes. To begin, I put down a solid layer of Rucksack Tan.
Step 2) Next, create a wash for the ropes by thinning out Brown Ink with water. I use a 14:1 ratio of water to Brown Ink.
Step 3) Once the wash has completely dried, I use Rucksack Tan to reclaim some of the base color. I make sure, though, to leave that natural shade created from the wash showing through.
Step 4) Finally, I throw in some highlights using Menoth White Base.
Purple Cloth

Step 1) There is a small patch of cloth that needs some color. Start by applying a basecoat of Sanguine Base.Step 2) Next, to work the purple up, apply a layer of Beaten Purple.
Step 3) Continue to work up the highlights using a layer of Beaten Purple with a drop of Murderous Magenta.
Step 4) To create some saturation in this material, apply a thinned-out wash of Piggy Purple Ink and water—a 14:1 ratio of water to Piggy Purple Ink built up in a few layers seems to get the best results.
Step 5) Finally, add one final highlight of Beaten Purple with a drop of Murderous Magenta.
White Cloth
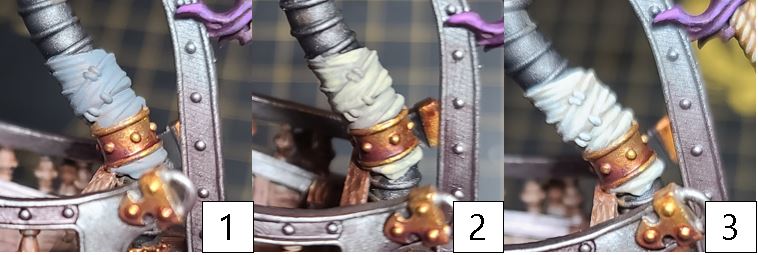
Step 1) Last but not least, there is some cloth wrapping around the piping of the airship. For this, I start with a basecoat of Hammerfall Khaki.
Step 2) Next, I continue to build up the color with a highlight of Menoth White Base.
Step 3) Finally, to finish off the lower section of the airship, I add a highlight of Menoth White Highlight to the cloth.
With the main part of the airship complete, it’s time to move on to the gobber gunner turrets!
Gobber Gunner 1 & 2
Skin Tones
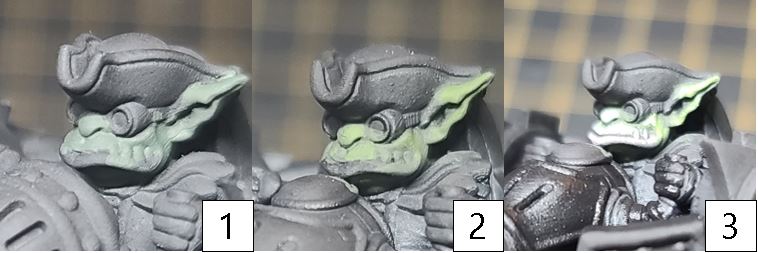
Step 1) Let’s tackle us some gobbers! Start by mixing Gnarls Green and Bog Moss together and applying it for a solid basecoat.
Step 2) Continue working the color up by adding a highlight of Ordic Olive.
Step 3) Finish off the skin tones by mixing Thrall Flesh, Ordic Olive, and Frostbite and applying it as a final layer of highlights.
Black Leather/Gunner Plating

Step 1) Next up are the black armor and leather. I start with a fresh layer of Thamar Black to ensure the best transition between colors.
Step 2) Since I started with the darkest color, I will be working up layer highlights for this section. For the first highlight, I start with a mixture of Coal Black, Exile Blue, and Thamar Black.
Step 3) I continue highlighting by adding Underbelly Blue to the previous mixture and applying this as the next highlight.
Step 4) Finally, for the final highlight, I add Frostbite to the previous mixture and place one last layer on the highest areas and hard edges.
Brown Leather

Step 1) With the black leathers done, it’s time to move on to the brown leathers. Start off with a basecoat of Idrian Flesh.
Step 2) Next, begin shading the area using Umbral Umber and two-brush blending in the first shadows.
Step 3) For the darkest areas and shadows, create a second shade using Thamar Black and Brown Ink.
Step 4) Begin highlighting this section using Bootstrap Leather.
Step 5) Finally to bring it all together, mix Bootstrap Leather with Rucksack Tan and apply as the final highlights.
Silver Metals

Step 1) To keep the coherency of the metals together, I’ll be using the exact same steps for my silvers and golds from the ship. I start off with a basecoat of Pig Iron.
Step 2) For my first shade, I mix Greatcoat Grey, Battlefield Brown, and Pig Iron together and blend in my first area of shadows.
Step 3) To continue shading, I mix Thamar Black, Brown Ink, and Blue Ink together and apply as my final shade.
Step 4) With my shading complete, I move on to my highlights. I apply Cold Steel and to the raised areas and hard edges of the model.
Step 5) Finally, after sealing the model with matte sealant, I’ll return to the area with Quick Silver to brighten some of the areas muted by the matte sealant and create that glinting metallic highlight.
Golds
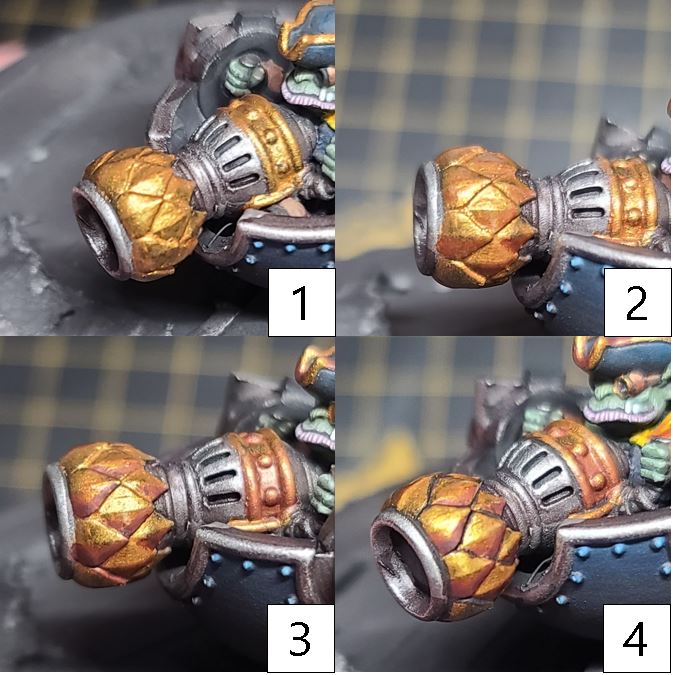
Step 1) To finish off the turret, let’s add some gold accents. Start by laying down a solid basecoat of Rhulic Gold.
Step 2) Mix Brown Ink, Yellow Ink, and Rhulic Gold together, and blend this in as the first layer of shadows for the gold areas.
Step 3) To darken the shade, apply a mixture of Umbral Umber, Sanguine Base, and Brown Ink. Apply this color to the deepest shadows and recesses.
Step 4) With the shades applied, I’s time to move on to your first highlight using Solid Gold. Make sure to get this into all of the raised areas and hard edges.
Step 5) Finally, after the model is completely sealed with a matte varnish, return to the area for one final highlight using Solid Gold mixed with Cold Steel. This will really set off the highlights and make the gold stand out.
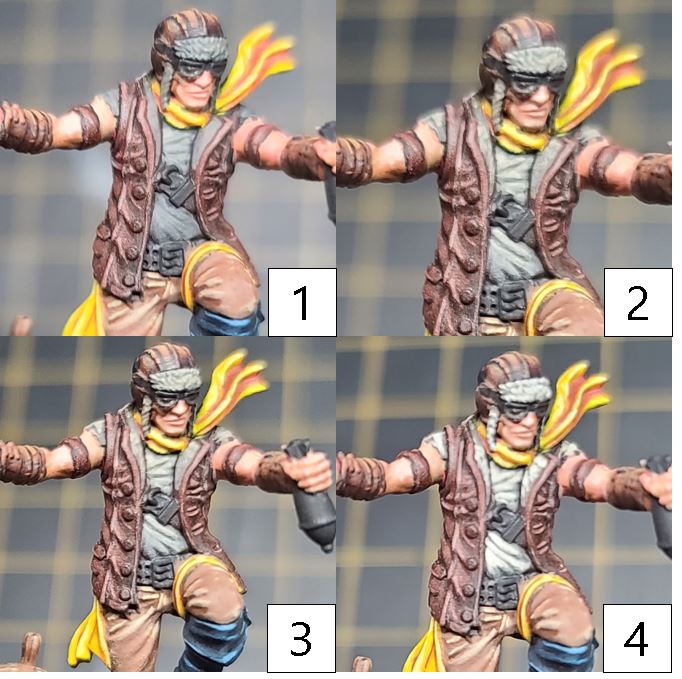
Pilot 1 & 2
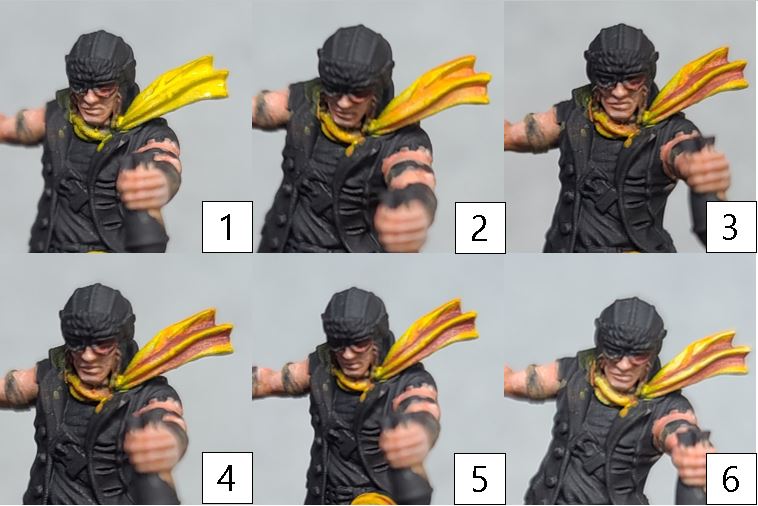
Skin Tones

Step 1) With the goblin turrets completed, its time to tackle the pilots of the airship. I start off with the skin tones using a solid basecoat of Midlund Flesh.
Step 2) Next, I shade the area by blending in Skorne Red mixed with Midlund Flesh.Step 3) To balance out the rosy color of the previous step, I mix Battledress Green and Midlund Flesh together and blend it over the previous step.
Step 4) With the skin tones now having a natural look, I’ll deepen the shadows with a mixture of Skorne Red and Battledress Green, blending this into the deepest recesses.
Step 5) For my first layer of highlights on the skin, I’ll mix Midlund Flesh and Ryn Flesh together and apply this to the highest areas.
Step 6) Finally, to really add some definition, I’ll apply Ryn Flesh as my last layer of highlight.
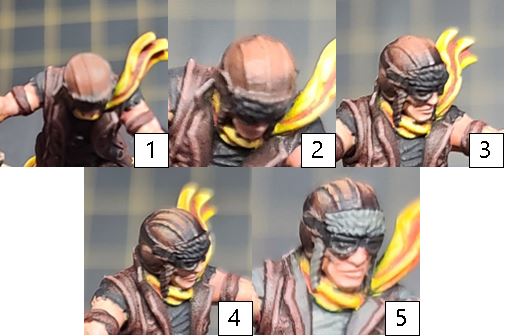
Yellow Scarves
Step 1) The scarves on the pilots provide a perfect opportunity to bring in some bright colors and tie into the Brinebloods army with some bright yellows. Start off with a solid basecoat of Cygnus Yellow.
Step 2) Begin working on the shade by mixing Cygnus Yellow, Inferno Orange, and Bloodstone together and blending this in for the start of the shadows.
Step 3) Continue darkening the area by mixing Bloodstone and Inferno Orange and then applying this as the second layer of shading.
Step 4) Finish off the shading with one final mixture of Sanguine Base and Umbral Umber. Apply this to the darkest and the heaviest shaded area.
Step 5) For highlighting, start by mixing Cygnus Yellow and Menoth White Base together and applying the mix to the raised areas.
Step 6) Finally, add a small amount of Menoth White Highlight to the previous step and apply this to any hard edges or areas that need that final bit of definition to make the color pop.
Woodgrain

Step 1) There is a small amount of wood for the steering wheel. Just like as in the first section, I’ll be using my tried-and-true woodgrain effect. I start off with a basecoat of Gun Corps Brown.
Step 2) Next, I line out the wood panels using Menoth White Base. I draw straight lines following the wood panels with the occasional lift to create some uniqueness in the pattern.
Step 3) Similar to the previous step, I use Umbral Umber to line out the darker grain structure. I follow along the Menoth Base White, essentially making a sandwich of the three tones: Menoth White Base, Gun Corps Brown, and Umbral Umber.
Step 4) Next, I will stain the wood to give it a bright vibrant tone. I mix Bloodstone, Yellow Ink, and Brown Ink to create my glaze and blend this to about 75% of each wood panel.
Step 5) Once the previous step is dry, I repeat a blend using the same glaze but only go about 50% of the way up the wood panel this time.
Step 6) To create the final shading in the woodgrain, I add a drop of Blue Ink to the previous mixture and blend my highlight about 25% of the way up the wood panel this time.
Step 7) The final step to bring it all together. Add a drop of Thamar Black to the previous mixture. Apply this color only to the breaks in the wood paneling. This will help the individual panels jump out, giving a great overall look to the wooded areas.
Black Leather
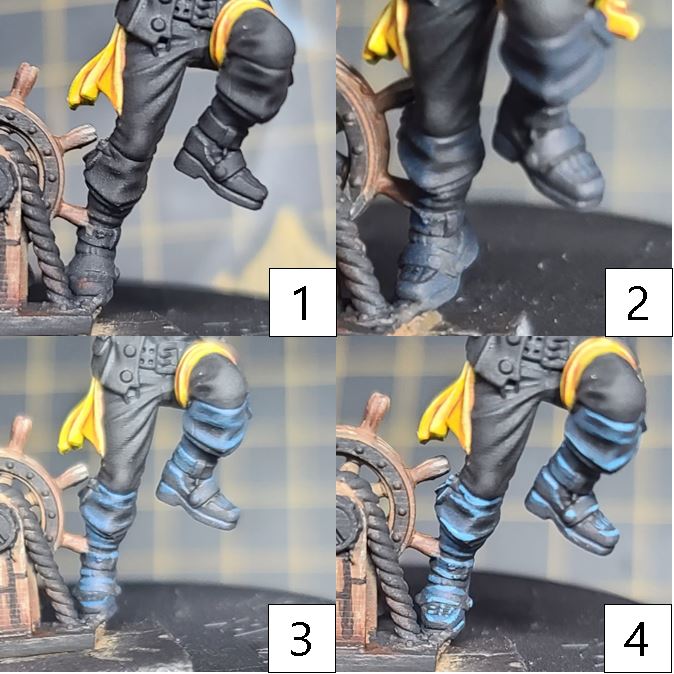
Step 1) For the black leather on the pilot, we will use the same black leather process we did with the gobber turret. Start with a solid basecoat of Thamar Black.
Step 2) Next, start highlighting the area using a mixture of Coal Black, Exile Blue, and Thamar Black.
Step 3) Continue highlighting the dark leather by mixing Underbelly Blue to the previous step and applying this mix to any raised surfaces.
Step 4) Finally, add Frostbite to the previous mixture and apply a hard-edged highlight to any areas you want to showcase the reflection of the material.
Brown Leather
Step 1) Just like the previous brown leather, I start off with a basecoat of Idrian Flesh.
Step 2) I start my shading on the leather with Umbral Umber, blending it out to create the first layer of shadows.
Step 3) I continue to darken the leathers by mixing Brown Ink and Thamar Black together and blending this into the recesses to create my second shade.
Step 4) For my first layer of highlights, I use Bootstrap Leather.
Step 5) Finally, I finish off the highlights with a mixture of Bootstrap Leather and Rucksack Tan.
Light Shirt/ Hat Fuzz
Step 1) Time to tackle the light shirt and the softer cotton areas on the hat and inside of the pilot’s jacket. Start with a basecoat of Bastion Grey.
Step 2) For the shirt, add a simple layer of Hammerfall Khaki. For the hat and jacket puffs, add highlights from this point in circles and dabs when working up the highlights.
Step 3) For the second layer of highlights, apply Menoth White Base, using the same techniques as you did for the shirt and puffs.
Step 4) Finally, for the shirt, apply a few highlighted areas of Menoth White Highlight. For the helmet and jacket, a few dabs of Menoth White Highlight in the center of those circles should bring it all together.
Golds

Step 1) For the steering wheel, I will be using the same steps for the gold as before. I start off with a solid basecoat of Rhulic Gold.
Step 2) Moving on to the first layer of shade for the golds, I mix Brown Ink, Yellow Ink, and Rhulic Gold together. I blend this color in as the first layer of shadows for the gold areas.
Step 3) To darken the shade, I apply a mixture of Umbral Umber, Sanguine Base, and Brown Ink. I work this into the deepest shadows and recesses.
Step 4) Finally, with the shades applied, I move on to highlighting using Solid Gold. Make sure to get this into all of the raised areas and hard edges.
Step 5) After the model has been completed and sealed with a matte sealant, I’ll hit the golds with a few pops of Solid Gold mixed with Cold Steel for a final highlight to make that gold shine.
Rope
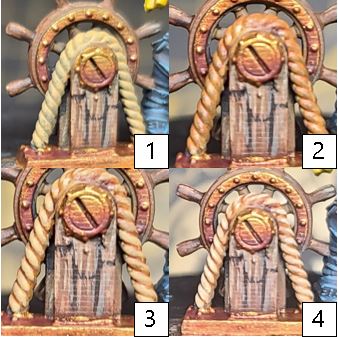
Step 1) There is a rope that is tied to the steering system for these aircrafts. Just like before, start off with a basecoat of Rucksack Tan.
Step 2) Create a wash of Brown Ink by thinning it out with some water and applying this all over the rope area.
Step 3) Reclaim some of the base color by applying a layer of Rucksack Tan. Make sure to leave some of the natural shade showing through from the previous steps.
Step 4) Finally, add a final highlight of Menoth White Base.
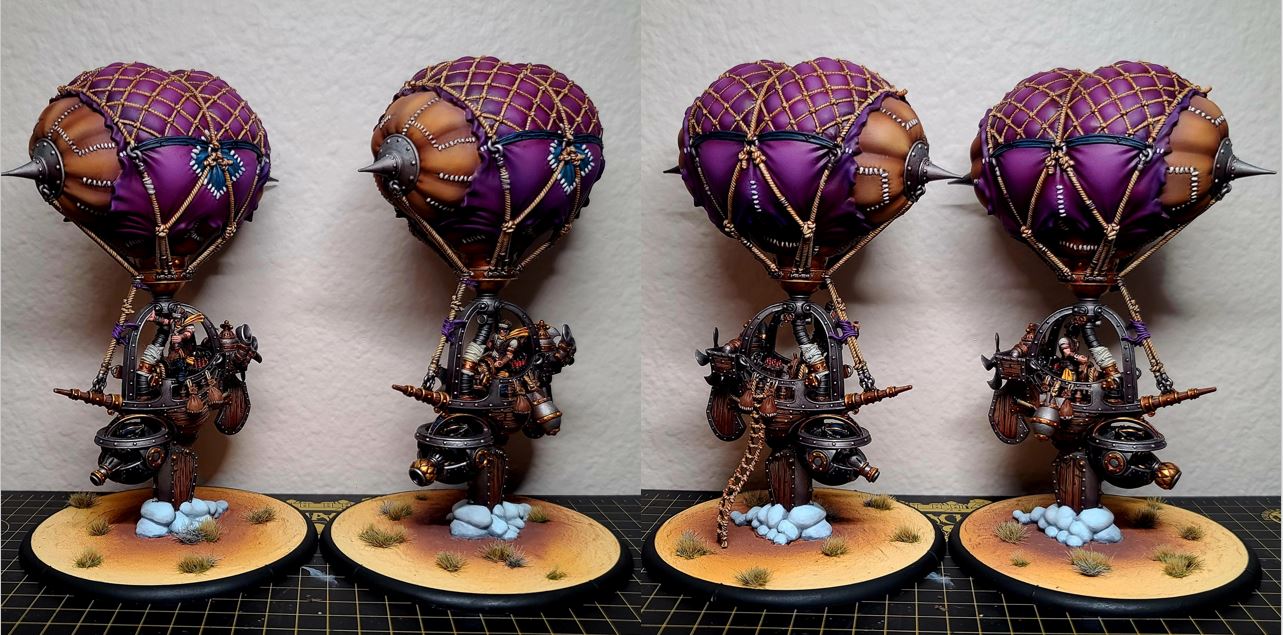
With the pilots complete, we’re on to the final section: the upper balloon structure.
Balloon Material
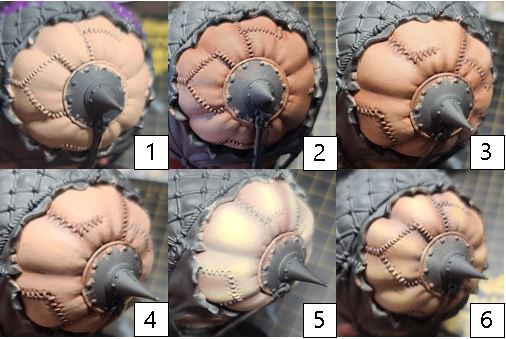
Step 1) Time to tackle the final section on these battle engines. I start off on the balloon material by combining Cygnus Yellow, Rucksack Tan, and Idrian Flesh for my basecoat.
Step 2) Next, I start my shading by blending Idrian Flesh into the recesses.
Step 3) I finish my shading by mixing Idrian Flesh and Umbral Umber and blending this into the previous step.
Step 4) I start my highlights off by reclaiming some of the area with my original base mixture: Cygnus Yellow, Rucksack Tan, and Idrian Flesh.
Step 5) Next, I add a highlight of Cygnus Yellow, Rucksack Tan, and Menoth White Highlight.
Step 6) With the area completed, there are a few sections sculpted like patches. To get a slightly different color and show a different material, I add a thin glaze using Brown ink to one section and use a thinned-out glaze of Mixing Medium, water, and Thornwood Green to shift the colors of the section.
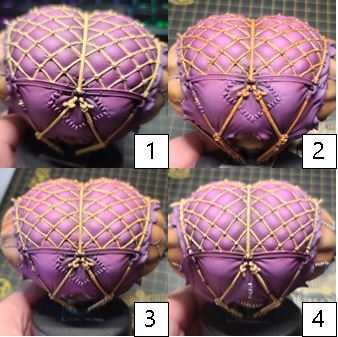
Purple Tarp/Cloth
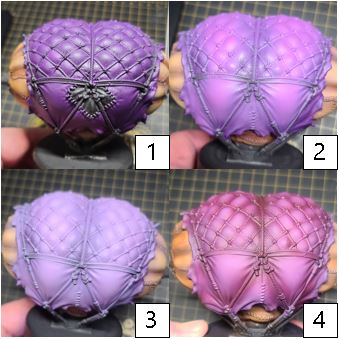
Step 1) With the core material done, let’s get that fabric coloring the balloon. Start the area with a solid, even coating of Bad Bruise.
Step 2) To cut down on effort and time, airbrush on a highlight of Beaten Purple.
Step 3) To create the third layer, mix Menoth White Highlight with Beaten Purple to add another layer of highlights.
Step 4) For the final layer, Thin out Sanguine Base with water in a 1:16 ratio of paint to water and airbrush a glazer over the top to shift the colors to almost a pink hue.
Ropes
Step 1) The like the other areas of rope, I start off with a basecoat of Rucksack Tan.
Step 2) Using some water, I thin out a little Brown Ink and apply it as a wash over the entire area. I make sure not to let the wash pool up too heavily in any of the recesses. A small amount is what we need but not a super-heavy wash.
Step 3) Working the color up, I use Rucksack Tan to reclaim some of original color. Make sure to leave some of the natural shade created from the wash show through.
Step 4) Finally, I add some Menoth White Base on the raised surfaces to finish out my ropes.
Gold

Step 1) For the golds on the base of the balloon, use the same formula as before, starting with a basecoat of Rhulic Gold.
Step 2) Next, shade the metal with a combination of Rhulic Gold, Yellow Ink, and Brown Ink.
Step 3) Continue shading with a mixture of Sanguine Base, Umbral Umber, and Brown Ink.
Step 4) Highlight the metals with Solid Gold.
Step 5) Finally, after sealing the model with a matte sealant, mix up Solid Gold and Cold Steel and apply some final glinting highlights to the area.
Silver Metals
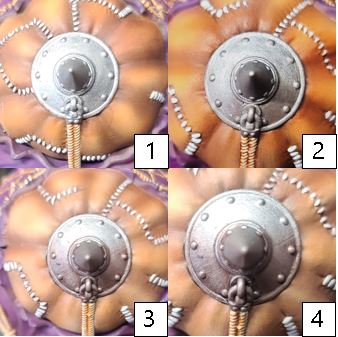
Step 1) For the silver metals, I basecoat the area in Pig Iron.
Step 2) To shade the areas, I combine Greatcoat Grey, Battlefield Brown, and Pig Iron and blend this into the metal to create my first area of shadows.
Step 3) To darken the shadows a little bit more, I mix Thamar Black with Brown Ink and blend this mix into the darkest areas of the silver.
Step 4) For highlights, I use Cold Steel and apply it to the upper raised surfaces and area.
Step 5) Finally, after the model has been sealed with matte sealant, I return to the area for one more highlight using Quick Silver to get that bright glinting metallic look.
Patch Cloth

Step 1) One last detail that needs to be addressed is the patched material on the main balloon cloth. Start with a basecoat of Gravedigger Denim.
Step 2) Add a shade using Asheth Grey and blend it into the recesses.
Step 3) Reclaim any lost areas using Gravedigger Denim.
Step 4) Begin your highlights for this area using Gravedigger Denim and Underbelly Blue.
Step 5) Finally, for the final layer of highlights, add a drop of Frostbite to the previous step’s mixture and apply it to raised surfaces and any hard edges.
With that, our Sky Raider and Sky Bomber are ready to take flight!
I’m so pumped to get these on the tabletop at Warfaire Weekend, but our journey isn’t done yet. Join me next time as I paint The Great Old One! See you next time for Part 3 of the Road to Warfaire Weekend series, and I hope to see you all in person in just a few weeks!