by Jason Soles
In the first part of this series, we looked at the history of the Marcher Worlds as they evolved from a frontier territory into the Marcher military estates and finally developed into the Coalition of Free States. We also discussed the structure, traditions, and background of the Rangers as they grew alongside the Coalition. In the second part, we examined how the themes and concepts behind the Marcher Worlds informed the development of the Faction’s units. Finally, we are now ready to move on to a discussion about the Marcher units on the tabletop. In this part, we will look at the tactics and strategies behind the Marcher Worlds, beginning with force construction.
It is generally a good idea to approach army construction with a general plan of attack. Do you want to focus on heavy firepower in order to facilitate shooting your opponent’s forces off the table or does your strategy focus on hit-and-run tactics and combined arms? The Marchers are well suited to both of these options and many more. They have strong ranged game, exceptional mobility across the models in the Faction, and a good number of dirty tricks.
I tend to build flexible Marcher armies that are both capable of providing plenty of firepower and mobile enough to react to my opponent’s movements on the battlefield. While I certainly lean slightly more into the ranged game, I do not neglect the melee potential of the Marchers, either. The speed of the Marchers pretty much ensures you can get them to where they need to go, which is always the trick with melee-focused units.

When building a Warcaster force, regardless of Faction, I tend to follow the rule of thirds. One-third of units will be taken up with squad selections, one-third solos, and one-third warjacks and vehicles. This means when playing a Primary Mission scale game with fifteen units, I will dedicate five of my units options to squads, five to warjacks and vehicles, and so on. The squads are necessary for scoring most scenarios, the solos get the lion’s share of activations during each game, and vehicles and warjacks provide my force with its real offensive firepower. It is also worth saying that the rule of thirds is just a rough guideline, and players should feel free to experiment with formulas and force breakdowns to see what works best for them.
When possible, force construction should also take into account the scenario to be played. You certainly do not want to short yourself on any unit options required for scoring, for example.
I generally start my force construction with my squads. The squads have always felt like the core of a Warcaster force to me; not only are they the only unit type that can score in most Warcaster scenarios, but they are also warrior models, which means they can place void gates. Because squads are usually made up of three models, they feel to me as if they have more presence on the battlefield than solos, which are single-model units. Even if a squad gets shot up during your opponent’s turn, provided at least one model survives, you will be able to drop a new void gate and get fresh units into play on the tabletop.
It is also worth mentioning that Marcher Worlds is the one Faction I regularly break the rule of thirds for when constructing my forces. I value all of the Marcher squads about equally and so sometimes take two of each, for a total of six squads. In that case, I usually drop a warjack with the idea that I’ll make up for it by ensuring I have at least one Combat Engineer solo in my force and the Impulse Inducer Cypher card in my Rack. Both remove activation tokens from warjacks, so that despite having fewer individual models in my force, I will get plenty of use out of the ones I do have.
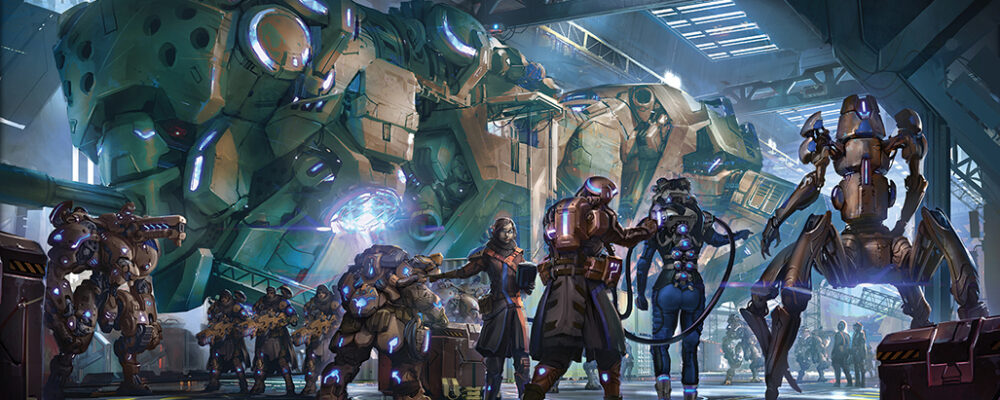
Assuming I stick to the rule of thirds, my exact choice of squads is dependent upon my opponent’s Faction. While I highly value the Ranger Heavy Support as one of the best squads in the game for its sheer offensive firepower, between its Blast Weapon and Targeter special rules, the effectiveness of the blast weapons (which inflict explosion damage) is blunted by Paladin compound armor. If you are not familiar with all the rules involved, Blast Weapons not only damage their target but also inflict explosion damage rolls on the two models closest to the target on a direct hit. The Targeter enables the attacking model to reroll its attack while its squad is charged. Together, this is a powerful combination. A model with Compound Armor, however, gains +1 ARM against explosion damage, which significantly weakens the effect of blast weapons against those models.
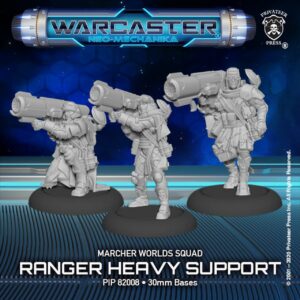
I usually start by taking two Ranger Fire Team squads. If I am playing against the Alliance, I will supplement them with two units of Ranger Infiltrators and single Ranger Heavy Support squad. When facing off against any other Faction and adhering to the rule of thirds, I will take two Ranger Fire Teams, two Ranger Heavy Support squads, and a single Ranger Infiltrator squad.
Ranger Fire Teams are incredibly versatile squads with an exceptional threat range, a solid ranged attack, and the ability to strip Arc off of enemy units and void gates. All Ranger squads have Slip Displacers, which enable them to spike to move up to 3˝. Ranger Fire Team models are also armed with Battle Rifles that have the Mechanikal Optics rule, which says that while the model is charged, its Battle Rifle gains +4˝ RNG. That means that a charged Ranger Fire Team model has SPD 6, a RNG 12 Battle Rifle, and 4 extra inches from Mechanikal Optics for a total optimal threat range of 22 inches. After attacking, the squad can then spike to use Slip Displacer in order to reposition itself, clearing any Arc you want freed up and enabling the squad to move into position around an objective or to pull back into cover.
The Ranger Infiltrators, on the other hand, are melee specialists. They are armed with both fusion axes and magnetic charges. The magnetic charges are short-ranged blast weapons the Infiltrators can place before repositioning themselves away from the forthcoming detonation. While these blast weapons have the same difficulty against models with compound armor as the Ranger Heavy Support models’ Talon Rocket Launchers do, the Infiltrators’ axes have no such problem. With the Cleave rule, a well-placed Infiltrator can cut down two Paladins per turn.
While the Ranger squads’ Slip Displacers afford them a great deal of tactical flexibility and maneuverability, it’s worth pointing out that they are still squads, and for the most part, your job will be to get them to objectives where they can score. Once in place, they will generally remain in the vicinity of the objective as long as it can be scored and they remain on the tabletop. Your true mobile combatants are your warjacks, vehicles, and solos.
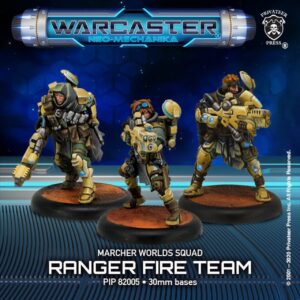
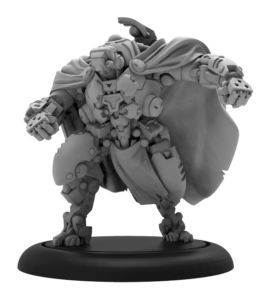
The Marchers have two exceptional warjack chassis to choose from in the form of the Dusk Wolf and the Strike Raptor. I always take at least two of each in any force. Assuming I am adhering to the rule of thirds, I will round out my warjack selections with a Razorbat vehicle.
When arming my warjacks for a given force, I always make sure they are equipped identically, in terms of both their weaponry and their cortexes. I find this lessens my cognitive load of trying to recall which models are equipped with which weapons and gear. This is a habit I developed in playtesting when models are virtually never armed with appropriate weapons anyway as we test simultaneously with the models being sculpted.
Both of the Marcher warjacks are exceptionally maneuverable. The Dusk Wolf has the same Slip Displacer tech as the Ranger Squads and additionally has an Arcantrik Turbine, which grants it +1 SPD for each Arc it is charged with. The Dusk Wolf’s Scout cortex additionally grants the warjack Pathfinder, which allows it to ignore the movement penalties for rough terrain.
The Strike Raptor is equipped with a mechanika jump pack, which enables it to get around rough terrain without penalty while it is charged. It can spike to gain true flight and +3 SPD during its activation. A Strike Raptor equipped with the Dog Fighter cortex can also move up to 3˝ each time it is targeted by an enemy attack.
When it comes to arming my Marcher warjacks, I tend toward two builds. I either focus on heavy weapons capable of blasting warjacks and vehicles off the table or I focus on builds that can take out large numbers of solos and squad models. While some players prefer melee-focused builds for some of their warjacks, it is not an option I’ve personally had a lot of luck with, though I usually equip my warjacks with at least one melee weapon.
When adding Dusk Wolf warjacks to my force, I generally choose to equip them with either the Scout or the Sniper cortex. In addition to granting Pathfinder, the Scout cortex also enables the warjack to ignore cover when making ranged attacks. This is highly valuable with most Marcher ranged weapon options except for the Flamethrower, because the Flamethrower already has this capability natively. On the other hand, the Sniper cortex adds +2 RNG to all the warjack’s ranged weapons, which is great for Flamethrowers.
Should I intend to field a melee-focused Dusk Wolf, I’m torn between the Fighter cortex, which grants an extra attack with each of the warjack’s melee weapons, and the Neural Net cortex, which adds to the model’s DEF for each other friendly model within 5˝ of it (granting up to a +3 DEF bonus). While the Neural Net cortex can help keep a melee-focused warjack in play long enough to reach the enemy, the extra attacks granted by the Fighter cortex are incredibly potent when coupled with the Dusk Wolf’s Ripper weapon, which grants an additional attack when you destroy a model with the weapon.
While the Cleave attacks do not generate additional Cleave attacks, a Dusk Wolf equipped with a Fighter cortex and a pair of Rippers can make an astounding number of attacks, if it can reach enough enemy models to make an attack each time one is triggered. If you are faced with a mix of hard and soft targets, it’s worth considering using your initial and Fighter cortex attacks to take out squad and solo models, then use the Cleave attacks they generate against the harder target, since you are unlikely to take it out with a single attack anyway, and should you do so, it will not generate an additional attack.
If I am leaning into a ’jack-hunting role for my Dusk Wolf warjacks, I usually arm them with Rail Guns. I also find Blazers quite compelling, though they are a little soft for a primary anti-warjack weapon. After selecting either, I’ll be left with 2 weapon points, which I will spend on some combination of Battle Rifles, Impalers, Rippers, and Slug Guns. I will usually take one ranged weapon and one melee weapon.
If I am looking to add anti-personnel-focused warjacks to my force, I equip my Dusk Wolf ’jacks with a Flamethrower and Talon Rocket Pod combination. I then round that out with a single 1-point arm weapon, which will generally be a melee weapon.
While Particle Accelerators can be quite strong, as all High Intensity weapons can be, I tend to eschew them due to the large Arc investment required to get them to perform at peak efficiency. More than most options, High Intensity weapons very much influence how you play the models armed with them. They are real Arc hogs, but once you have them powered up, they are in a class all their own.
It is also worth considering the Dusk Wolf’s Wildflower weapon. It is a minelayer (or more accurately “sprayer”) that scatters small explosives over a wide area, causing all other models within 3˝ of the Dusk Wolf to suffer a POW 3 explosion damage roll. While such a weapon is unquestionably valuable in clearing squad model objectives, it has far less value against heavier armored targets. Even Paladin squad models will be difficult for the Wildflower to take out, due to their Compound Armor. And the fact the Wildflower hits automatically without an attack roll is something of a double-edged sword. While the weapon never misses, this also means it does not benefit from the extra successes of an attack roll that could ordinarily increase the damage output. It also has the twin drawbacks of a shorter range and is one of the few weapons in the game that can damage friendly models. All and all, it is a very solid weapon but with a few drawbacks, depending on your goals and playstyle.
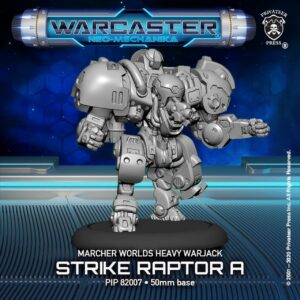
When it comes to my Strike Raptors, I tend to go for the Ace and Dog Fighter cortexes. The Ace cortex adds +2 RNG to all of the model’s ranged weapons, and I described the Dog Fighter cortex above. Though its benefit is not huge, I like that the Ace cortex benefits all the Raptor’s ranged weapons. That said, I sometimes lean into extreme warjack hunter builds armed with a pair of Rail Guns. Those weapons already have RNG 18, so the Ace cortex can feel like overkill.
The Dog Fighter cortex feels like a get-of-jail-free card. The Strike Raptor is a tough warjack; it can require some concerted firepower to take them off the table. Each of those attacks is another opportunity for the warjack to use its Dog Fighter cortex to fall back out of your opponent’s range or to move into cover or behind a wall. Depending on what your opponent has left to throw your way, it can also be used late in a turn to move into position and set up your next turn with the model.
While the Bomber cortex is quite strong—it adds an Action Die to the attack rolls with explosion weapons and enables the warjack to move up to 2˝ when it makes an attack with an explosion weapon while it has Flight—I seldom arm my Strike Raptors with enough explosion weapons to get a lot of value out of it. The Precision cortex, which adds +1 POW to the warjack’s melee weapons, is likewise a little too focused for most of my builds.
Because they are half the Deployment Cost of the Strike Raptors to get into play, I tend to think of the Dusk Wolf warjacks as the workhorses of my forces. As such, I usually add them to my forces first, so if I went with an anti-personnel build for them, I will go for a ’jack-hunter build for my Strike Raptors and vice versa.
When building a Strike Raptor ’jack hunter, I tend to go as offensive as possible. If I’m going for long-ranged firepower, it’s Rail Guns all the way. But sometimes I like to mix things up and add a Blazer or Particle Cannon. Basically, I’m all about the Cost 3 weapons for my Raptor-hunters. While the Particle Cannon’s ability to take out bystanders can be nice, for me it is all about that POW 6. While the Blazer clocks in at a slightly more anemic POW 4, it is both a Strafe weapon and inflicts the fire continuous effect, which can play havoc with your opponent’s ability to retaliate once you’ve set fire to their heavy warjacks.
I round out the primary shoulder-mounted weaponry with some lower cost arm-mounted weapons. With likely 6 of my 8 weapon points invested, that leaves only 2 points for arm weapons. The Strike Raptor’s 1-point arm weapon selections include: the Battle Rifle, Fusion Drill, Rock Buster, and Slug Gun. All of these are solid options. I prefer to take one melee and one ranged weapon from this list.
The Cost 2 weapons come up when I am building an anti-personnel-focused Strike Raptor. I start by selecting a Cost 3 “big gun,” usually a Blazer, Cyclone Cannon, or Particle Cannon—something with the ability to damage multiple targets. Then, I add a Cost 2 shoulder weapon to round it out, a Talon Rocket Pod or a Vortex Missile. That leaves 3 points for the arm weapons. One of those weapons will certainly be a Cost 1 melee weapon, a Fusion Drill or Rock Buster. The other will most likely be a Cost 2 Flamethrower.
In addition to my warjack support, I try to leave room for at least one Razorbat vehicle in my force. While the Razorbat cannot carry as many weapons as a warjack or be charged with as much Arc, it is a rock-solid, fast-moving weapon platform with a Maelstrom Activator that enables it to spike to attack a second time with all of its weapons. If your opponent is unwise enough to walk into the range of your guns, the Razorbat’s Stand & Deliver Maneuver further adds another Power Die to each of your ranged attack rolls, but at the cost of the Razorbat’s movement that activation.

When equipping your Razorbat, which had options like a Blazer, Slug Cannon, and Talon Mk II to choose from, it’s hard to go wrong. Additionally, because all three weapons are nestled in the Razorbat’s crewed turret, attacks made with them gain +1 RAT. While you may have already picked up on my fondness for the Blazer, I am also a big fan of anything that can slam its target. At POW 5, the Slug Cannon is one of the most powerful slam guns in the game.
The Talon Mk II is a bit more specialized. An improvement on the Marcher’s ubiquitous rocket launcher, the Mk II is actually a guided anti-air weapon that gains an additional +2 RAT when targeting models with Flight. Additionally, it has the same Mechanikal Optics rule as the Ranger Fire Team, which increases the RNG of the Talon Mk II from 12 to 16 while it is charged. Just keep that in mind when you spike to use your Maelstrom Activator and go to make your second Talon attack. Because the vehicle is no longer charged, your RNG will drop back down to 12.
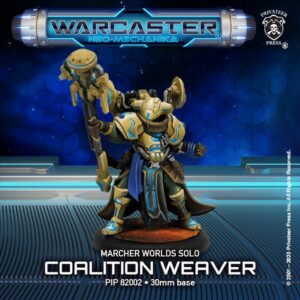
Finally that brings us around to the Marcher’s solo options. Assuming we are sticking with the rule of thirds, that will leave five solos to add to the force plus three hero solos. The first solos I always add to my force are two or three Coalition Weaver solos. Though they lack the range of the more arcane Factions, the Coalition Weavers more than make up for this shortcoming with their ability to spike to recycle Furies back to your hand of Cypher cards. This ability can ensure some very offensive turns by facilitating back-to-back Fury attacks to bookend your hopefully brutal model activations.
If I want to add a second vehicle to my force, I generally drop a Coalition Weaver from my force to add Fiddler & Co.
I round out my standard solo options with Hunters and a Combat Engineer. If I went with three Coalition Weavers, I add one Hunter. If I have two Weavers and didn’t take another vehicle, I will add two Hunters to my force.
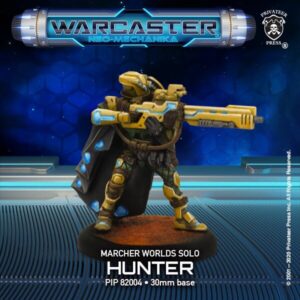
While the Hunter’s defensive tech is impressive (DEF 4, Stealth while charged, and the ability to move up to 3˝ after making a ranged attack), I really take the model for its firepower. While POW 4 alone is not necessarily noteworthy, the Sniper Rifle is RNG 15 and certainly benefits from the Hunter’s RAT 6. Its ability to spike to reduce its target’s ARM by 1 after it hits further pushes the effectiveness of this model. I sometimes use them to blast my opponent’s void gates, hoping to capitalize on the model’s high RAT against the gate’s relatively low DEF before spiking to bring its ARM 5 down to a more manageable 4.
As a warning, though, Hunters can feel like Arc hogs when they’re on the table alongside warjacks. They are great for turns when you do not have any ’jacks in play to activate, but generally you will not need more than a couple of them in your force.
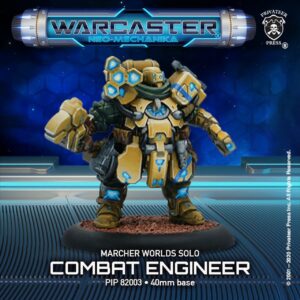
The Combat Engineer is another all-around incredible model, and I always include one in my forces. Not only can the model perform Repair and Tune Up special actions, but it can also spike to remove activation tokens from your warjacks. I try to keep my Engineer close to my warjacks, which is pretty easy because my opponent will generally shoot the poor guy off the table as fast as possible, thus freeing it up to be redeployed wherever necessary.
With regards to Hero solos, the Marchers have access to the gun mage Artemis Fang and the Wild Cards Captain Jax Redblade, Corebus, and Voitek Sudal. My go-to Heroes are always Fang and Redblade. They’re both excellent disruption pieces that will force your opponent to deal with them. Artemis Fang puts out a high volume of very accurate attacks, and she can choose to make each attack cause the fire continuous effect, gain the blast effect, or ignore Stealth. The downside is that while she may be hard to hit, once she is hit, she’s going down.
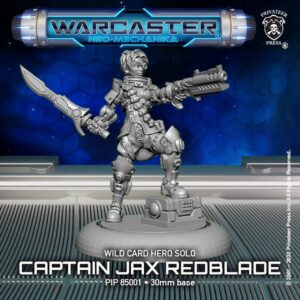
Redblade is among the fastest and most maneuverable models in the game. While she is charged, she gains Flight and her SPD is increased from 6 to 9. Always lodge her into a position where she has cover to make the most of her native DEF of 5. And watch out for blast weapons because, like Fang, this one is a glass cannon.
My third choice will come down to force composition. Would my army benefit more from Sudal’s dirty tricks or Corebus’ defensive capabilities and iron fists? Sudal excels at limiting your opponent’s options for deployment. He is armed both with Null Detonators, which automatically makes him a natural for Marcher forces, and with a Gate Jammer that increases the Deployment Costs of your opponent’s units by 1 while Sudal is charged. Then there is that handy spike on his Force Constrictor that enables Sudal to place an activation token on an enemy unit.
Meanwhile, Corebus can act as a shield for your models, absorbing any hits targeting friendlies within 5˝ of his metal frame. While moving around your opponent’s attacks can be a great boon for your softer solos and other high-value models, be aware of the special relations on the table when it comes to blast weapons. While Corebus may save Artemis Fang from a direct hit, he won’t help her against the blast damage if she is still too close to him.
The real fun of Corebus is his offensive capabilities. The robot can attack with two POW 4 fists and a Teleforce Blaster that can slam with a spike, all in the same turn. He additionally gains two Power Dice to attack rolls targeting warjacks, giving him a clearly defined role on the tabletop.
Having discussed the model options available to the Marcher Worlds, we can move onto the final part of force construction: choosing your Cyphers. When I build my rack, I am usually torn between taking the bare number of cards, 12, or maximizing my options at 15. A smaller deck enables you to move through it more quickly, thus ensuring “that card” is at least always closer at hand. A larger deck, however, has the benefit of more options. My deck discipline is not so good, and most often I will go for options. It is worth saying that I am a big believer in discarding the cards that don’t have immediate application, so I tend to cycle through my decks quite quickly no matter what their size.
I highly value the Coalition Weaver’s Fury Reciprocator special rule, and for this reason always make sure I have at least four Furies in my Marcher decks. I prefer to take those Furies with the most disruptive secondary effects regardless of their base POW. Cryo Lock, Havoc Spiral, Malediction Rubric, Null Collider, Psychonomic Lash, Pyrokinetic Surge, and Velocity Projector all regularly make it into my decks, though Null Collider and Pyrokinetic Surge are my must-haves.
Null Collider strips Arc from the unit or void gate it hits, which—when played alongside the Ranger Fire Team with their Null Detonators—is all the more effective.
The Marchers also have limited access to the fire continuous effect, which has been relegated to warjack weapons for now. Pyrokinetic Surge gives them good access to a fire-causing effect.
While I take Instability Equation with some Factions, I do not tend to value it for the Marchers. They already have great access to blast weapons from both the Ranger Heavy Support squads and several warjack and vehicle weapon options.
When it comes to Geometrics, my go-to Cyphers for the Rangers are the holy trinity of Displacement Index, Reiteration Complex, and Temporal Cycle. Displacement Index gives the target squad an immediate 3˝ move, which can be very strong with the Marchers’ already great maneuverability. Reiteration Complex gives each model in the squad an additional ranged attack. This can make even Ranger Fire Team squads into ’jack killers while they are charged and makes the Ranger Heavy Support squads into living terrors. Temporal Cycle enables you to remove an activation token from a squad, which is a great card no matter which Faction you are playing. Because of how important camping squads around objectives can be, I will also sometimes be tempted to throw in a Plexus Densifier card, which adds +2 ARM and the cost of –1 SPD to a squad.
With regards to my Overdrives, I favor cards that maximize the effectiveness of the warjack itself. I love Ascension Catalyst, Cortical Rampager, Devastation Optimizer, and Impulse Inducer.
Ascension Catalyst adds +2 to the warjack’s SPD and grants it Flight for a turn. While it may be slightly counterintuitive to take this card in support of a force that includes Strike Raptors, it can help maximize the destructive potential of the warjack by enabling it to retain all of its Arc for dealing damage. I have seldom regretted taking it, no matter how many Raptors are in my force.
Cortical Rampager enables the target warjack to immediately move up to 5˝ through friendly models. It’s a great card, available only to the Marchers, and is extremely effective when used in conjunction with a melee-focused warjack because it helps get them in position for maximum death dealing.
Devastation Optimizer affects the target warjack with the tune up continuous effect, granting it +1 STR, MAT, RAT, and DEF. When possible, I use it in conjunction with Impulse Inducer, which removes an activation token from a warjack. I use Devastation Optimizer on my strongest, best-placed warjack on the table (and then as early in the turn as possible). Then I try to reactivate the warjack as often as my opponent will let me before it gets shot off the table.
There are so many great Harmonic options open to the Marchers that it can be hard to narrow them down. My favorites are Aggression Theorem, Arcane Synthesis, Cyclonic Vitalizer, Divination Algorithm, and Dominion Imperative. Obviously, some paring down will be necessary to fit all these options into a fifteen-card deck…which will not be helped if you took two or more vehicles and are also considering taking the Psychodynamic Infuser card, which removes an activation token from a vehicle.
Aggression Theorem is a deceptively simple card that enables the target model to immediately make an attack. I say deceptively simple because the actual effect depends on the potentially board-changing weapon you decide to attack with. The attack can slam models aside, clear lanes of movement, create opportunities for scoring, defensively set models on fire, score the last point of damage on a warjack, etc. Its effects are really only limited by the board, the models in play, and your devious imagination.
Arcane Synthesis simply allows you to load any amount of Arc onto a target model up to its maximum. This is another one of those cards that is generally always just useful. And it is a godsend for filling up your warjacks with Arc.
Cyclonic Vitalizer is another card that is only available to the Marcher Worlds. It enables a target unit to move up to 3˝ at the start of each of your turns. I love this card on Jax Redblade, especially because she can be so hard to hit. Even if you don’t activate her during a given turn, you can use this card to continue to move her up the field to drop void gates. Note that such tactics will further draw your opponent’s ire and limit Redblade’s effective life expectancy. But if Redblade isn’t your jam, just put it on a Strike Raptor and pretend like you always have an Impulse Inducer card in your hand, ready to return the warjack to full combat readiness.
Divination Algorithm adds +1 RNG and POW to a unit’s ranged weapons, which can be incredibly powerful when played on the right model. I prefer it for models with a high volume of attacks, such as warjacks, vehicles, and Artemis Fang.
Finally, Dominion Imperative allows all of the solos in your force to move up to 3˝. Paired with the Marchers’ great maneuverability, this card will help further apply pressure in any scenario.
That essentially concludes my overview of Marcher force construction, but before wrapping up, I would like to look at some of the tactics and strategies I use when playing this Faction.
For starters, I usually try to deploy as few units at the start of the game as possible. I usually limit myself to a single solo and an objective-scoring unit, which is most often a squad. Limiting myself to a solo and one other unit at the start of the game ensures that all of my units will be free of activation tokens at the start of my second turn of the game.
Assuming I took her, the solo I first deploy is usually Jax Redblade. I like Redblade because she can quickly get up the field to place void gates as far forward as possible.

I generally field a Ranger Fire Team alongside her, which will move up to the closest objective and park themselves around it to await scoring. Because the squad’s activation token will be removed, it will retain some threat potential even from the back row. If you need to call the unit into action, charge it (which will increase the RNG of their battle rifles to 16), advance it forward as much as necessary while still keeping it in the vicinity of the objective, attack with it, and then spike to reposition it back around the objective. Extra points if you also managed to tag the unit with Reiteration Complex before opening fire. The spike at the end for repositioning always frees up the Arc you charged the unit with.
Early in the game, I try to get as many squads out as possible for scoring. I then start to transition toward warjacks and vehicles, all the while keeping an eye on the numbers of unactivated solos in play. I tend to get my Dusk Wolf warjacks out first due to their lower Deployment Costs before moving on to vehicles and Strike Raptors. That said, depending on what my hand of Cypher cards look like, all bets are off. If the cards want to turn my Strike Raptor into a biblical angel of death, an angel of death I shall have as early as possible.
Thanks for reading through this mammoth series of articles. Next up is a glimpse at the millennia spanning secrets of the Empyreans…