Welcome back to another edition of “Sorry-we-can’t-stream-at-the-moment-but-we-still-love-you-so-enjoy-this-old-timey-handwritten-dev-chat-instead.” Or, as I like to call it, an Insider.
Today we’re chatting about a pair of new models coming out next month that are playable in both Riot Quest and WARMACHINE, so we’re covering the rules for both games.
The Riot Quest rules you’re seeing today are the final versions—and, in fact, we’re going to show off their finished gear cards as well. The WARMACHINE rules are the current playtest versions of each of these models, however, and while these rules are very close to being set in stone, they are still subject to change.
So, if you spot a typo where someone has a spell with AOE 14, don’t worry, we’re not actually doing that.
Yet.
Let’s begin with General “Thunderstone” Brug. For starters, Brug isn’t actually a general, but you wouldn’t know that at first glance. This sly Pyg is a tactical genius, commanding his Pyg forces to victory with poise and confidence. The soldiers under his command trust Brug with their lives, not only because of his impressive accomplishments in battle, but also because Brug stole a Cygnaran captain’s uniform and started calling himself General “Thunderstone.” The cool shades don’t hurt, either.
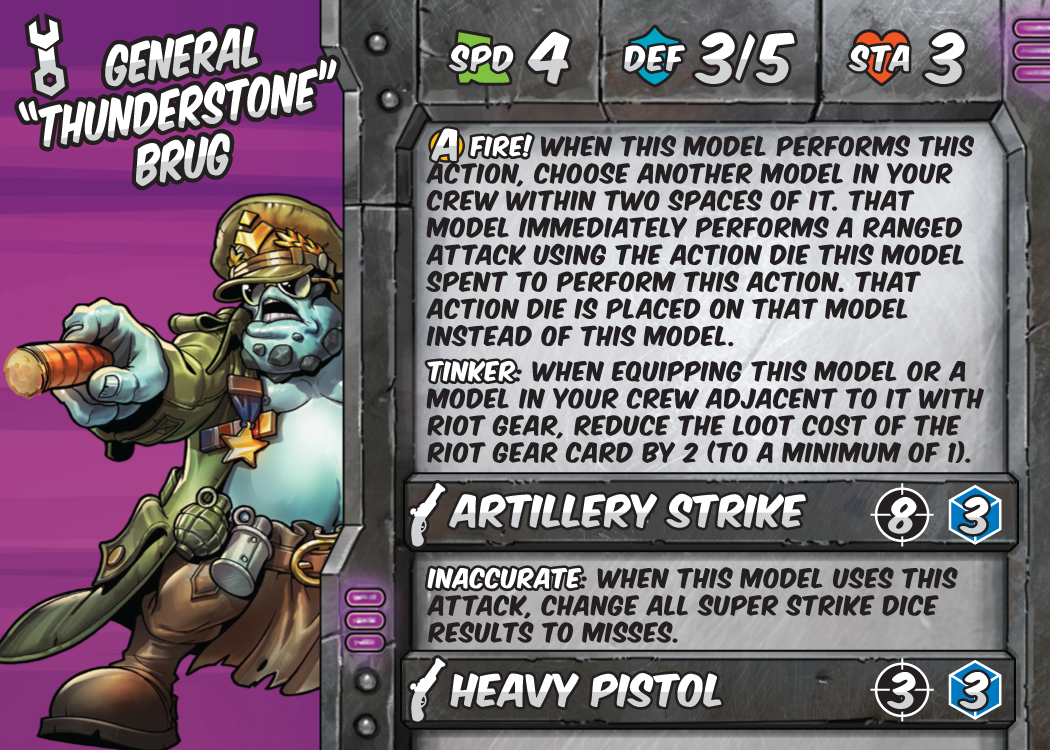
Specialists in Riot Quest are a support class, sometimes offering more specialized support and sometimes more generic support. Brug falls into the category of specialized support. His Fire! Special Action is incredibly potent with proper positioning and a nearby ranged-based Hero to support.
In Riot Quest, a Hero can’t activate if they have any spent Action Dice on their card at the start of each turn, but a Hero could activate multiple turns in a round if they can somehow complete each turn with no spent dice on them. Brug can make this happen.
If Brug begins his turn within 2 spaces of another friendly model, you can activate him, use Fire!, and place the Action Die that would normally go onto him for performing a Special Action onto the Hero he made shoot instead. Then, if you pass your turn, when it comes back around to you, Brug still has no spent Action Dice on him, and you can do this again and again until you’re out of Action Dice.
This combo is particularly nasty with Scythe, who—thanks to her Sniper ability—can potentially remove a spent Action Die from her card if her attack causes Super Damage.
You’ll also note that Brug has the longest base RNG weapon in the game, with his Artillery Strike being RNG 8. You’ll also note that this attack is terrible.
Three Boost Dice is average on a ranged attack, but the Inaccurate rule means you simply cannot roll any super strike results no matter what you do. Even if you reroll the attack a hundred times, it doesn’t matter—all of his super strikes change to blanks.
If you want to accurately shoot someone with Brug, get in range and use his Heavy Pistol or, better yet, run up and use Fire! on someone else with a better gun. If you absolutely, positively need to tag someone across the map, try to call down the Artillery Strike.

Brug also comes with the single most adorable piece of Riot Gear created thus far. The Dhunian Menace art is reason enough to run this card in your gear selection, but with regards to gameplay, it’s also incredibly good at making a sturdy Hero into an absolute tank or helping to protect a more fragile Hero. Permanent Cover is nothing to sneeze at, but preventing your opponents from throwing more than one white Action Die into their attacks against the equipped Hero is amazing. Put this gear on the likes of J.A.I.M.s or Ledfoot & Tredz and watch them become unstoppable juggernauts in the Arena.
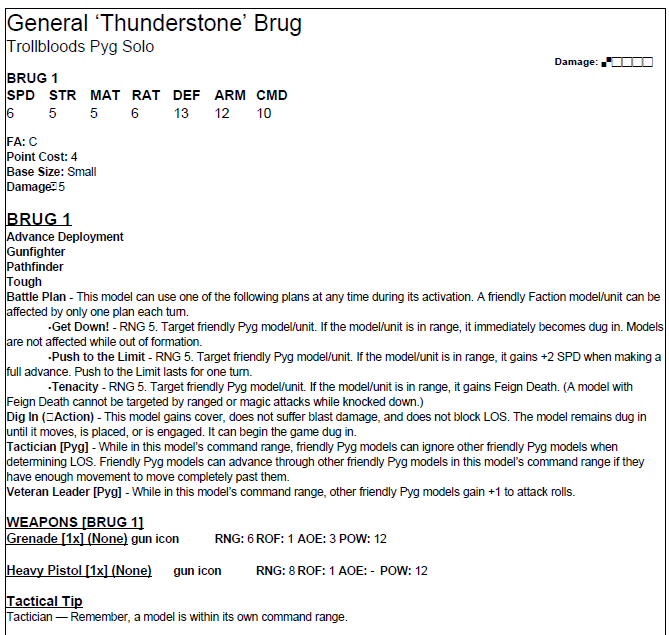
Do you like Pygs? Do you want Pygs to be even better? If you are a Trollbloods player and answered yes to either of these questions, I recommend picking up Brug for your army. Brug is a Pyg-dedicated support solo that provides a variety of passive and active buffs.
First up, Tactician [Pyg] and Veteran Leader [Pyg] are both straightforward abilities that will help out every Pyg in your army within 10˝ of Brug. His personal defensive stats aren’t great, so try to Dig In each turn unless you REALLY need Brug to shoot something. Remember, he can use his Battle Plan and still Dig In, so you aren’t losing any of his effectiveness as you move him into the perfect position.
Brug’s three Battle Plans options offer some compelling options for your Pygs. His range on each of these abilities is 5˝, so most turns, Brug is going to walk 6˝, Dig In, and then yell a plan out to some other Pygs. Don’t neglect that Brug does have Gunfighter, so if you really need that extra range to get a Battle Plan off, you can have Brug charge an enemy near him.
You are most likely using Push to the Limit for the extra SPD early on in the game, whether on an entire unit of Bushwhackers or on just a single Pyg Tank you want to send flying across the battlefield.
Starting as early as the second turn of the game, you’ll often find yourself trying to decide between using Get Down! or Tenacity, and it really comes down to what your opponent is bringing to bear against you. Having your Bushwackers use Slip Away to break free of the enemy, get some shots in, and then Dig In during Brug’s activation can be fantastic. Also, causing one of the Pyg Tanks to Dig In is always good fun.
But maybe you find yourself in a situation where you must have Brug activate before another model/unit, and that model/unit also needs to move to get into range with their guns. In cases like this, Tenacity is going to be the better defensive option, as Dig In will expire when the unit moves. Another example could be if your opponent is threatening a lot of spray attacks, which would ignore cover. Tenacity can be more useful in this situation, depending on the positioning of your army. Most times you’ll be looking to Dig In the unit, but don’t discount Tenacity. It has its applications; they’re just more situational.
Right then, let’s move away from the Pyg and starting talking about the Pig: one of the most dashing Farrow scoundrels you’ll ever meet (for the brief moment you see him before he makes off with your pearls), Lord Azazello.
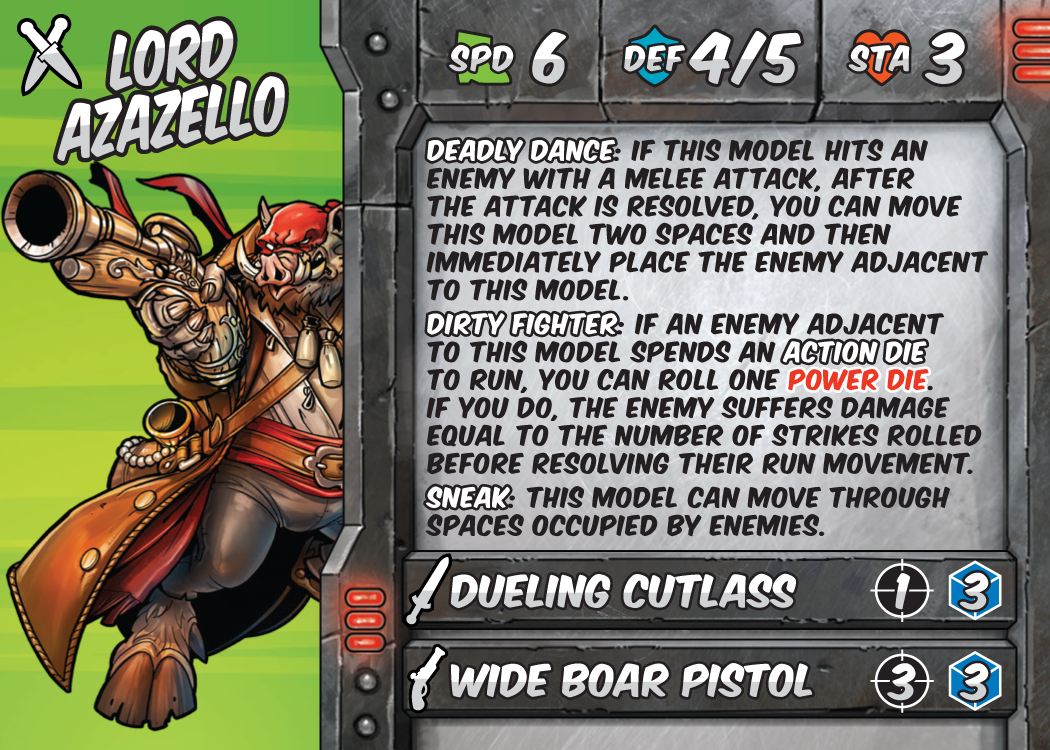
Like most Rogue class Heroes, Lord Azazello is a tricky pain in the rear for your opponents. He’s a decent threat at both melee and ranged, but his real strength comes from his mobility and the fact that he can potentially lock down an Enemy from getting away.
Dirty Fighter isn’t a new ability—it first appeared on Black Bella around the launch of Riot Quest. It’s an excellent tool to disrupt your opponents’ plans. Black Bella, being a Fighter, is more focused on pure melee damage, so she doesn’t have a trick that forces your opponent to suffer Dirty Fighter; however, Azazello, being a Rogue, absolutely has such a trick, one that complements his already impressive speed.
Deadly Dance is the reason that, 9 times out of 10, you want to attack with Azazello’s melee weapons instead of his pistol. If you simply don’t have the range to get there in melee, the pistol can help you with its extra two spaces of range, but it’s definitely the backup. Deadly Dance will let you reposition Enemy models into all sorts of awkward positions, sometimes far away from their allies, sometimes directly into a deathtrap, but always in range of Dirty Fighter.
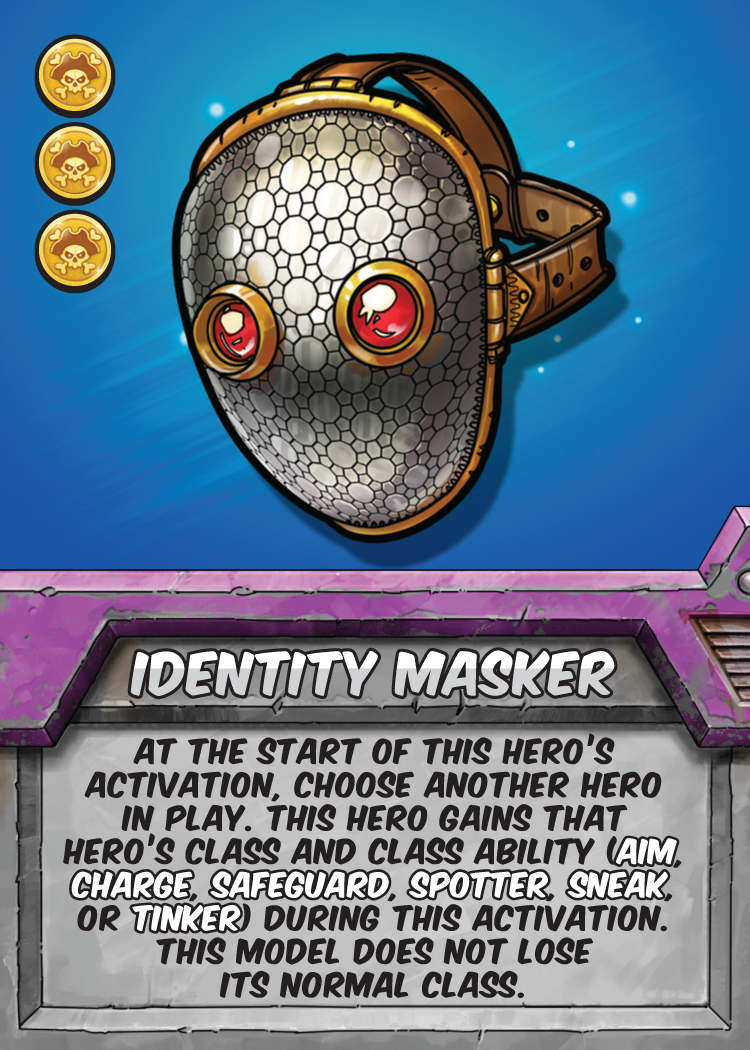
Azazello comes with the Identity Masker card, and what a crazy card it is! Being able to grab another class ability on the fly is super handy! Need to move through some Enemies? Steal Sneak. Need a better chance at shooting someone? Steal Aim or Spotter. Really need some more gear? Steal Tinker.
But stealing abilities isn’t the only strength of this card. A lot of the Treasure Chests and Bounty cards have special bonuses or triggers based on what type of class interacts with them. With Identity Masker, you can always be the right type of class! If you’ve played with the original Mayhem Bounty deck enough times, you’ll know that the Freakin’ Imposters Bounty (which requires you to knock out an Enemy with a Hero of the same class) can be difficult to pull off sometimes. Now, not so much!
What a year for Farrow and Minions players—they just saw the release of Helga on Wheels and just a few months later…BAM! Another new warlock!
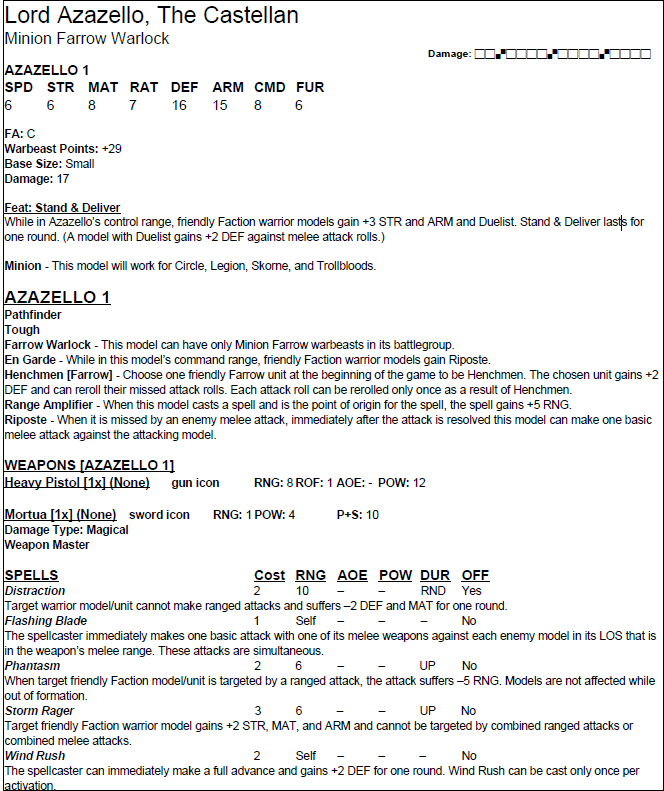
Lord Azazello is, unquestionably, a warrior support ’caster. He can also mix it up himself in melee fairly well under his own feat and with Storm Rager upkept on himself.
Being a warrior-based ’caster, Azazello needs a way to deliver both infantry units and solos. First, we see his Henchmen rule, which is a permanent buff granted to a single Farrow unit at the beginning of the game. If you’re playing Azazello in the Will Work for Food theme force, this is absolutely going on a unit of Farrow Valkyries. In the Thornfall Alliance, you might want to consider putting this buff on a unit of Farrow Brigands—the reroll effect is excellent.
Azazello’s feat will increase his armies DEF in melee once engaged, but in terms of getting said army into melee, Azazello has two primary methods to accomplish this. First is the spell Phantasm, which flat reduces the RNG of all incoming shots onto a unit by 5˝. The second is Azazello’s combination of Range Amplifier with the spells of Wind Rush and Distraction. Just walking up and casting Distraction, Azazello can threaten the spell at 21˝; thanks to Wind Rush, he can also safely put himself back into a secure position.
You will find, in many early turns, Azazello must live dangerously, keeping zero fury to himself. You’re often going to want to upkeep Phantasm and Storm Rager, then move up, throw out a Distraction, and Wind Rush back to safety. When the time comes to commit to the battle, though, Azazello with Storm Rager on himself and under his feat is effectively a MAT 10 P+S 15 Weapon Master with DEF 18 against incoming melee attacks, possibly DEF 20 if you Wind Rushed AND he has Riposte.
Don’t be scared to commit him to the front lines when the time is right—just watch out for knock down or stationary effects that can reliably hit you.
Azazello not only has Riposte himself, but he also grants Riposte to all friendly Faction warriors within 8˝ of him. This is particularly brutal during his feat turn when most of his infantry also has Duelist, as well as +3 STR and ARM. Rushing your warriors forward to engage the enemy and popping his feat early, often Turn 3, can provide your opponent with some really unpleasant options.
If you’re looking to play Azazello in Thornfall, I recommend grabbing a unit of Brigands to make Henchmen and then consider running the full Field Allowance of Farrow Valkyries. He works really well with Valkyries, and they help keep him alive, given how close he likes to get to the action.
For Will Work for Food players, I recommend at least two units of Farrow Valkyries and also Archons. Lots of Archons. Running double-Primal double-Void backed by two units of Valkyries packs an incredible punch under Azazello’s feat (both on your turn and potentially on your opponent’s).
Countercharging Duelist Riposting Primal Archons are horrifying.
Okay, that’s it! Thanks for reading—I hope you enjoyed today’s preview of these upcoming models. Keep an eye out for the official launch in June and for the final versions of their WARMACHINE rules! Until then, stay safe and be well, y’all!