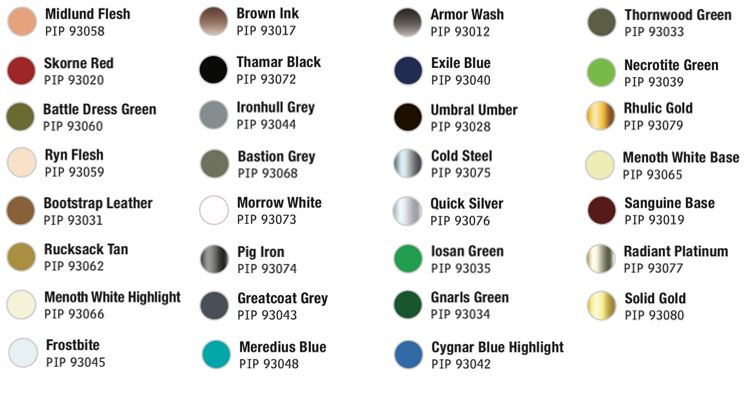
Colors Used
Hello, hobbyists, and welcome back to another painting Insider!
Last time, we tackled painting Prisoner 102822. With AdeptiCon coming up in just a few short weeks, I want to continue filling out some of the Mercenary options for my armies. So, in this Insider, I’ll be painting Eiryss, Shadow of Retribution. That means it’s time to grab some paints and brushes and get to it!
Skin Tones
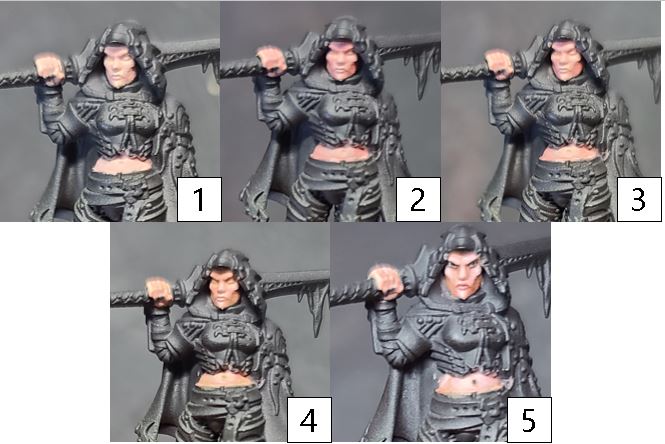
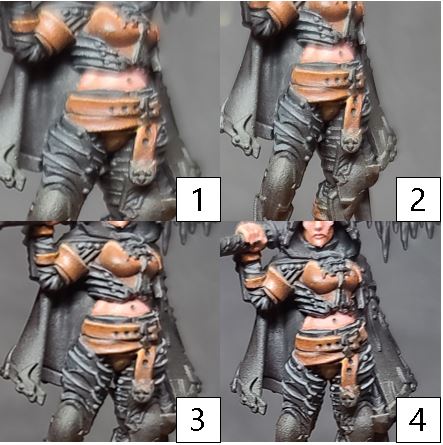
Step 1) For some reason, I always struggle with skin tones, so I like to get them out of the way first. I start off by basing the skin areas in a solid basecoat of Midlund Flesh.
Step 2) Next, I start my shadows with a mixture of Midlund Flesh and Skorne Red, blending this into the recesses.
Step 3) I continue to shade the skin tones by mixing Midlund Flesh and Battledress Green and then blending this deeper into the shadows on her face. I pay particular attention to eyes, cheeks, and mouth areas.
Step 4) For a final shade, I mix together Skorne Red and Battledress Green, applying this to the deepest shadows.
Step 5) With the shading complete, I move on to highlights on the skin tones. I’ll blend in Ryn Flesh with Midlund Flesh onto the highest points and raised edges.
Brown Leather
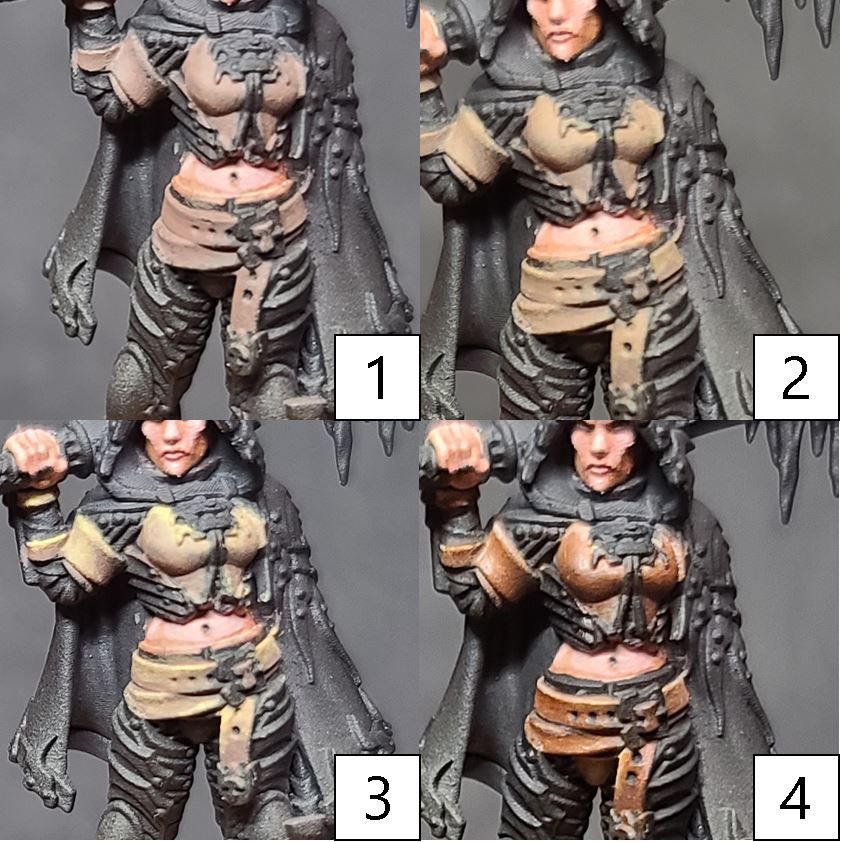
Step 1) Next up, let’s tackle all of the brown leathers on Eiryss. Start by basecoating the areas in Bootstrap Leather.
Step 2) Next, start working up the highlights by mixing Bootstrap Leather and Rucksack Tan together and then applying to the main areas—but making sure to leave some of the Bootstrap Leather showing in the recesses.
Step 3) Continue to work the highlights up by adding in a drop of Menoth White Highlight to the previous mixture and applying this to the highest areas and raised edges. This definitely looks a bit bright for leather, but no worries: the next step will bring it all together.
Step 4) Finally, thin out some Brown Ink with water—a good mixture is about 1 drop of Brown Ink to 10 parts water. Apply this thinned-out mixture as a glaze over the entire area. The key is to apply an even, thin coat without letting it build up in any of the recesses or pool on the flat surfaces. We are hoping to keep the glaze even. Wait for this layer to completely dry, then reapply until your achieved the desired look.
Black Leather
Step 1) Next up, I’ll tackle the black leathers. I start by reclaiming the areas with a solid coat of Thamar Black.
Step 2) After the basecoat dries, I begin working up my highlights by mixing Thamar Black and Ironhull Grey together. (Less is more on black highlights, so stay away from overdoing this highlight or the black leather may look too grey.)
Step 3) Next, add a drop of Bastion Grey to the previous mixture and begin the second layer of highlights. gain, less is more—making sure not to overdo this step will sell the effect better. I focus on the uppermost areas and edges.
Step 4) Finally, I add a drop of Morrow White to the mixture and place a few stark edge highlights to the edges on where the light would be shining the brightest across the material.
Silver Metals
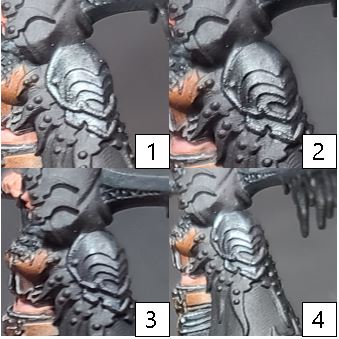
Step 1) Next up: the metal armor plates. For the silver metals, start off with a solid basecoat of Pig Iron.
Step 2) For the first layer of shade, create a wash out of Greatcoat Grey and Armor Wash. Apply this to the armor areas, not letting it pool up too much. Less is always more, as additional layers can be applied to the plates to darken up the look.
Step 3) For a final shade mix Exile Blue with Umbral Umber and apply this to the deepest areas of the metal.
Step 4) With shading completed, it’s time to focus on the highlighting. Apply a blend of Cold Steel to the upper areas where light would be shining the brightest on them.
Step 5) Once the model is completed, return to the area for one final highlight using Quick Silver. Apply this to the tips and the shiniest of areas.
Green Cape
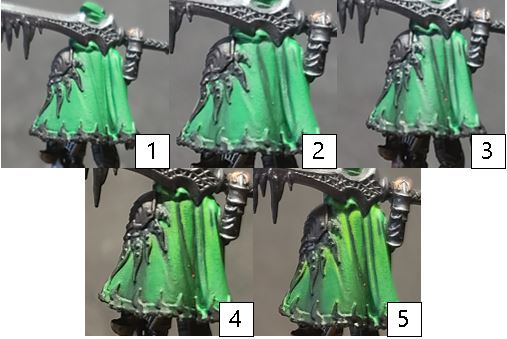
Step 1) Time to get some color onto her cape! I start off by basecoating the area in Iosan Green.
Step 2) Next, I’ll start my shading by blending Gnarls Green in the shadows and the recesses.
Step 3) To finish off the shading, I add a drop of Thornwood Green and Umbral Umber to the previous mixture and blend that into the deepest areas.
Step 4) For my first highlight, I mix Necrotite Green with Iosan Green and focus on the upper areas.
Step 5) For that final edge highlight and bright color, I mix Necrotite Green with a drop of Menoth White Base and apply this as a final highlight.
Golds
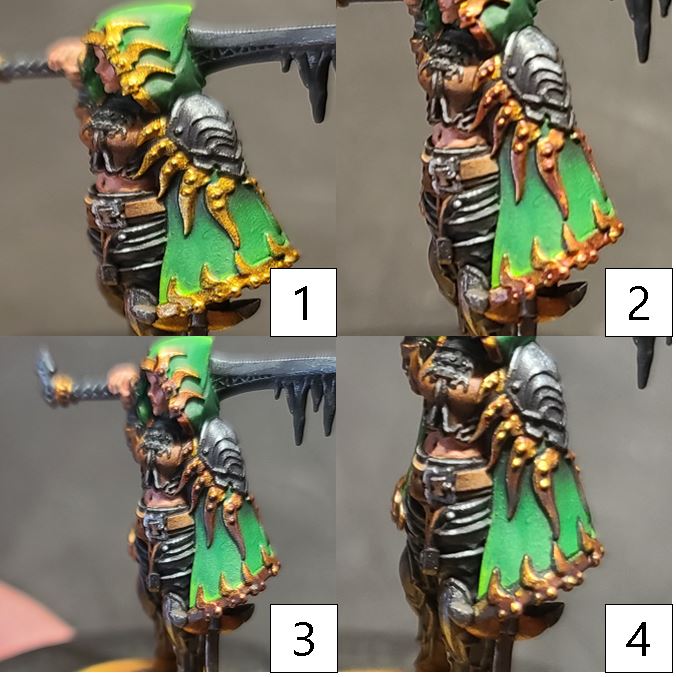
Step 1) With the cape complete, it’s time to add some gold elements to the model. Start by basecoating the gold areas in Rhulic Gold.
Step 2) For shading, start by mixing Sanguine Base and Brown Ink together and blending it into the shadows.
Step 3) To create some depth to the metal, mix Exile Blue and Umbral Umber for a second layer of shading and apply only to the deepest recesses.
Step 4) Start highlighting by applying Solid Gold to the raised areas and details.
Step 5) Finally, after sealing the model with a matte sealant, return for one final highlight using Radiant Platinum and Solid Gold to create that glinting metallic look.
Ice
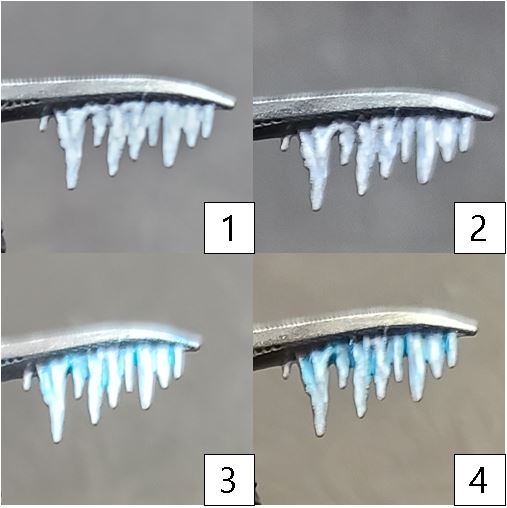
Step 1) Only one thing left to do, and that’s give this model some chill. For the ice areas, I start with a basecoat of Frostbite.
Step 2) Add fine lines of Morrow White to all of the raised areas and edges. The colors will look a bit muted, but that’s okay—we will really see it all start to come together in the next step.
Step 3) Create a glaze of Meredius Blue by thinning the paint with water. For this particular model, I used 1-part Meredius Blue to 14-parts water.
Step 4) Continue building up a few subsequent layers with each layer going less toward the top of the ice.
Step 5) Time to reclaim a little bit of the highest highlight with Morrow White.
Step 6) To really sell the effect, thin Cygnar Blue Highlight in the same manner as in step 3 earlier: mix 1-part Cygnar Blue Highlight with 14-parts water. This time, we will be going from the metal to the ice, building up a few layers of glaze so that it looks like the ice is forming right from the cold steel!
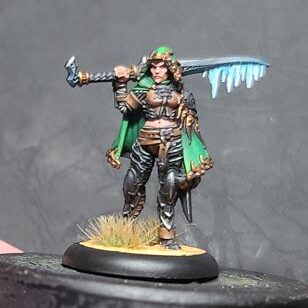
With that, Eiryss is ready to strike down her enemies on the battlefield! Time to flip that paint counter to 2/100. Well, still a lot of 2024 to go! Looking forward to seeing everyone in just a few short weeks at AdeptiCon!