by Charles Foster III
Hello, hobbyists, and welcome to another painting Insider. In the previous Insider, I painted up Admiral Boomhowler; so, For today’s Insider, we’ll be adding a Reef Troll to her battlegroup. Let’s grab some paint, some brushes, and get to it.
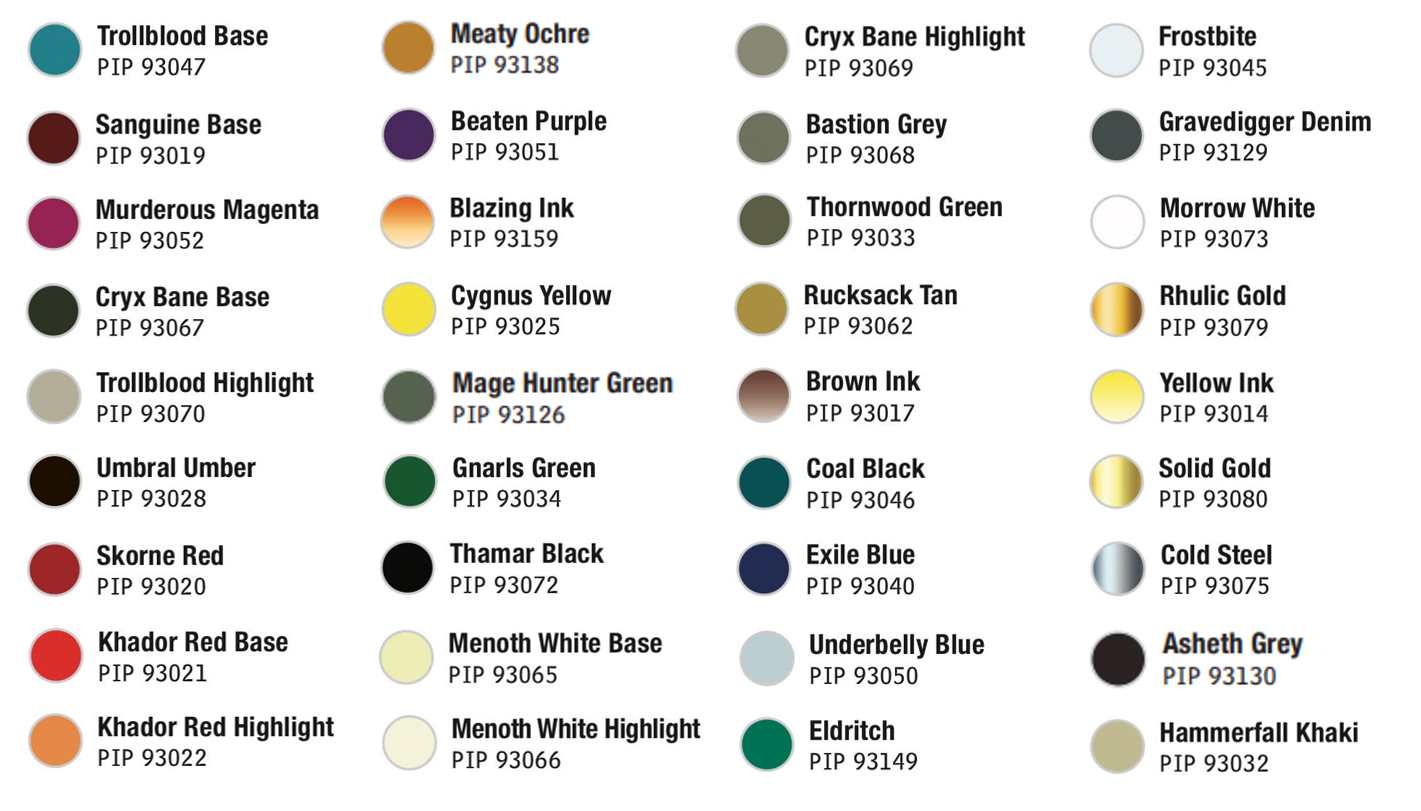
COLORS USED
Skin Tones
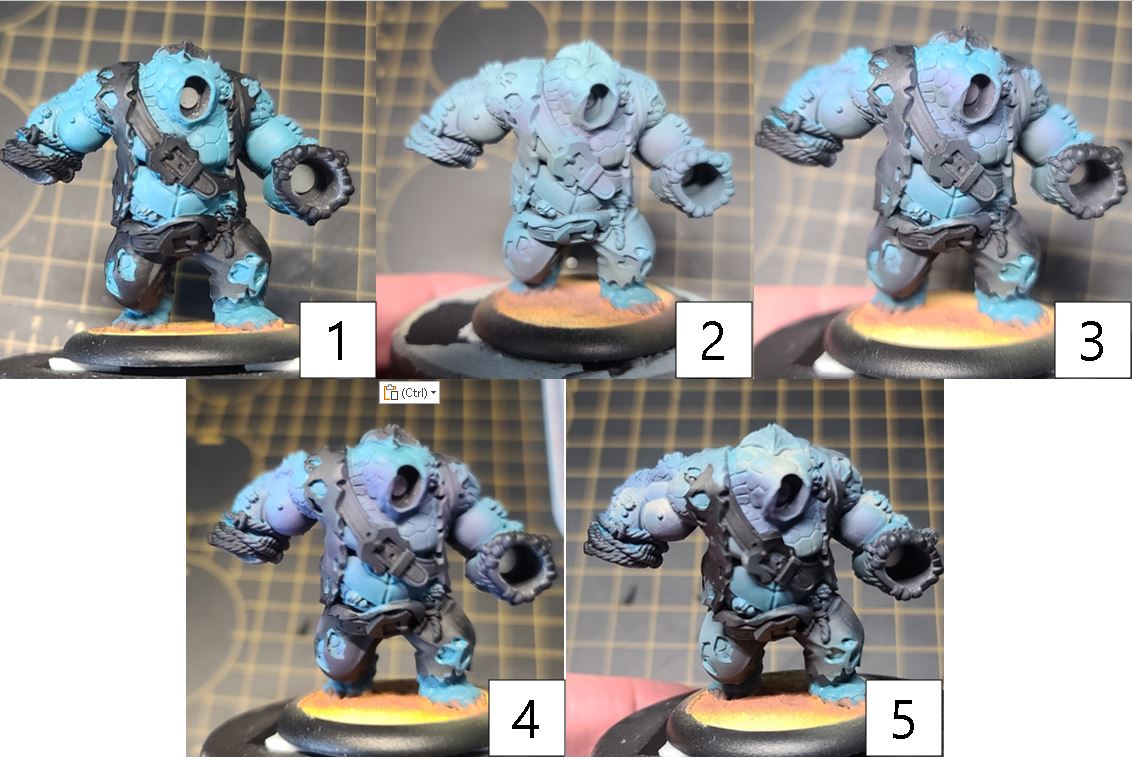
- Step 1) To start the skin tones, I airbrush on Trollblood Base mixed with Sanguine Base in a 50/50 mix. (No worries if you don’t have an airbrush—you can just as easily hand-paint this color on.)
- Step 2) For the first shade, I add Trollblood Base to Murderous Magenta and apply this color to shadows of the model.
- Step 3) To continue to darken the shadows, I create a second shade using Trollblood Base and Cryx Bane Base. I apply this color sparingly to the deepest shadows.
- Step 4) To begin my highlights, I mix Trollblood Highlight with Trollblood Base in a 50/50 mixture.
- Step 5) Finally, for the highest edges and raised areas, I put down a final highlight using Trollblood Highlight.
Chitin and Rocky Features

- Step 1) With the skin tones complete, time to pick out the chitin. Start by basecoating the areas in Umbral Umber.
- Step 2) For the chitin, it will be easiest to work the colors up in tone rather than shifting up and down with shades. For the first layer, use Skorne Red.
- Step 3) For the second highlight, apply Khador Red Base but make sure to leave areas of the previous steps showing through across the area.
- Step 4) Finally, mix Khador Red Base and Khador Red Highlight together and apply as the last highlight, making sure to leave layers showing through from the previous steps.
Starfish!
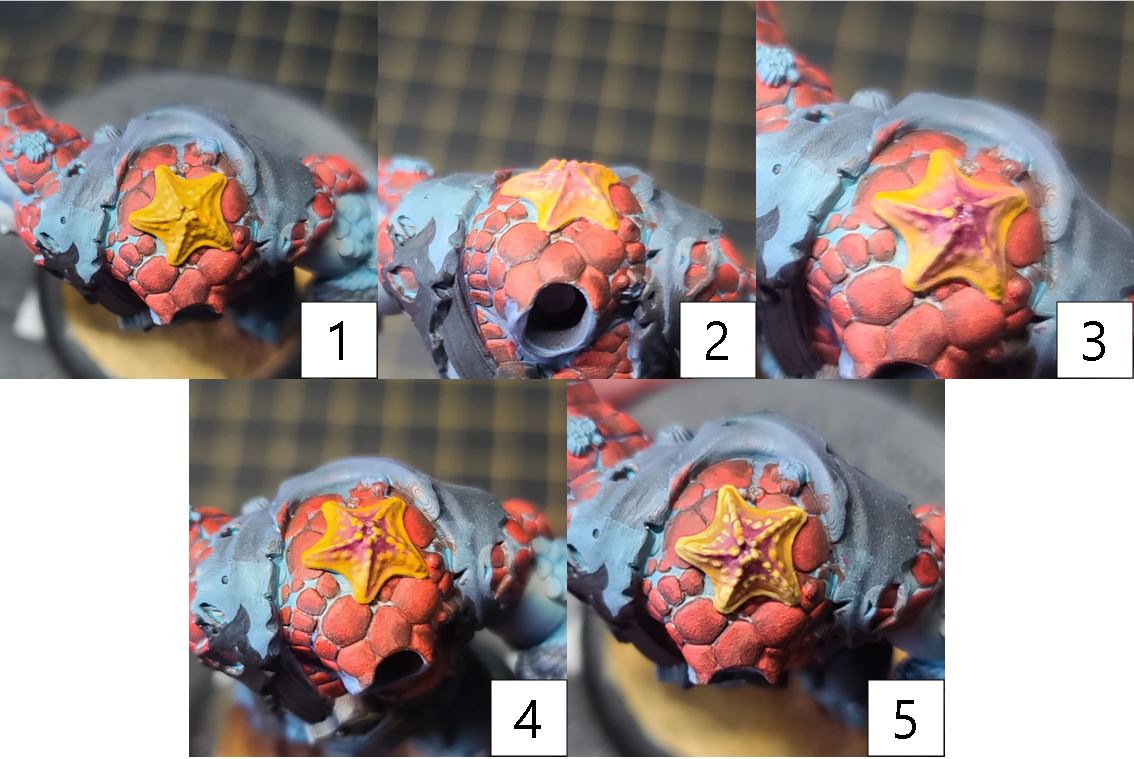
- Step 1) With the chitin colored in, let’s go ahead and tackle the starfish. I’ll start off by laying down a solid basecoat using Meaty Ochre.
- Step 2) To add in some tones, I blend in my first shade using Murderous Magenta.
- Step 3) To darken the shade, I blend a small amount of Beaten Purple into the deepest areas.
- Step 4) To blend all of the colors together, I take some water and thin out a little Blazing Ink, applying this as a light glaze. I add a few layers of this over the top, letting each layer dry completely before applying the next.
- Step 5) Finally, I grab Cygnus Yellow and apply some final hard-edge highlights.
Green Shirt

- Step 1) For the Reef Troll’s green shirt, start off your basecoat with Mage Hunter Green.
- Step 2) To create some shade on the basecoat, mix Mage Hunter Green and Gnarls Green and apply this to the shadowed areas of the shirt.
- Step 3) To darken the shadows and create more definition, add a drop of Thamar Black to the previous mixture and apply to the deepest areas of shadow.
- Step 4) Mage Hunter Green really creates a nice color on this shirt, so to keep all the colors in the same tone, add Menoth White Base to Mage Hunter Green and apply this for your first highlight.
- Step 5) To really bring some brightness to the highlights, add Mage Hunter Green to Menoth White Highlight and apply to the uppermost areas and hard edges for a final highlight.
White Pants
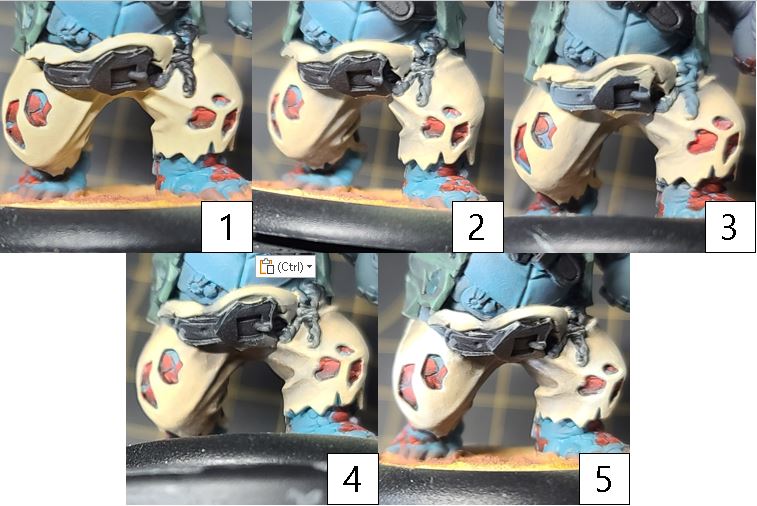
- Step 1) For the white pants, I start with a basecoat of Menoth White Base.
- Step 2) To start the shading, apply Cryx Bane Highlight to the shadows.
- Step 3) To darken the shadow, apply Bastion Grey to the deeper areas of the pants.
- Step 4) To really get the Menoth White Highlight to stand out in the next step, we need to create the opposite in the shadow. To do this, I apply Thornwood Green to the deepest shadows.
- Step 5) Finally, to bring the pants together, I add a final highlight of Menoth White Highlight to the raised areas and hard edges.
Ropes!

- Step 1) To tackle the ropes of the model, start with Rucksack Tan as your basecoat.
- Step 2) To shade the ropes, thin out Brown Ink with water and apply this as a thin wash to the ropes.
- Step 3) Next, return to the area and reclaim some of the base color by using Rucksack Tan as a highlight over the washed area. Be sure to leave some of the color from the layer below showing through.
- Step 4) To bring out the depth of the rope, add a final highlight of Menoth White Base.
Black Leather

- Step 1) If you’re a less sloppy painter than I am, and the model’s belts are still Thamar Black, you can skip this step. However, if you slopped paint on them (like I did), start off by basecoating the leathers in Thamar Black.
- Step 2) For the first layer, mix Coal Black, Exile Blue, and Thamar Black and apply liberally to the areas. Make sure to leave areas of the Thamar Black showing.
- Step 3) Next, add a few drops of Underbelly Blue to the previous mixture and apply as your second layer of highlights.
- Step 4) Finally, to seal the deal on the leathers, add a few drops of Frostbite to the previous mixture and apply sparingly to the uppermost areas and locations you would like to draw attention to the light on the model.
Turtle Armor?
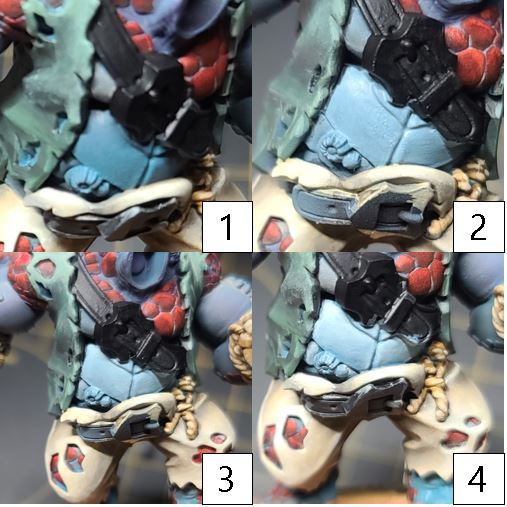
- Step 1) This model has what looks like turtle shell on its stomach. So, that’s what we’re gonna go for on it! Start by basecoating the area in Gravedigger Denim.
- Step 2) For this shell area, we will be building up layers rather than the traditional shading and highlighting. For the first layer, apply Underbelly Blue, making sure to leave color from the basecoat showing through. Small thin layers with thinned paint almost like a glaze will get the best results here.
- Step 3) Next, add another layer using Frostbite. Again, make sure to take your time and build this up using thin layers. Patience can go a long way in creating a smooth transition.
- Step 4) Finally, mix Morrow White and Frostbite together and apply as a final highlight over the raised areas.
Golds

- Step 1) Let’s get some gold on this model. I start off by laying down my basecoat using Rhulic Gold.
- Step 2) To shade the gold areas, I mix Brown Ink, Yellow Ink, and Rhulic Gold and blend this into the shadows of the basecoat.
- Step 3) To really get a rich gold, I mix Umbral Umber, Sanguine Base, and Brown Ink for a final shade. I then apply this to the darkest shadowed areas, and additionally, I use it to separate my gold from other areas.
- Step 4) With the shading complete, I turn my attention to highlighting. I start my highlights with Solid Gold.
- Step 5) Finally, after the model is sealed with a matte sealant, I return to the area for one more highlight using Solid Gold and Cold Steel. I pay close attention and focus on the highest raised areas and surfaces to create that glinting gold metal.
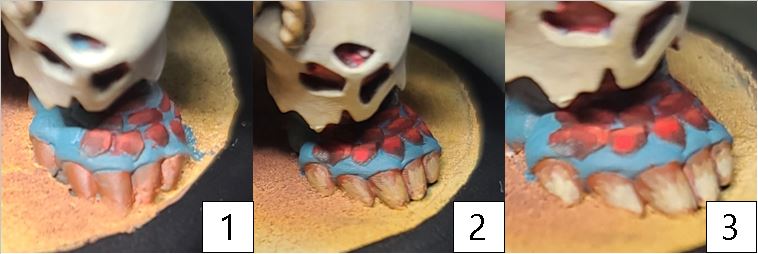
Barnacles

- Step 1) Just like most of the models in the Brineblood Army, there are quite a few barnacles here. Don’t panic—these simple five steps will give you great-looking sea crusties for your model. Start by mixing Gravedigger Denim with Eldritch and applying this color as a basecoat. Letting this color reach the surfaces that the barnacles are attached to will help bring attention to the area.
- Step 2) Next, use Gravedigger Denim as your first layer of highlights. Be sure to leave the previous step’s colors showing through.
- Step 3) For the second layer of highlights, mix Gravedigger Denim and Hammerfall Khaki. Apply this color in lines to the area and raised surfaces.
- Step 4) For the penultimate highlight, use Menoth White Base, drawing lines near the top to start defining the surface of the barnacles.
- Step 5) Finally, to make your barnacles stand out, add a final highlight using Menoth White Highlight. Take care to apply this to any raised areas or hard edges only. This will really make the barnacles get that sun-bleached look we’re going for.
Mussels! What? Mussels Yeah!
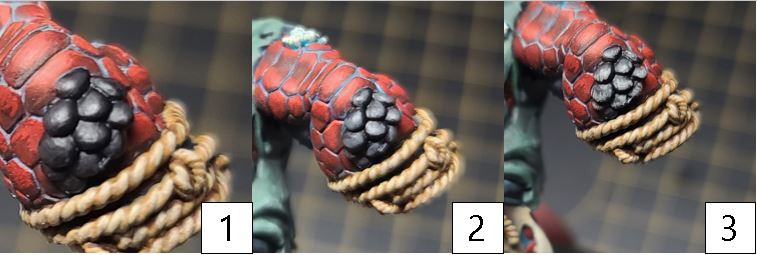
- Step 1) (Kudos to anyone that got the Terry Crews Old Spice commercial reference from the title of this section.) There are a few areas on the model that have mussels or clams. I start off by using Thamar Black as a basecoat for these areas. If you’re less sloppy with your painting, you might even have the models still black from priming, and you can skip this step if you wish.
- Step 2) I start my first highlight using Asheth Grey. I paint small lines from the top of the model to the edges in a striating pattern, making sure to leave areas of the Thamar Black showing through.
- Step 3) For a final highlight, I mix Asheth Grey and Menoth White Highlight together and repeat the striating patterns making sure to leave the two previous steps showing through. This three-layer line will help create that texture you see on the shellfish.
Teeth, Fingernails, and Toenails
- Step 1) Time to add in cuticles and teeth to the model. Basecoat your teeth, fingernails, and toenails in Bloodstone.
- Step 2) To deepen the color and effect, add a layer highlight of Rucksack Tan. Make sure to leave some of the basecoat showing through.
- Step 3) Finally, to make those pearly whites and French manicures show through, add a highlight of Menoth White Base to the tips. Leave all three layers showing through to create a nice sense of depth to the areas.
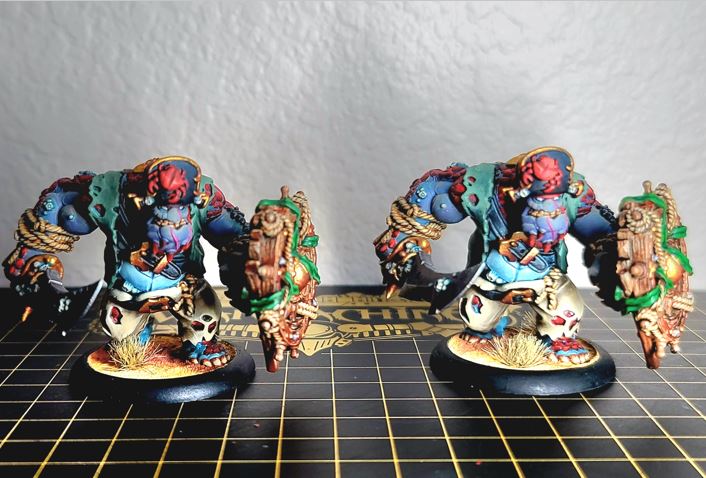
Simply applying these steps to the rest of the model will create a fantastic-looking Reef Troll or two! As you can see by the photos, I’ve been painting a set of these models for con demos. A special shoutout to all those who came by the Gen Con booth and chatted it up, played Riot Quest, got some WARMACHINE in, or even got a demo. It was great to see everyone, and it got me really excited to paint even more stuff. Speaking of which, normally a Deepborn Dire Troll would be next on my menu, but sadly, I painted them up and forgot to take pictures. Fear not, however; these were all demo models, and for my personal army, I’ll be doing something untraditional on the paint scheme and sharing it with you here in a few weeks. In the meantime, Magnus the Unstoppable is next on my paint desk, and I’m eager to share a more traditional color scheme for mercenaries than the yellow of the studio paint job. See you next time, hobbyists!