by Charles Foster III
Hello, painters, and welcome to another painting Insider. Last time, I kicked off my year of pirates with my Commodore Cannon. Now that I’ve had some time to discuss it with the community and play a few games, I’ve locked in my two 100-point lists for the foreseeable future (or until next week, when I’m sure I’ll change it again😉). Let’s take a look at list #1 today with Captain Bartolo Montador and then get some more paint on models:
Bart 100
Mercenaries—Talion Charter
Grand Melee—100 points
- Captain Bartolo Montador
- 13 Mule 1
- 13 Mule 2
- 13 Mule 3
- 10 Toro 1
- 10 Toro 2
- 10 Toro 3
- 3 Lord Rockbottom
- 4 Master Gunner Dougal MacNaile
- 1 Powder Monkey 1
- 1 Powder Monkey 2
- 1 Powder Monkey 3
- 6 Lady Aiyana & Master Holt
- 3 Sea Dog Rifleman 1
- 3 Sea Dog Rifleman 2
- 3 Sea Dog Rifleman 3
- 6 The Commodore Cannon & Crew
- Defenses
- DEFENSE 1—Barrier
- DEFENSE 2—Fire Pit
- DEFENSE 1—Fire Pit
- COMMAND CARD
- Break Through
- Careful Reconnaissance
- Defenses
- Hit & Run
- Power Swell
TOTAL POINTS: 100/100
Colors Used

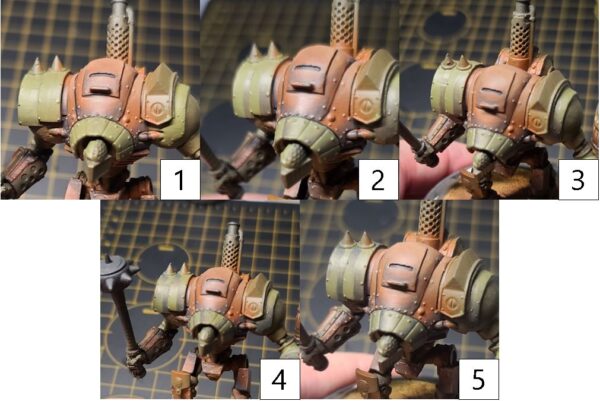
Here be all the guns and cannons a Talion list can jam in! With the models now locked in, it’s time to paint. In the last few Insiders, I’ve shared how I painted up Bartolo Montador and the Powder Monkeys, so I think the best place to start from there is at the top of the list with the three Mule warjacks. So, let’s grab some brushes and get to it.
Preparation
Step 1) I went with a normal black primer on the model.
Step 2) To save some time, I went ahead and airbrushed on a layer of Bloodstone. If you don’t have an airbrush handy, no worries—you can easily paint on the Bloodstone a little later.
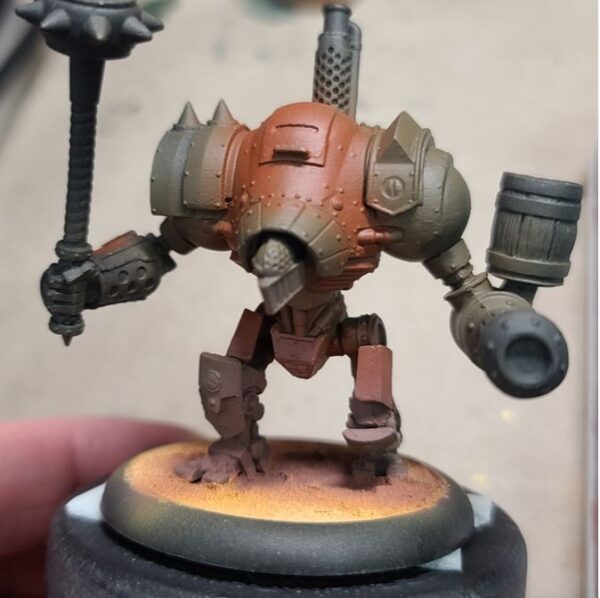
Wood
I really liked how the wood formula came out for the Commodore Cannon in my last Insider, so let’s use it again here for the barrel and the wood handle on the Steam Lobber.
Step 1) I start off by basecoating the wood areas of the barrel and Steam Lobber in Gun Corps Brown.
Step 2) Next, I use Menoth White Base to draw out the grain structures of the wood: small lines with the occasional bump or two to break it up from looking too uniform.
Step 3) To create the depth on the wood, I use Umbral Umber and do the same thing I did in the previous step: draw small lines following near the Menoth White Base. I make sure to leave some areas of the Gun Corps Brown still showing to create multiple layers of color.
Step 4) To generate the great wood tones, I mix Bloodstone, a drop of Yellow Ink, and Brown Ink in a 3:1:2 ratio. I blend a glaze across the woodgrain structure from the previous steps, essentially staining the wood.
Step 5) To deepen the contrast, I repeat the previous step once more but only going half the distance of step 4. This will blend the areas together.
Step 6) To create a final shade, I add a single drop—if not just a half-drop—of Blue Ink to the previous color. Too much blue can overpower the color, so use caution when adding in this ink. Using this mix, I blend in one final layer of shade in the darkest areas.
Step 7) To finalize the wood areas, I mix a drop of Thamar Black into the mix from the previous step. I apply this color to the darkest areas and the spaces in between any planks to thoroughly define the separation of the boards.
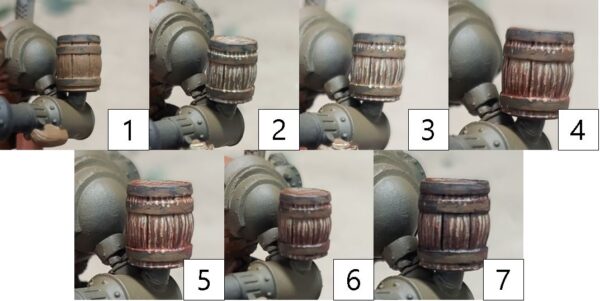
Brown Armor
Step 1) If you used an airbrush to spray on Bloodstone in the preparation step, proceed to step 2 here. If you haven’t applied a basecoat of Bloodstone to your main areas for the brown armor, now’s the time to do so.
Step 2) Start your shading by blending in some shadows with Battlefield Brown.
Step 3) To deepen the shadows, apply a second shade using a mixture of Umbral Umber and Exile Blue.
Step 4) With the shading complete, it’s time to move on to the first highlight of the brown armor using Bootstrap Leather. For lighter colors such as this, a few drops of mixing medium can go a long way with control when trying to add smooth highlights.
Step 5) Finally, to create that nice bright focal point, use Beast Hide to add in final highlights to the area.
Green Armor
Step 1) With my brown armor complete, it’s time to add in the mercenary green to the model. I start by basing the areas in Traitor Green.
Step 2) Next, I apply my first shade using Thornwood Green.
Step 3) To darken the shade, I blend in a second shade of Cryx Bane Base.
Step 4) Finally, to get the depth of color I’m going for, I add another shade by mixing Coal Black and Brown Ink. Be very sparing with this color and only go for the deepest recesses.
Step 5) For highlights, I slowly work my way up mixing Traitor Green with ’Jack Bone. With the colored plates complete, it’s time to tackle the metals.
Brass
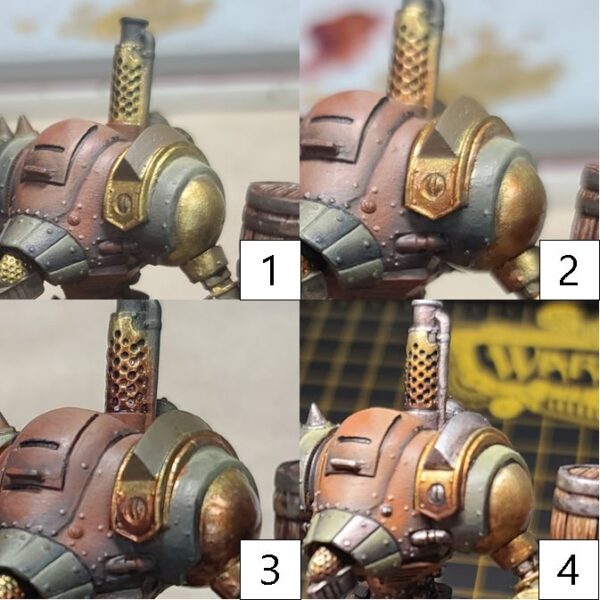
Step 1) Time to tackle the metals on these miniatures. Start off with a solid basecoat of Brass Balls.
Step 2) Next, thin out a small amount of Molten Bronze and apply this color as your first layer of shading.
Step 3) To give the metal a brass tone, mix Molten Bronze with Brown Ink and Gnarls Green and apply this to the area as your second shade.
Step 4) Finally, after sealing your model with a matte sealant, return to the area with a mix of Cold Steel and Solid Gold for a final highlight and to bring a little more shine back to the area.
Steel

Step 1) Last but not least, it’s time to finish off the model with some steel. I basecoat the last of the unpainted area using Cold Steel.
Step 2) I start my shading with a mixture of Brown Ink and Exile Blue.
Step 3) To darken the shade a little more, I mix Green and Brown Ink with a small dot of Cryx Bane Base and apply to the darkest areas.
Step 4) After sealing the model with a matte sealant, I return to the steel areas with a final highlight of Quick Silver.
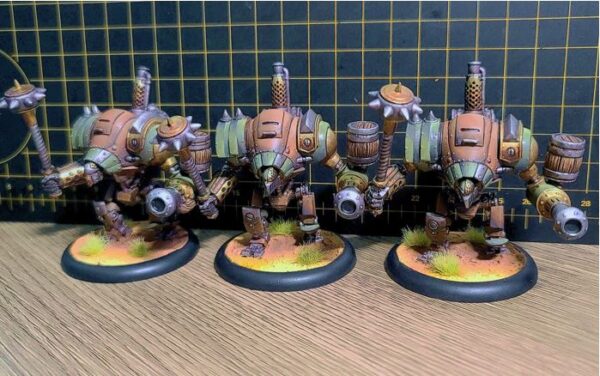
These Mule warjacks came out great and are ready for the tabletop. Next time, I’ll be taking a small break from the Talion Charter and instead be taking a shot at the great-looking Brinebloods! Join me when I paint Admiral Boomhowler. See you then!