Happy New Year, and welcome back to another painting Insider. Today, I’m continuing the work on getting my Prime Legacy Privateer Army ready. Every good pirate list loves a little Lady Aiyana & Master Holt, and that’s definitely true for my army. Time to grab some paint and get it on these miniatures—let’s do it!
Master Holt
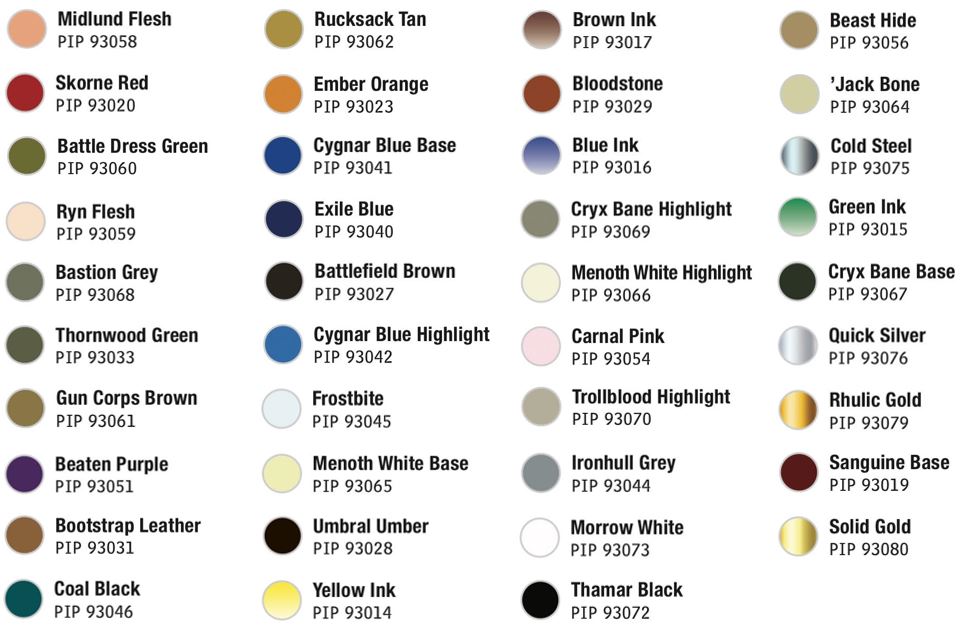
Colors Used
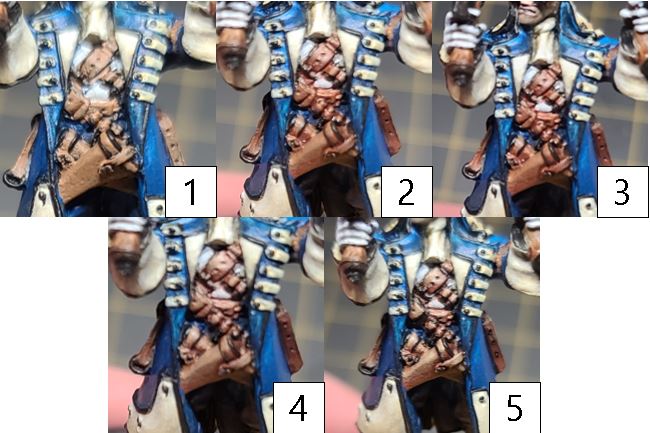
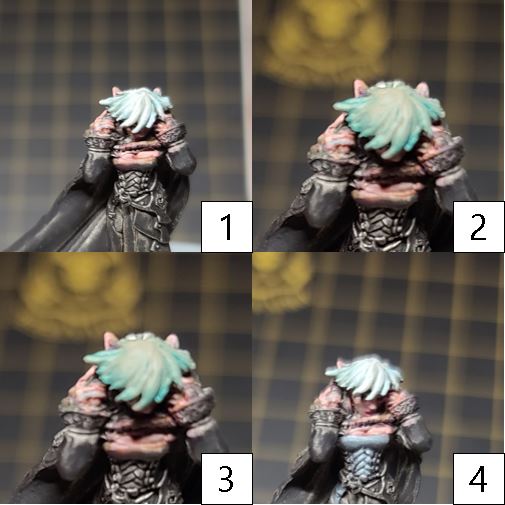
Face
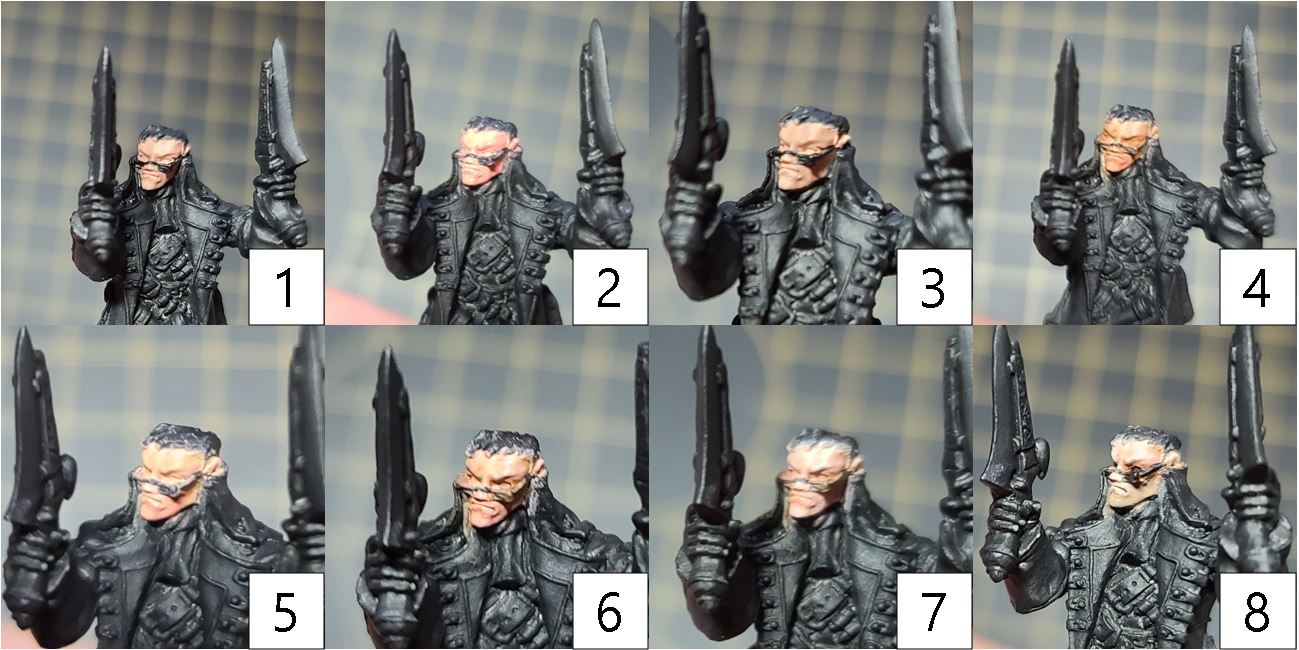
Step 1) Nothing special on the prep work for the models, just a simple black primer to start. Jump right in with a basecoat on the face using Midlund Flesh. Keep your paint thin, and make sure your basecoat is solid and uniform.
Step 2) Shade the face using a mixture of Skorne Red and Midlund Flesh. A 50/50 ratio will work just fine.
Step 3) Next up, mix Battledress Green with more Midlund Flesh and apply this mixture as a second shading. This mixture, when blended over the previous mixture, will balance out the pink color from step 2.
Step 4) For a final shade, mix Battledress Green with Skorne Red and use this color to define the lines of the face.
Step 5) Start your highlights using a 50/50 mix of Midlund Flesh and Ryn Flesh and applying this color to the cheekbones, forehead, nose, upper lids, and eyelids.
Step 6) Using Ryn Flesh and a fine-detail brush, highlight the highest raised edges of the face. Focus your attention on the forehead, eyebrows, cheeks, and nose.
Step 7) For a “five o’clock shadow,” mix Midlund Flesh with Bastion Grey in a thin mixture with a lot of water.
Step 8) Because this model is a pirate and probably has stubble instead of just a five o’clock shadow, mix Thornwood Green with Midlund Flesh, thinning again with lots of water. That’s a scruffy-looking face.
Hair

Step 1) For Holt’s hair, apply a simple basecoat of Gun Corps Brown.
Step 2) For the first shade, apply a mixture of Beaten Purple and Bootstrap Leather to the recesses of the hair.
Step 3) To really make the hair stand out, mix Beaten Purple with even parts Coal Black and apply this to the darkest regions of the hair or places you want to create definition.
Step 4) Finally, mix together equal parts Gun Corps Brown, Rucksack Tan, and Ember Orange to create your highlight.
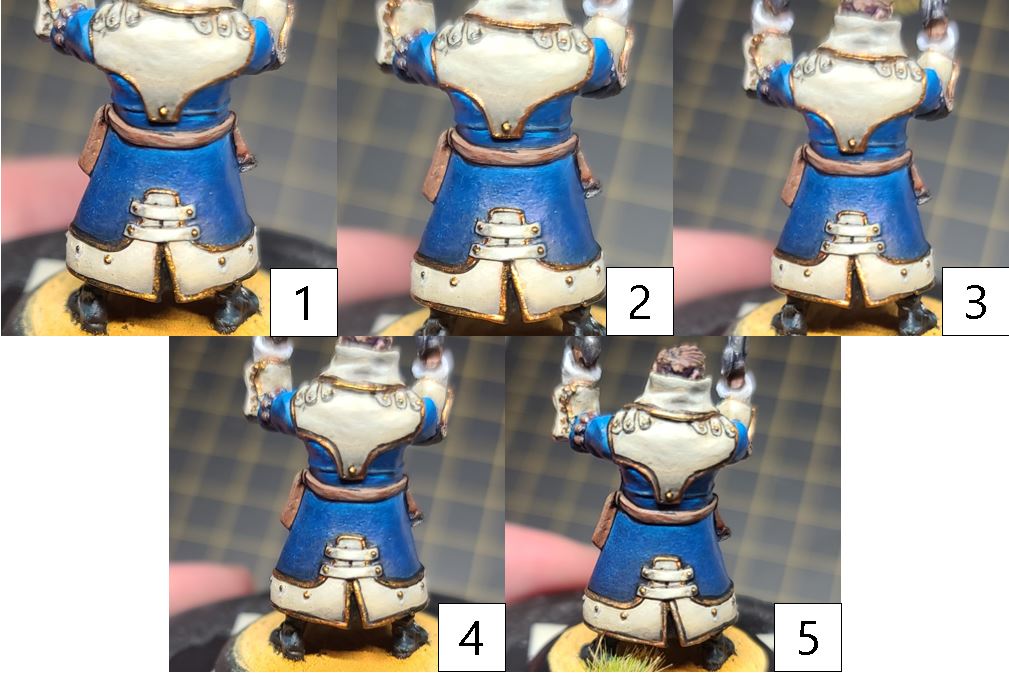
Blues

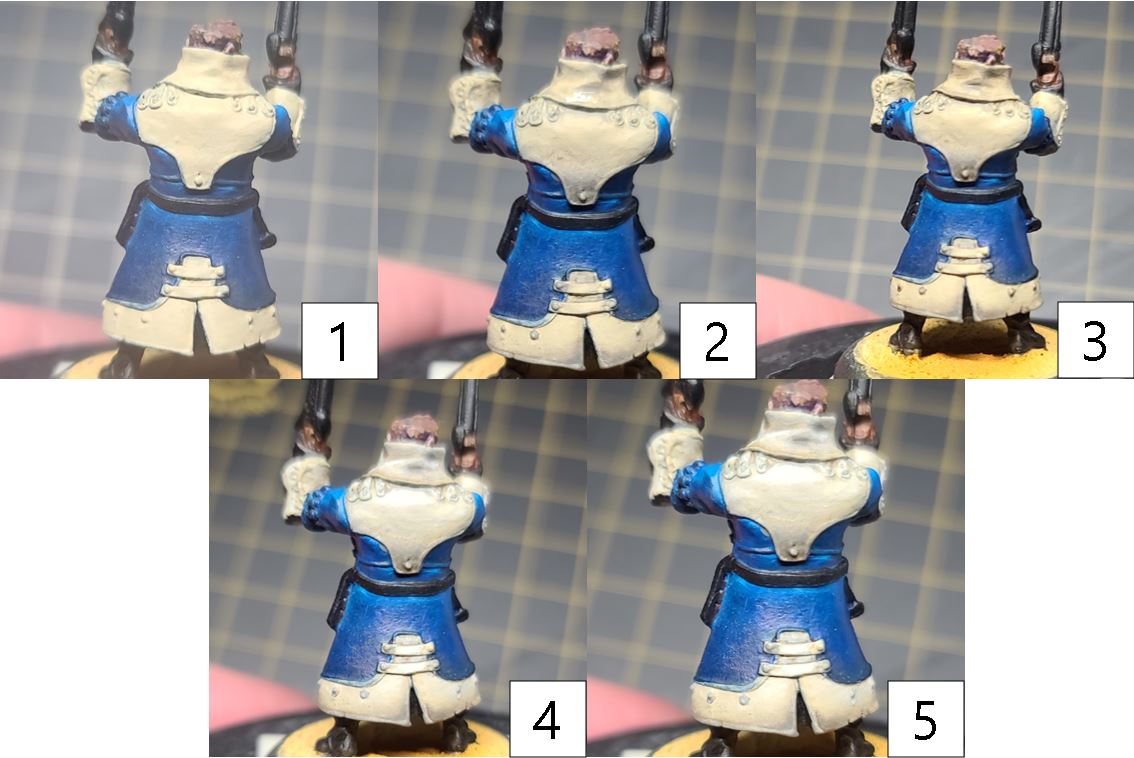
Step 1) I start the blues of the coat and pants by basecoating the area using Cygnar Blue Base.
Step 2) To start my shade, I apply a coat of Exile Blue to the recesses and undersides of the area.
Step 3) Next, I deepen the shadows with a mixture of Exile Blue and Battlefield Brown. I take special care to make sure the blue dominates the paint mix or else my model may turn out looking muddy and battleworn.
Step 4) I start my highlights off with Cygnar Blue Highlight.
Step 5) To finish my highlights, I use a mixture of Cygnar Blue Highlight and Frostbite.
Woodgrain

Step 1) For the woodgrain of the pistols, start by basecoating the area in Gun Corps Brown.
Step 2) To define the lines of the woodgrain, paint the wood texture using Menoth White Base.
Step 3) To create depth in the wood texture, apply Umbral Umber to the same area as in the previous step.
Step 4) Next, mix a small amount of Yellow Ink and Bloodstone into Brown Ink and blend this mixture over the texture.
Step 5) To finish the woodgrain texture, add a drop of Blue Ink to the previous mixture and use this to apply final shading.
Whites
Step 1) For the warm-colored whites on Holt’s jacket, I basecoat the area in Menoth White Base. I use a couple of thin layers of paint to ensure a smooth, solid basecoat with absolutely no patchiness.
Step 2) Next, I shade this section using Cryx Bane Highlight that has been thinned with a little water.
Step 3) For my second shade, I apply Bastion Grey to the deepest areas.
Step 4) To blend it all together, I use Thornwood Green sparingly in the deepest recesses.
Step 5) To highlight the model, I mix Menoth White Base with Menoth White Highlight and apply it to the highest raised areas. You can take this one step farther by doing one final highlight of Menoth White Highlight.
White Gloves

Step 1) For the pure white gloves, start by applying a solid basecoat of Frostbite mixed with Carnal Pink.
Step 2) Shade this color using Trollblood Highlight.
Step 3) Next, apply further shading to the area using Bastion Grey.
Step 4) To define the deepest areas of the gloves, apply a shading of Ironhull Grey.
Step 5) Start your highlights by mixing Carnal Pink, Menoth White Base, and Menoth White Highlight.
Step 6) To continue highlighting, mix Frostbite and Menoth White Highlight and apply to the highest raised edges.
Step 7) Finally, to define the areas, take a little Morrow White and apply to the highest points and raised edges.
Leather
Step 1) When painting leather on my models, I like to start with a basecoat of Bootstrap Leather.
Step 2) Next, I start my shading by mixing Brown Ink with Bootstrap Leather to make a wash. I blend this across the area.
Step 3) To continue shading, I mix Brown Ink with a small amount of Thamar Black—usually a single drop will do just fine. Pay special attention to the lines that separate sections of leather from one another.
Step 4) I start my highlights by mixing Bootstrap Leather and Beast Hide.
Step 5) Lastly, I add ’Jack Bone to the previous mix and use this to add line highlights to the edges of the straps and the raised edges.
Boots

Step 1) For a good-looking black, start with a solid basecoat of Thamar Black and build up the highlights.
Step 2) For your first highlight layer, mix a dot of Thamar Black into Coal Black.
Step 3) Continue building the highlights, adding Menoth White Base to the previous mixture and applying the resulting color as a highlight to the Coal Black areas. Blend the areas as you go to create a smooth transition.
Step 4) Finally, add Menoth White Highlight to the previous mixture and use this to apply final subtle highlights.
Silvers

Step 1) For the silvers on the pistols and belt clasps, I basecoat the area using Cold Steel. Make sure to use enough coats of paint to get a solid basecoat with no patchiness.
Step 2) Next, I shade the basecoat metal with a mixture of Brown Ink and Exile Blue.
Step 3) To darken the shadows a bit more, I apply a second layer of shading using a mixture of Green Ink and Brown Ink with a small dot of Cryx Bane Base added.
Step 4) Finally, after the rest of the model is painted and protected with matte sealant, I apply final highlights using Quick Silver.
Golds
Step 1) To tackle the gold trim around Holt’s coat, start with a solid basecoat of Rhulic Gold.
Step 2) Next for your first shade on the gold colors, mix Brown Ink and Yellow Ink together with Rhulic Gold.
Step 3) Deepen the colors with a final layer of shading using a mixture of Umbral Umber, Sanguine Base, and Brown Ink.
Step 4) To highlight this area, use highlights of Solid Gold.
Step 5) Finally, after the model is painted and sealed using a matte sealant, return to the area with a mix of Solid Gold and Cold Steel together for the final highlight.
Lady Aiyana
Colors Used
Skin Tones
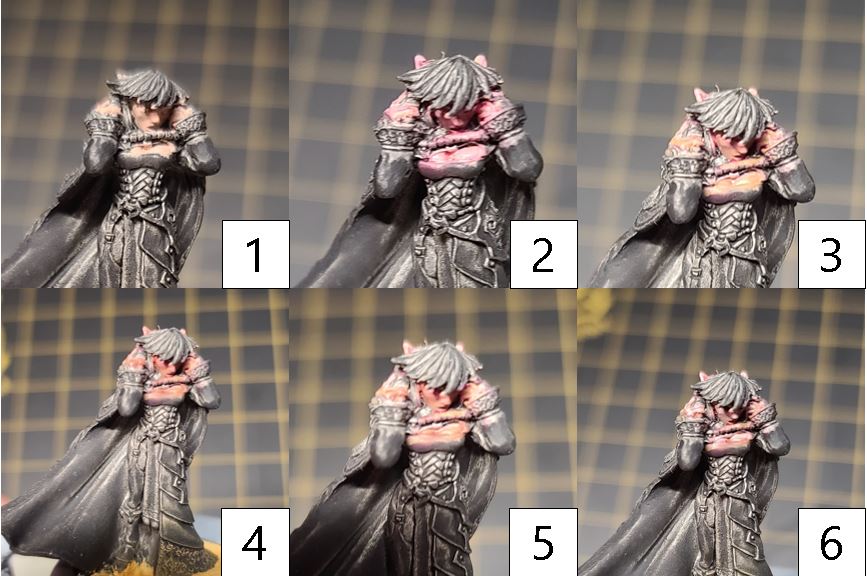
Step 1) With Holt ready, it’s time to tackle Lady Aiyana. I start once again by working on the skin tones. I basecoat the flesh with an equal mixture of Ryn Flesh and Menoth White Base.
Step 2) Next, I shade the lines and recesses of the face by adding Sanguine Highlight and a dot of Mixing Medium to the base color and blending in my first layer of shadow.
Step 3) I continue shading by mixing Battledress Green with more of the base color and adding a few drops of Mixing Medium. Blending this color into the area will help reduce the red from the previous step and make it look more natural in flesh tones.
Step 4) I add a final shade by applying thin lines of Sanguine Highlight mixed with Battledress Green.
Step 5) With the shading complete, I turn my attention to highlights by adding Menoth White Highlight to the original base mixture and applying it to the raised areas of the face.
Step 6) Finally, to complete my highlights, I apply Menoth White Highlight to the tips of the ears, nose, and brow and to the top of the face.
Hair
Step 1) To get that solid platinum blonde look of hair for Aiyana, start by applying a basecoat of Menoth White Base mixed with Trollblood Highlight to achieve a yellowish grey.
Step 2) Start shading the area with Turquoise Ink mixed into the basecoat color. Very little Turquoise Ink is needed, as it is a very strong color when mixing.
Step 3) Apply a second shade to the area using Bastion Grey. This will help separate the strands of hair and add depth.
Step 4) Finally, apply highlights to the ridges of the hair using a mixture of the basecoat color and Menoth White Highlight. You can choose to take this one step farther by adding a drop of Morrow White to the mix and returning for one more round of highlights.
Greys
Step 1) For the grey tones on Lady Aiyana, I start with a basecoat of Greatcoat Grey mixed with a small amount of Menoth White Highlight.
Step 2) I start shading the area with a little Greatcoat Grey.
Step 3) To darken the shadows, I mix Greatcoat Grey with Coal Black and use this color to define the deepest areas.
Step 4) Next, I move onto my first stage of highlights with a mixture of Menoth White Base and Greatcoat Grey.
Step 5) For the final highlights, I add a few drops of Menoth White Highlight to the mixture from the previous highlighting step and apply that to the edges and highest spots.
Bright Reds
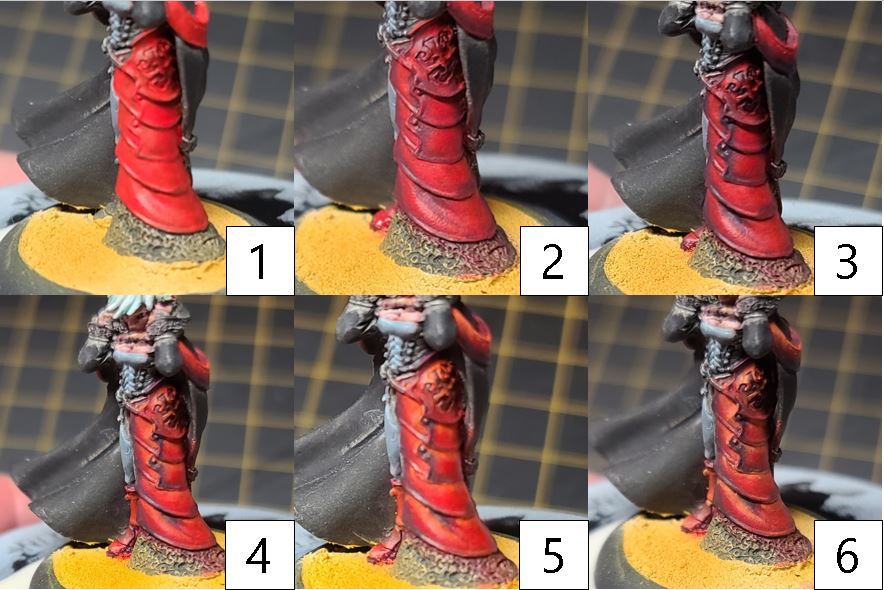
Step 1) For the bright vivid reds of the dress, start off by basecoating Khador Red Base over the area.
Step 2) To darken this color, add a shade of Sanguine Base.
Step 3) To darken this shade more, take Sanguine Base and mix in a few drops of Exile Blue. Blend this into the area to create the heaviest shadows.
Step 4) Begin highlighting the area by mixing Khador Red Base with Khador Red Highlight and apply this to the upper areas of each section.
Step 5) Continue highlighting by mixing Khador Red Highlight and Menoth White Highlight together and apply this to the area. It’s okay if this looks bright and a little bit off. When we add the next step, it will blend all of the colors together.
Step 6) Glaze the entire area with multiple layers of Red Ink thinned out to about 16:1 with water: Red Ink. Be patient in this step, and make sure you get a nice even coat over the area. Don’t let the ink rest in the recesses like a wash normally would, as it will take away from the overall effect. Special note: Make sure to wait until each layer is fully dried before adding another layer. Patience in this step really is key. If you need to speed up the process, a hair dryer is always a great way to go.
Maroon
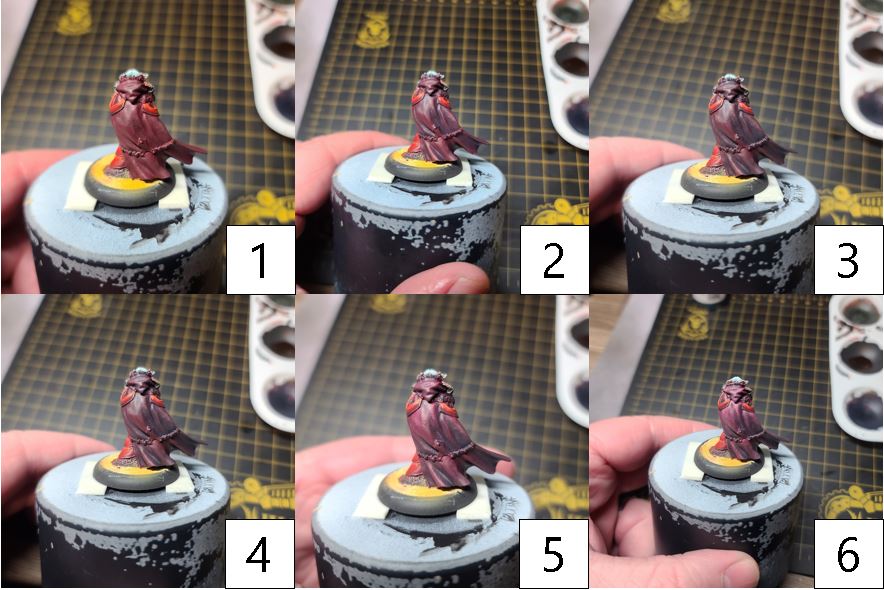
Step 1) For the cloak, I start applying Sanguine Base to the area until I have a solid basecoat.
Step 2) Next, I take a bit of Exile Blue and put it to the Sanguine Base and apply this mixture for the first layer of shading.
Step 3) I follow up with a few small dabs of Coal Black to the previous mixture to create a nice, colorful black. I use this color for the final layer of shading.
Step 4) I start my highlights with Sanguine Highlight.
Step 5) Using the edging technique, I apply a final highlight of Sanguine Highlight mixed with Menoth White Base.
Pinks

Step 1) Time to tackle the pink shirt and front cloth. Start with a solid basecoat of Carnal Pink.
Step 2) Next, create the first shade by mixing Carnal Pink with Murderous Magenta and apply this as the first layer of shading.
Step 3) To darken the shadows a little bit more, mix Sanguine Base with Carnal Pink and a drop of Beaten Purple, and then apply this to the deepest recesses of the area.
Step 4) To highlight the area, mix Carnal Pink with Menoth White Highlight and apply this to the upper areas.
Step 5) Finally, mix Morrow White with Carnal Pink and apply it the uppermost areas and hard edges.
Whites
Step 1) I basecoat the area with a three-part mixture consisting of equal parts Menoth White Base, Underbelly Blue, and Trollblood Highlight.
Step 2) To make the small details stand out, I apply a wash of Bastion Grey mixed with Trollblood Base.
Step 3) Next, using a fine-detail brush, I line the undersides of all the raised details with Ironhull Grey.
Step 4) I start highlighting the area with a mixture of Underbelly Blue and Menoth White Base.
Step 5) For the next layer of highlighting, I use a mixture of Menoth White Highlight added to the mixture from the previous step.
Step 6) I then apply Menoth White Highlight as another layer of highlights.
Step 7) Finally, I finish off the highlights with Morrow White.
Golds

Step 1) Apply Brass Balls as a solid basecoat for all the gold areas.
Step 2) Shade the area by using water to thin out Molten Bronze and apply it as a wash.
Step 3) Next, mix Molten Bronze with Brown Ink and Gnarls Green and use this for additional shading.
Step 4) After the rest of the model is painted and protected with matte sealant, apply your final highlights with a mixture of Cold Steel and Solid Gold.

With Holt and Aiyana done, I’m two pirates closer to my fully painted pirate list! There are only a few more weeks until Las Vegas Open—and I’m hoping to catch up with everyone and get in as many games as possible when we all get there. Join me next time when I tackle Lord Rockbottom. See you then!