Welcome back to another painting Insider! Last time, I tackled getting paint on my Hazaroth, Narcissar of Ruin…which means that this week, we need to get some warjacks ready to go and make more winter bases! So, grab your paints and brushes and let’s get this Dusk painted before the sun sets.
Colors
Winter Bases
For the winter bases, I use a series of different products. To follow along, have on hand the following materials and paints:
Materials
-
- Vallejo Earth Texture Acrylic Arena Desert 25.217 Desert Sand
- Vallejo Ground Texture Acrylic Nieve 26.820 Snow
- Crushed cork board to simulate rocks
- Sculpting tools
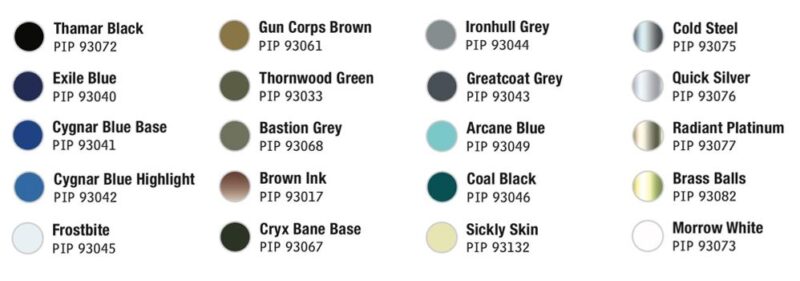
- P3 Paints
- Gun Corps Brown
- Coal Black
- Bastion Grey
- Sickly Skin
- Blue Ink
- Exile Blue
- Cygnar Blue Highlight
- Frostbite
- Thamar Black
- Morrow White
Steps
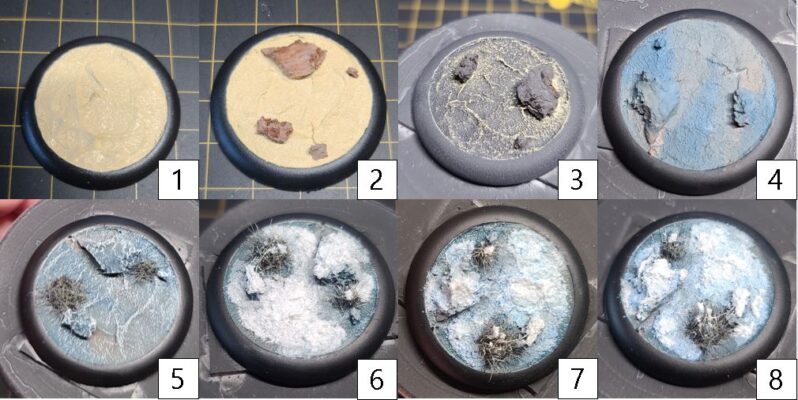
- Step 1) The first thing I do is take a small amount of masking tape and block out the hole on the 40 mm and any 30 mm base sizes I need.
- Step 2) Once the masking tape is securely in place, I use a sculpting tool to portion out an amount of the Earth Texture Desert Sand by Vallejo to fill in the base size. I distribute this material evenly; as it dries, it creates a great-looking base that we’ll eventually turn into our winter wasteland.
- Step 3) While the base material is drying, I use crushed cork board to simulates rocks on a battlefield by placing them into the drying base material of the Earth Texture. The Ground Texture Acrylic will dry to almost a rocklike hardness, so no extra glue is needed.
- Step 4) Once I have the desired outline for the base, I let this material completely dry for 30–45 minutes. Once this is dry, it’s time to prime with a little Black Primer.
- Step 5) Now I prepare my base paint colors. I mix a small amount of Coal Black with Exile Blue and with Bastion Grey, all in equal parts. I then start applying these mixtures as well as Gun Corps Brown throughout the base and wet-blending the two areas together across all of the surfaces. Don’t worry if this looks a bit messy; we still have more steps to go, and it will all come together in the end.
- Step 6) Allow the previous step to completely dry before proceeding. Once the base is completely dry, use Sickly Skin to drybrush the entire base. This creates a nice definition for any areas that aren’t going to be covered by the snow texture in the next step.
- Step 7) Time to glue on any tufts or static grass you want on your model! We will add a bit of detail to this area later on, so it’s best to add this part now.
- Step 8) It’s snowing! Rather, it’s time to make it snow. Using an old brush, apply the Vallejo Snow Ground Texture to anywhere you want to have snow. This material will shrink slightly as it dries. Make sure to add a small amount of snow to the static grass to enhance the elements of the base. If you’re looking to save some time, you can just call your base done at this step. For my part, though, I want to deepen the effect, so it’s time to add blue shading to the snow.
- Step 9) Be sure to let the previous step dry completely. Then, to get the effect we’re going for, we need to really thin out a few blue colors. Here are the mixes I use:
- Dark Blue Wash (Blue Ink, Exile Blue, Thamar Black, and water in a 1:1:1:16 ratio for a very watered-down mixture)
- Medium Blue Wash (Cygnar Blue Base and water in a 1:16 ratio so that the paint becomes a wash)
- Light Blue Wash (Cygnar Blue Highlight, Frostbite, and water in a 2:1:14 ratio)
- There really isn’t a specific formula for this step; I just add all three mixes across the entire base, using the Dark Blue Wash on bigger rocks to create better shading and more definition.
- Step 10) Once all of the washes have dried completely, I use a small amount of Morrow White to reclaim some of the upper areas of the snow.
And there you have it: some really nice-looking snow bases, ready for whatever frozen wastes you want to display your army on. Now, it’s time to move on to getting some warjacks on the field.
Warjacks
Dark Steel

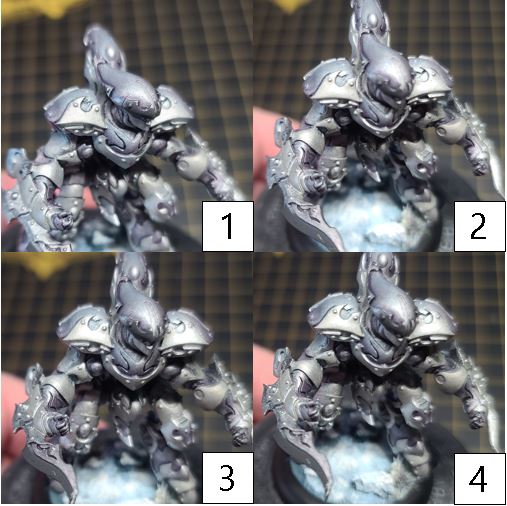
- Step 1) There are a lot of metal surfaces on my Dusk warjacks, so to break up the metals, I think it’s best to add variance by using two different shades of metals. For both colors, I start off by basecoating the entire model in Cold Steel.
- Step 2) To create darker-looking metal areas, I thin out a little Greatcoat Grey with a lot of water and create a glaze., and I apply this to any of the areas I want to be a darker surface. I decided to focus the “inner” layers or lower layers as my dark metal areas, ensuring I didn’t let the glaze pool up in any of the recessed areas—I want to keep the glaze thin and shift the color of the metal.
- Step 3) Next, I shade the dark metals using a mixture of 50:50 Exile Blue and Brown Ink. I blend this down into the recesses of the darker surface to create a nice contrast of shadow on the metal.
- Step 4) Finally, once the model is sealed with a matte varnish, I return to this area for highlights using Cold Steel. I am extremely cautious and add sparse highlights of this color, only focusing on bolts and highly raised surfaces. Using too much Cold Steel could easily overpower the dark look of the metal.
Light Steel
- Step 1) For the uppermost metal plates on my Ghast warjack, I want to do a lighter color. With the Cold Steel basecoat from the previous steps, I start my brighter-color white metal by glazing Bastion Grey over the areas. I take special care to once again not allow the paint to pool up in any area, as we want to avoid using the color like a wash.
- Step 2) To shade this lighter steel color, I use Ironhull Grey and blend this into the darkest areas, focusing on the recesses and where the plates overlap.
- Step 3) To make sure these surfaces appear to be brighter than the previous step, I start with a highlight of Cold Steel.
- Step 4) Once the model is completely sealed, I return to this area and apply a final using Quick Silver. I focus on any bolts, raised edges, or hard lines in the area that need that final pop of definition.
Brass
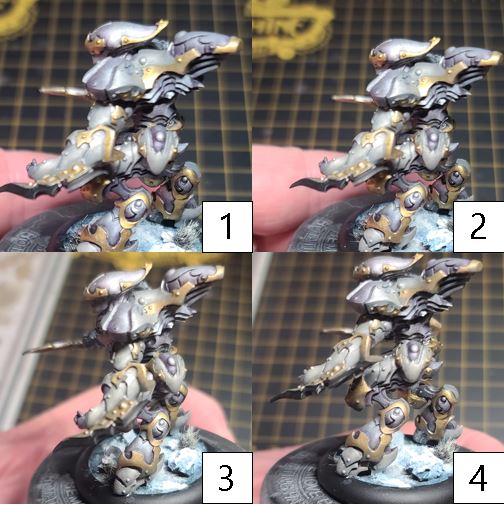
- Step 1) Next, let’s get Brass Balls in any areas where we would like our yellow metals to be.
- Step 2) To create some nice shading, blend in Thornwood Green to create some contrast in the area.
- Step 3) To darken the shade, blend in a small amount of Cryx Bane Base. Be careful when adding this shade, as too much can overpower the brass look we’re going for.
- Step 4) If necessary, take Brass Balls and reclaim a little of the base color.
- Step 5) Once the model is completely sealed, return to this area and apply a final highlight by mixing Radiant Platinum and Brass Balls.
Arcane Glow
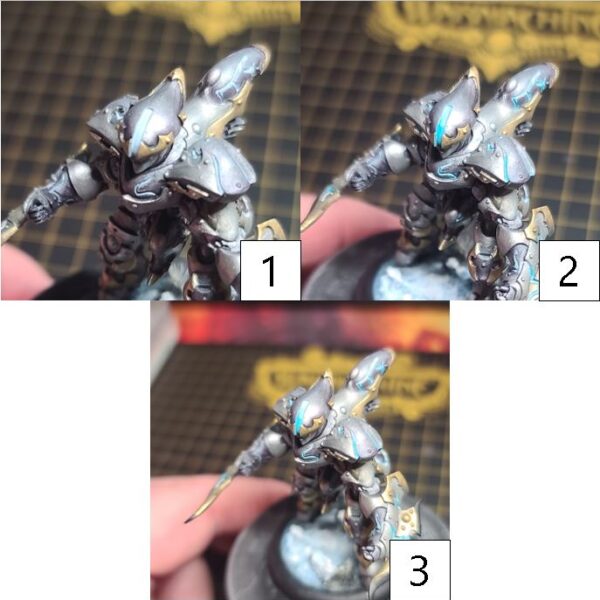
- Step 1) I have the power! Uh, sorry, got a bit carried away there. Time to add some glow and arcane power to the model. Start by basecoating any area you would like to see glow with Frostbite. Use multiple thin coats until you have a nice solid basecoat.
- Step 2) To create that arcane glow, thin out a little Arcane Blue and apply this as a blended shade. Take your time and do multiple layers, blending the blue up to the higher glowing points. Make sure to let each layer fully dry before applying another.
- Step 3) To get that buzzing white glow of energy going, thin out Morrow White with a few drops of water and apply as your final highlight. And thus…it’s alive! It’s alive! Bzzzz!
Dark Blue Gems
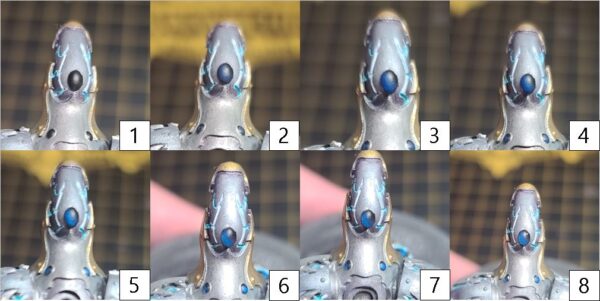
- Step 1) Sadly, I didn’t like how the gems looked on Hazaroth, so it’s time to go back and fix them while trying a new formula on the warjacks. For these gems, we will be building them up through layers. Start by basecoating the area in Thamar Black.
- Step 2) For your first layer, apply Exile Blue to the entire surface, leaving some Thamar Black in corner farthest from your light source’s origin.
- Step3) Next, add another layer, Cygnar Blue Base, and build on the previous layer are making sure the previous colors still show through.
- Step 4) For the next layer, use Cygnar Blue Highlight, once again building on the previous layers but keeping the previous steps visible.
- Step 5) Add a drop of Frostbite to the previous layer and continue adding on the layers.
- Step 6) Using Frostbite alone, create the highest point in the reflection of the gem.
- Step 7) Finally using Morrow White, place a dot in both the highest light source and the darkest to create the look of light bouncing through the gem source.
- Step 8) To really knock it out of the park, once the model has been completely sealed, return to the area and apply a small amount of gloss sealant to the gems in order to create that nice polished, reflective look.
Blue Glowing Blades
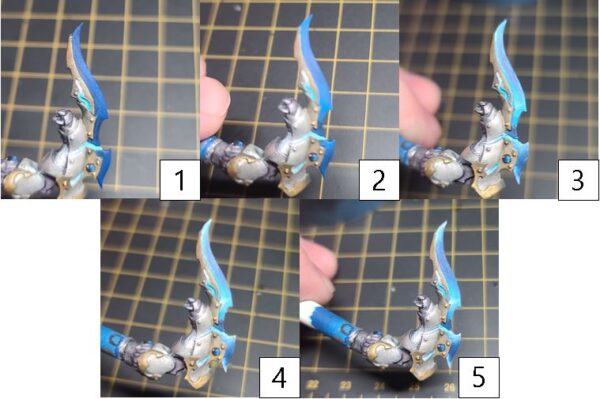
- Step 1) I feel I need a little more color on the warjacks. To break up the metals and add some spice to the model, I think it needs blue energy blades. So, I start by basecoating the area in Cygnar Blue Base.
- Step 2) Next, I pick out a few points of interest and raised edges to blend in a highlight of Cygnar Blue Highlight, leaving Cygnar Blue Base in between.
- Step 3) I create a second highlight for those raised areas by mixing Frostbite and Cygnar Blue Highlight. I then blend this over the top of the previous layer to create a smooth transition.
- Step 4) For a final highlight, I take Frostbite with a few drops of water and blend it over the previous steps.
- Step 5) To smooth the transition and create a little more depth, I blend Exile Blue in the center of each area to create a deep shade.
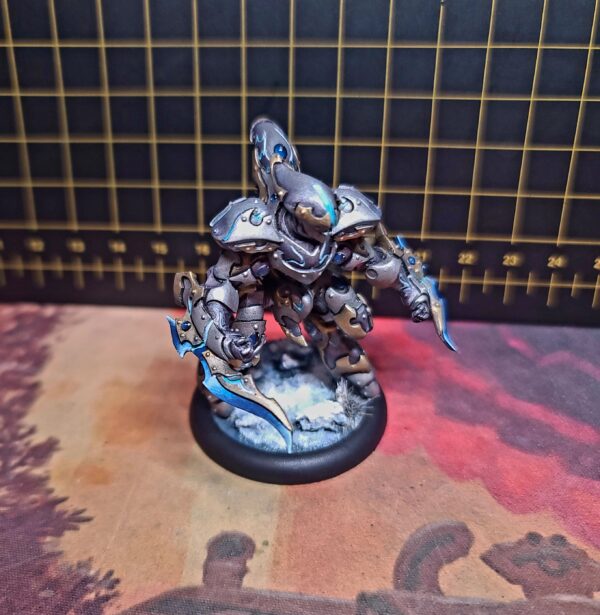
And there we go! (In my best “Here Comes Santa Claus” singing voice) “Here comes a Ghast ’jack, a snow-based Ghast ’jack, right down the House Kayllss lane. Winterguard, Orgoth, and Storm Legion screaming Hazaroth’s name.”
Feels like I might have a hit here…
I hope everyone has a great holiday season, and I’ll see you as we dive into 2023! Happy Holidays from myself and all the crew of Privateer!