by Emanuel Class
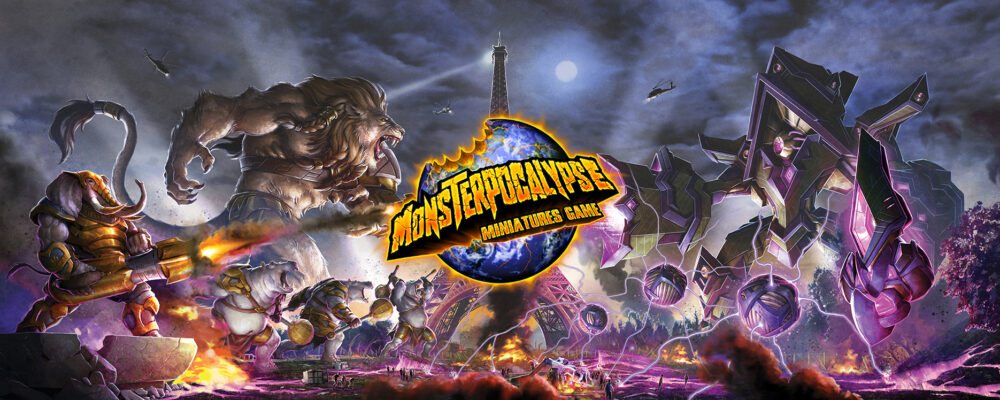
Plants vs. zombies a tale as old as time.
From the first collision of antimatter, life and death have always been anathema. Forever ouroboros to one another chasing the other’s tail for eternity. Such has been the case when the Necroscourge reached the Vegetyrant homeworld. Buzzing hives of verdant life dotted every corner of the glorious green and blue orb, which shone like a beacon to the Necroscourge Hive Queen.
When the planet was still young, she and her Necroscourge kind arrived like a cloud of flies ready to snuff out the planet. But life had other plans. The ancient protectors of the planet fought back. And in a final desperate act, the Vegetyrants harnessed the power of a solar flare to wipe the Necroscourge swarm from the planet.
For centuries they lay dormant, slowly becoming forgotten parts of the landscape. But that was only until the Swarm returned. Galamaxus, the herald of the Necroscourge, evaded or destroyed every planetary protector they came upon. It took until the day the Triton Crustaceor fell to the Swarm and became Karkinos that Stomatavorus Rex awoke to war.
The natural balance of life on the planet had shifted, and Stomatavorus Rex emerged from a forgotten part of the South American rainforest to move with single-minded focus directly toward the nearest Swarm. In the dead of night, Rex found Karkinos; life and death were once again on a collision course in an epic struggle, matter versus antimatter. Rex’s onslaught drove Karkinos into deeper water, and ultimately the two smashed against an offshore oil drill and a nearby chemical tanker, exploding them and igniting the oil to set the night sky ablaze. The Fireproof lobster grappled with Rex, keeping him from escaping the flames, and Karkinos would have completely ravaged the elemental, yet Stomatavorus Rex drew upon his ancient powers to manipulate the strands of fate in its favor. Rex freed himself from the monster’s claws and fought back with series of vicious attacks that tore into Karkinos’ Fireproof carapace. Retaliating, Karkinos cut off one of the mighty elemental’s snapping vines, distracting Rex long enough for the void lobster to dive to escape. Black smoke filled the night sky, silhouetting Rex in the glow of the fire. Karkinos was nowhere to be seen. And Rex knew: it was time to awaken the rest of the Vegetyrants.

Karkinos is an aggressive tank. With 10 health and Fireproof, this lobster can take a beating. She spends most of her time in alpha with 6 of its 10 health on that side of her card. Thankfully, it’s a great alpha to be in. Karkinos likes to hide in trap pockets in the maps that make the best use of her Grappler ability. When she’s ready to spring her trap, her Steamroller ability will make sure whatever monster she is teamed up with can get aligned with the enemy monster. Karakinos’ brawl triggers Steamroller and lets her open up lanes of attack while still being mobile. If the opposing monster finds itself unfortunate enough to be open to a power attack, Karkinos can use her Suplex ability to find the best landing spot to body slam the enemy monster. Karkinos has one big drawback in not having high mobility and being fairly average speed. These weaknesses are somewhat offset by her brawl trigger Steamroller. I like to imagine this giant space lobster rolling into an armored ball, ramming down a building and then rolling away to safety.
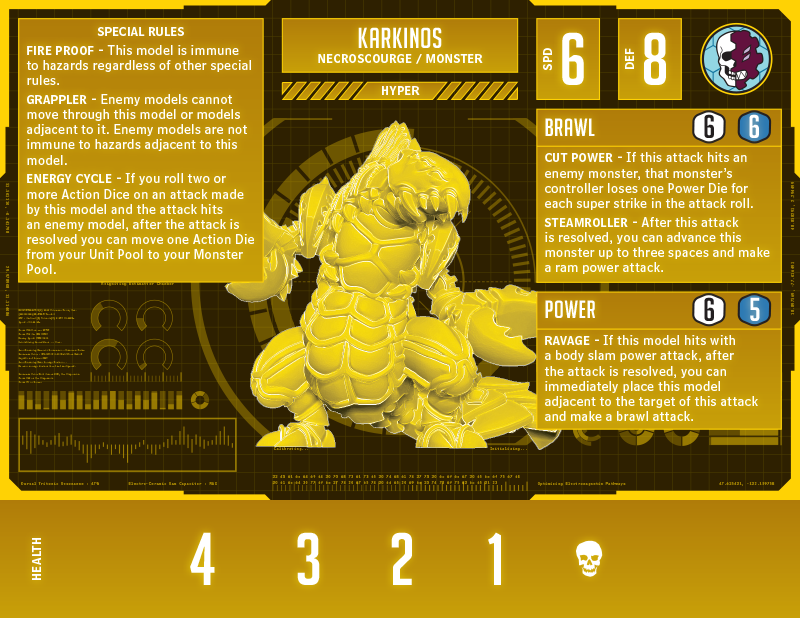
Then, pass the sriracha sauce, this lobster roll is about to get spicy! In hyper, Karkinos becomes a terrifying freight train of destruction. The only thing she lost from her alpha form is Suplex, and her only stat increase from alpha to hyper are the dice she gained on her attacks. What Karkinos did gain made her 4 health hyper a terrifying monster to behold.
Karkinos continues her body slam specialization with a new rule called Ravage. Ravage has two parts that trigger in order. The first happens after the body slam: Karkinos can place herself in any space that is not currently occupied adjacent to the target. This means she can leap over her target and get ready for the next part of her chain attack. This placement can be key—ideally, you want to land in a spot where Karkinos can retreat to safety and Steamroller a building for power or push it over onto the enemy monster to cause more damage. Once you find the right spot and place her, the last part of Ravage triggers. Karkinos gets a free brawl attack.
With that follow-up brawl attack you are hoping for a ton of super strikes to trigger Cut Power. This ability allows her brawl to remove one Power Die from the enemy’s power well for each super strike in the attack roll. But wait, there’s more! This void crustacean also has Energy Cycle. If you use 2 or more Action Dice on an attack, you get one back. This helps enable her chain attacks and serves her as an exceptionally efficient monster all around. Remember that even if you miss with the free brawl attack you still trigger Steamroller. So, i f you count the three free “steps” you gain from Steamroller as Action Dice economy and add them up with what you can get refunded by Energy Cycle, Karkinos can squeeze out 6 extra Action Dice from a turn for you and leave the enemy monster devastated and depleted with nowhere left to hide.
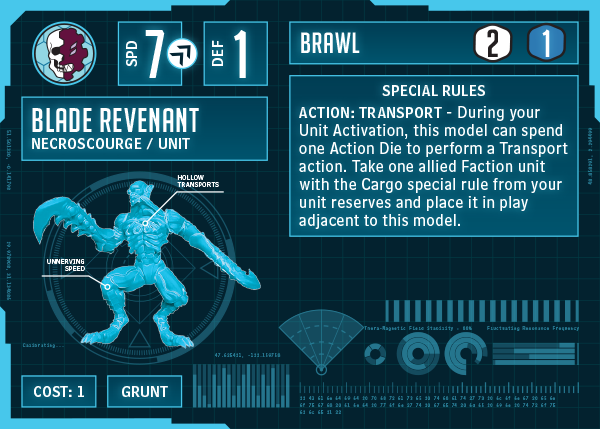
Blade Revenants are the fast and cheap shock troopers of the Necroscourge Swarm. They may not look like much at first glance, but inside of them lives the Hurling Swarm. Using their Transport ability, they can save you a spawning zone in the Spawn Phase. When it comes time for them to sit back and lay a trap, they can use Action: Transport to place a Hurling Swarm and be two-thirds the way to securing a building.

Hurling Swarms are mostly harmless by themselves with a meager 1/1 on their brawl and not much in the way of speed or defense, either. But they have a few things going for them that may catch opponents off guard. With their Cargo ability, the Hurling Swarm leap out of the Blade Revenant and support them using their Commander: Blade Revenant ability. On their brawl attack, they have Repurpose—if they hit an enemy unit with an attack, they replace that enemy with a Faction unit from your reserves that does not have Repurpose. Lastly, they have Amalgamate, which grants allied Faction units attacks within three spaces Repurpose. This means that when the Hurling swarm and Blade Revenant team up and kill a unit adjacent to a building, you now likely control that building. Together, they may not seem like much right now. But when combined with the full Necroscourge arsenal, they can become a force to be reckoned with.
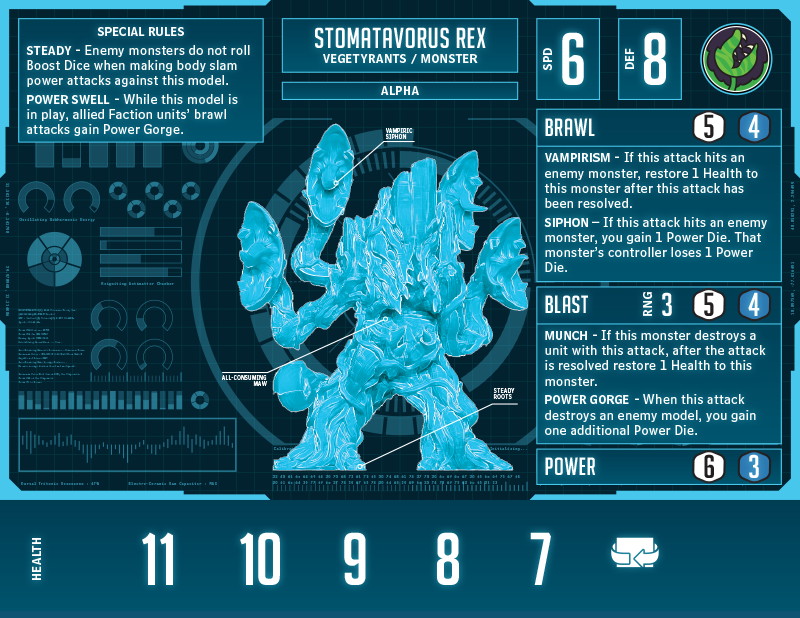
Stomatavorus Rex is a hard-to-kill power generator. In alpha, Rex is packing two different ways to heal. At range, Rex’s vines reach out and Munch units, healing off chip damage while double-dipping on power with his Power Gorge ability. If the opportunity presents itself, Stomatavorus Rex can bite into the enemy and siphon away their power while healing some chip damage with Vampirism. Branching out from there, Steady makes it hard to Body Slam this big siege tower. Steady is one of Rex’s best counters when facing off against Karkinos! Stomatavorus Rex also comes with a built-in power base. His ability Power Swell grants his Faction units Power Gorged. Although his roots act as a powerful defense they also mean he doesn’t have high mobility. He wants to get up and into the fight, so mobility is really his biggest drawback. His low Boost Dice on brawl and blast doesn’t help either, but he has to pay something for all that power dice generation and healing.
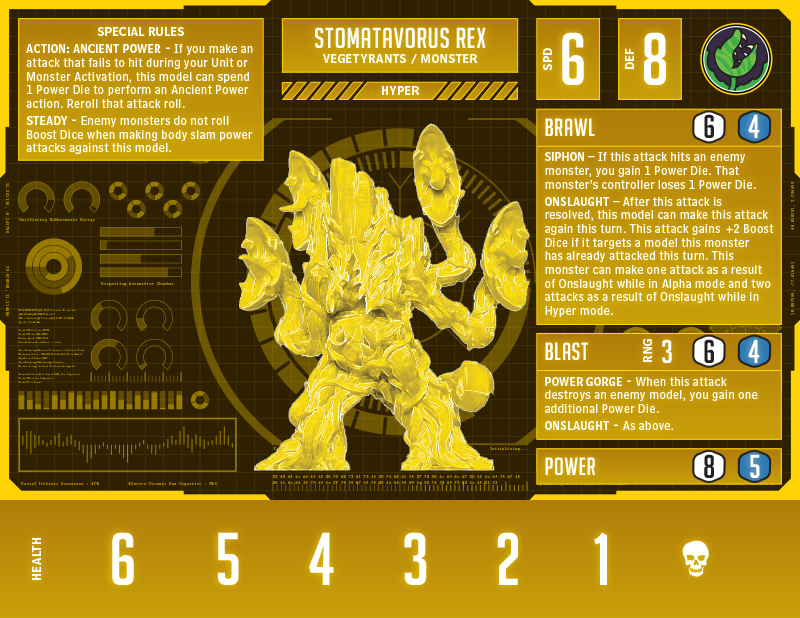
In hyper, Stomatavorus Rex embodies the full savagery of nature. Rex loses quite a bit from alpha, shedding Power Swell, Munch, and Vampirism. He trades his healing abilities for Onslaught on both profiles. This shifts him away from defense and into full-on offense. Both profiles keep their power-generating abilities, allowing for a big 6 Power Dice swing when fully unleashed.
Rex also gains Ancient Power. Ancient Power is not your grandpa’s reroll. The first thing to notice is that it is general for all allied models that works on your unit and monster turn. The next thing to note is that the cost of that reroll is a Power Die, not an Action Die. This helps play into his Action Dice economy, allowing you to reroll key roles with a resource he readily helps you generate.

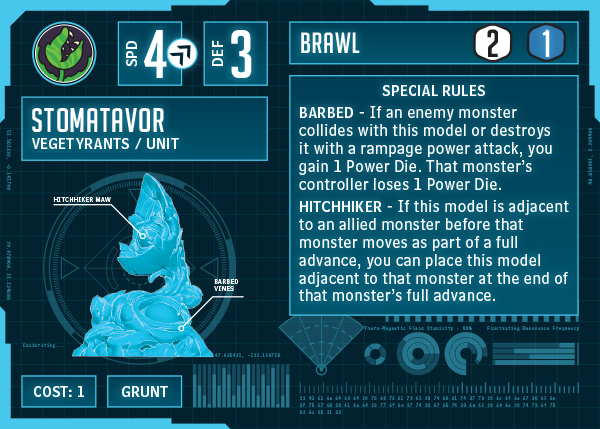
Stage 5 clinger alert! No, seriously. This unit is a lot of fun because it’s the screening unit that comes with you when you move. If a unit with Hitchhiker is adjacent to your monster when they make a full advance, the hitchhiking unit can come along. Once in place, they are a barbed nuisance, siphoning power from an enemy unlucky enough to be smashed into one. Stomatavorus Rex loves having these little tumbleweeds around. He has no way to screen himself, and this gives him that added layer of protection to his tanky kit. Once in place, they allow him to keep up his power siphoning even on his power attacks. This unit loves to have other abilities around that let it move out of activation to get into the perfect spot.
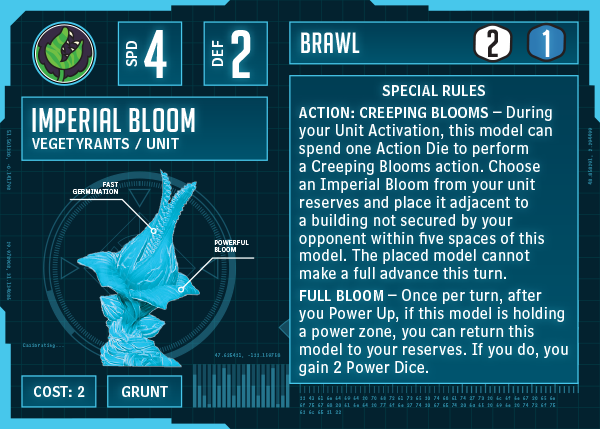
The Imperial Bloom is a unique unit that can be deceptively mobile and handy to have around. With its Creeping Bloom action, it can place another creeping bloom from your unit reserves adjacent to a building not secured by your opponent. This has some sneaky applications.
If you unsecure a building adjacent to another building secured by your opponent, you can use creeping bloom to disrupt that building while keeping a body on a nearby power zone or building. The best spot to land is the many power zones that are also adjacent to buildings. Pulling off a creeping bloom is a bit of a subtle dice economy, as creeping blooms cost one less than the unit’s cost. It’s also a subtle way to sneak in some early Action Dice economy when you need to secure a building. You can spawn one and have it Creeping Bloom the second one out to assist in securing a building before the Advancement Phase.
You may be thinking that you will run out of blooms quickly if you are creeping up the field. This plays right into its next ability, Full Bloom. During your monster turn after you power up, if a unit with Full Bloom is occupying a power zone, you may return it to your reserves to gain two Power Dice. I found something very poetic about plucking the flowers that were in bloom to gain that extra power. This is also an ability that does not cost any Action Dice, offering yet another sneaky way to net some power without spending any Action Dice. Imperial Blooms also create a sort of shell game for your opponent. They can creep into position on your unit turn; this typically leaves your opponent only one turn to respond to it before it comes around to your monster turn. If your opponent is locked into a monster turn after your unit turn, it forces them to choose to divert an attack to pluck your bloom early or concede that you will get at least 3 Power Dice from that one power zone on your next power up.
All in all, this was an exciting first piece to the puzzle for each of these Factions. These units will lead the way into more synergies and combos as the future monsters, units, and buildings drop for each agenda. So, there is more exciting stuff just over the horizon. Stay tuned to the Privateer Press networks for what comes next!