In this week’s Insider, I’ll look at how to photograph your miniatures using the camera on your phone and some household items. Given how far camera technology on phones has come, it’s become easier to take fantastic photos with very little effort. Even with all that technology, though, there are still a few aspects that often get overlooked.
The first and the most important element to consider is lighting. Whether you’re taking a photograph outdoors or indoors, having the right light source is incredibly important. When photographing your miniatures, you’re typically taking those shots inside, and unless you’ve properly lit your miniature, it’s going to be hard to make out all of the hard work you’ve put into its assembly and painting. In photo A, I had one of my Khadoran Kommandos sitting on a piece of printer paper on my dining room table. I hadn’t set up lights yet, and my apartment is fairly dark. One way I could’ve fixed this would have been to take the photo using the light from the windows to light it. Even if I had used that light, however, it wouldn’t have been sufficient enough to take a decent photo.
In photo B, I had placed a couple of camping lights on either side of the figure. The reason why the lights are placed on either side is to eliminate a directional hard shadow that would obscure the detail on one side of the figure. In photo C, you can see the final light setup before I took the final photos. If you have a decent DSLR camera, you can have more control of the light by adjusting your shutter speed and ISO, but I won’t cover that information in this tutorial. If there is a demand for info about photographing with a DSLR tutorial, I’ll write another Insider in the future.
What you’re looking at in photo C is a pair of free-standing floor lamps with their shades taken off and a camping light on the table pointing to the left. There are a couple of key things with this setup: first, I took a couple of pieces of printer paper and placed one under the figure and the other behind it. This is to give the figure a neutral color background so it stands out more. In product photography, this is critical, as it makes it easier to cut the figure out when it’s photographed on a neutral background. If you’re using a backdrop that’s a different color, it’s also important to take into consideration that it will affect the image, as the color may bounce onto the figure.
The second thing to note is the light placement. Taken from a higher angle, photo D shows one of my camping lights on the left of the figure, and my lantern is being diffused by one of the lamp shades. This is to help cut down on the harsh light that can wash out details. You can also use drafting lights and tape a piece of paper over the end. The awesome part about drafting lights or clip lamps is that you can adjust the height and angle of the light a lot more easily than my jury-rigged home setup. In truth, any light will do as long as it’s strong enough and you have a couple to light both sides of the figure.
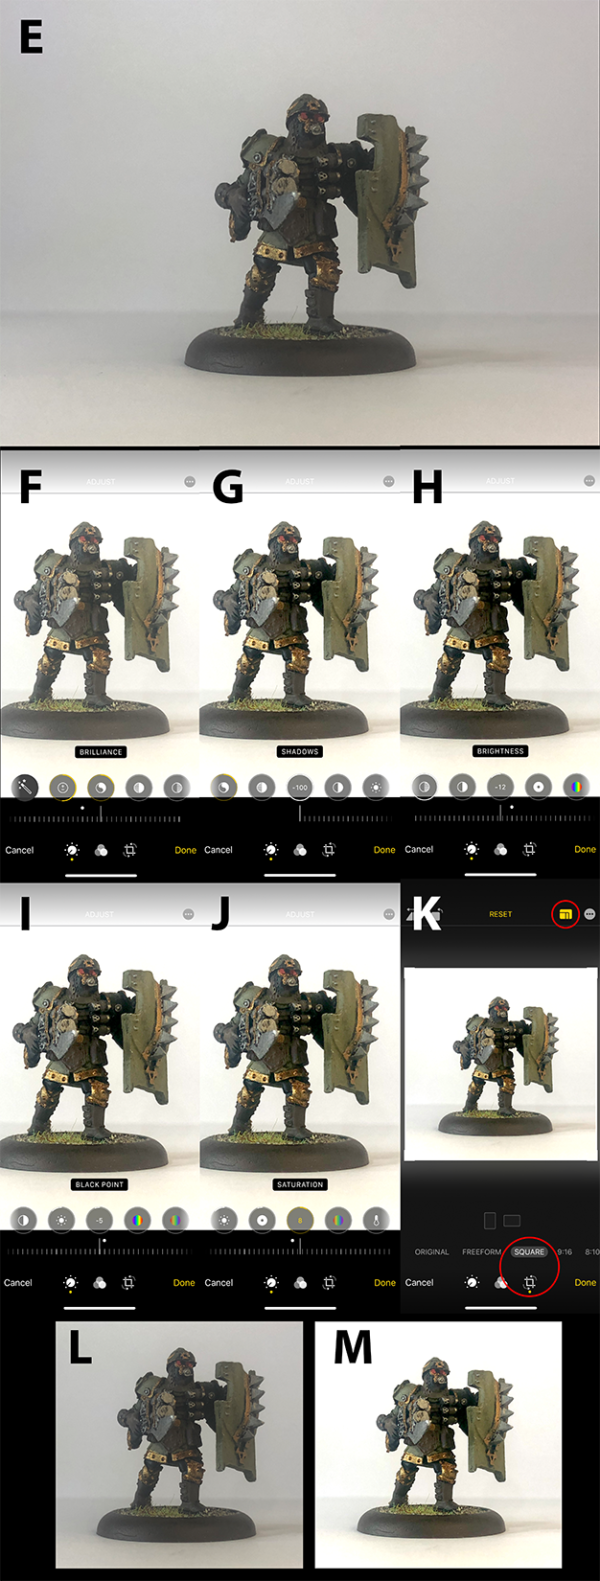
After taking several shots from different angle and distances, I decided to use photo E as my base. This shot was taken with my iPhone X from around a foot away. As you can see, my light setup was far from ideal, and the image is a bit underexposed, such that we’re losing detail and color. With that photo selected in my library, I clicked “EDIT” in the upper-right corner. This brings up the iPhone photo editor. In image F, I’ve already cranked up the exposure to bring back details to the image. As you can see, it’s now overexposed, and I neglected to take a screen capture of just the exposure adjustment. A lot of the color information was lost with that adjustment, so to counter it, I bumped up the brilliance. The colors are still washed out and the black areas look gray, but we can fix this!
In photo G, I dropped the shadows all the way to the left; that helped with contrast and making the colors a bit more rich. I then moved over to brightness and dropped it down a hair to help with the value range a bit more. In photo I, I dropped the black point a hair to help bring back some of the details obscured by the shadow across the chest. Then, in photo J, I bumped up the saturation a hair to help bring the colors out a little bit more. This is where a lot of people go overboard and oversaturate their images. See also: All of your friends’ sunset pictures where everything looks unnatural. If you’re that friend, STOP IT!
At this point, I’m pretty happy with the photo. Note: This is a table-ready paint job, and it definitely shows. This also brings up a great point: if you don’t want to see the little errors, don’t show the photo at full size. Instead, shrink it down so it’s not much larger than the actual figure, which will help disguise all the errant brush strokes.
The last edit I made was to click on the crop button (lower right), then to click the aspect ratio button (upper right), and finally, click on “Square.” With the crop finalized, I was done with the image. In photos L and M you can see a side by side of the original and edited photos, which was roughly five minutes of additional work. With the initial principles I’ve presented here, you now have the basics you need to take solid photos of your miniatures. If you have any questions, feel free to ask them on the Facebook group, and I’ll be more than happy to answer them for you. Just like any skill, you’ll learn more and become better by taking more photos. Now, go give your phone a workout and share some of your photos online!


