
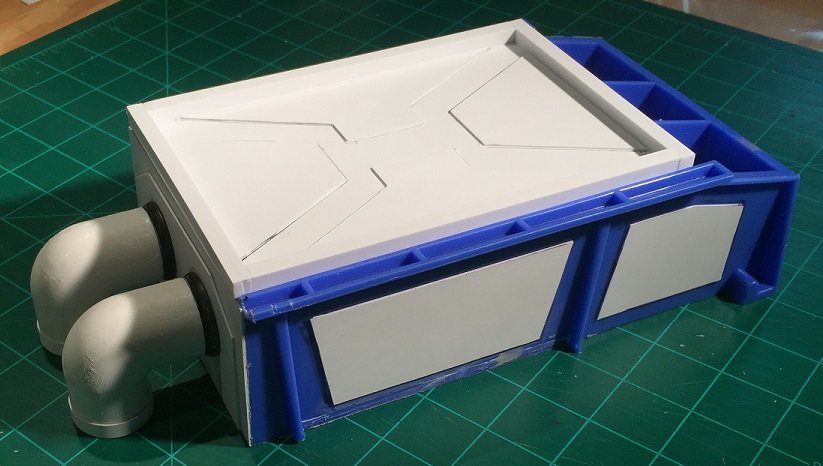
Hi, everybody! Michael again, and I’m back with another Warcaster terrain project: the Marcher Worlds bunker!
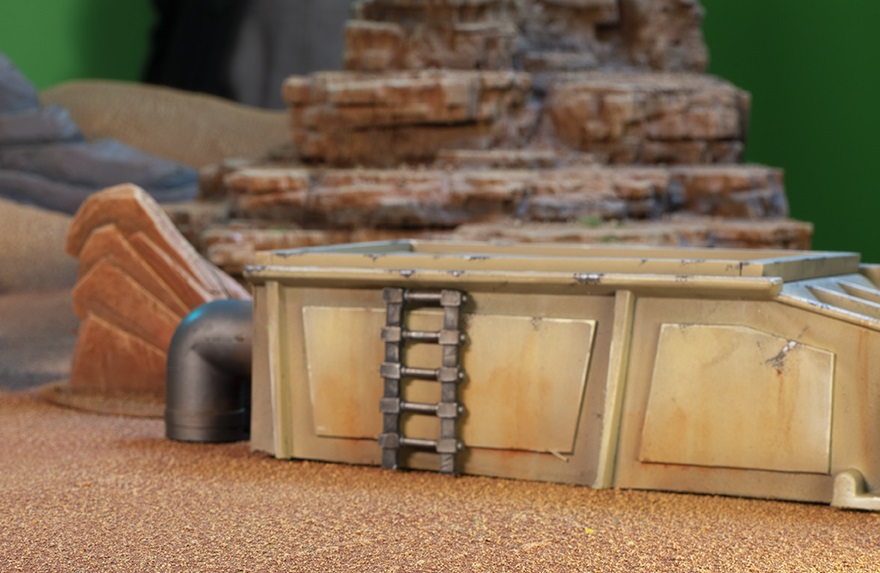
Isn’t it pretty? You bet it is. So, we’re going to reverse-engineer Danny’s beautiful build today.
There are very few published photos of this piece, so we’re going to be using screen caps from Danny’s February 2020 Marcher Worlds terrain stream in order to reconstruct the bunker. Here’s a link with an embedded time code:
<https://www.youtube.com/watch?v=VbgucD-UDPs&t=1720s>
This is a pretty simple piece to construct, as long as you know which supplies you need. And soon enough, you’ll benefit from the absurd amount of time I spent researching this!
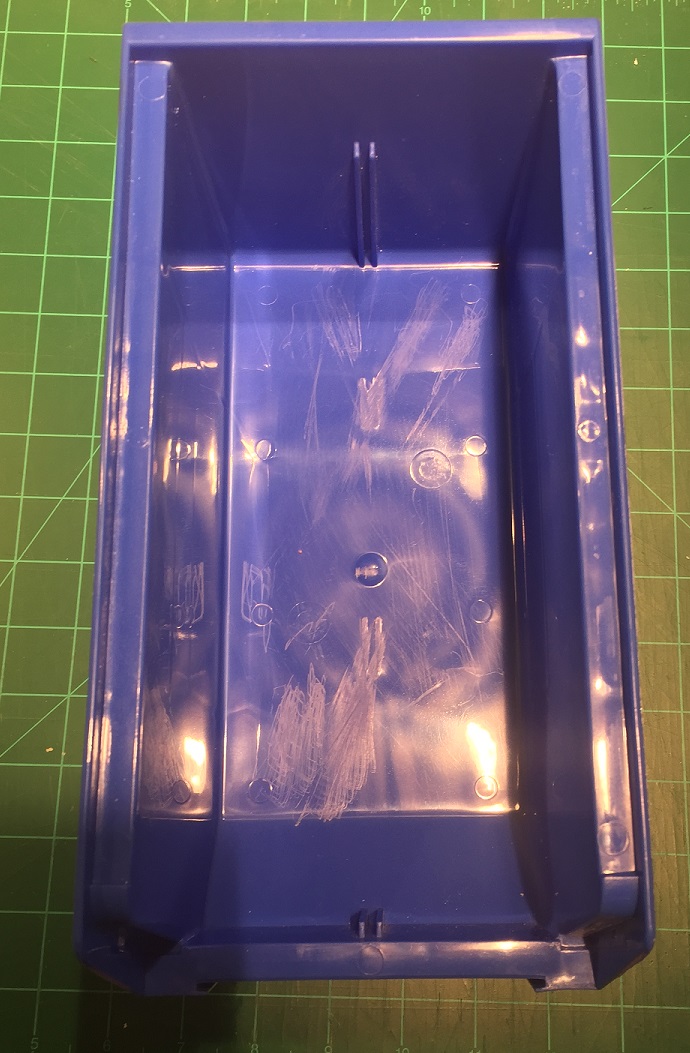
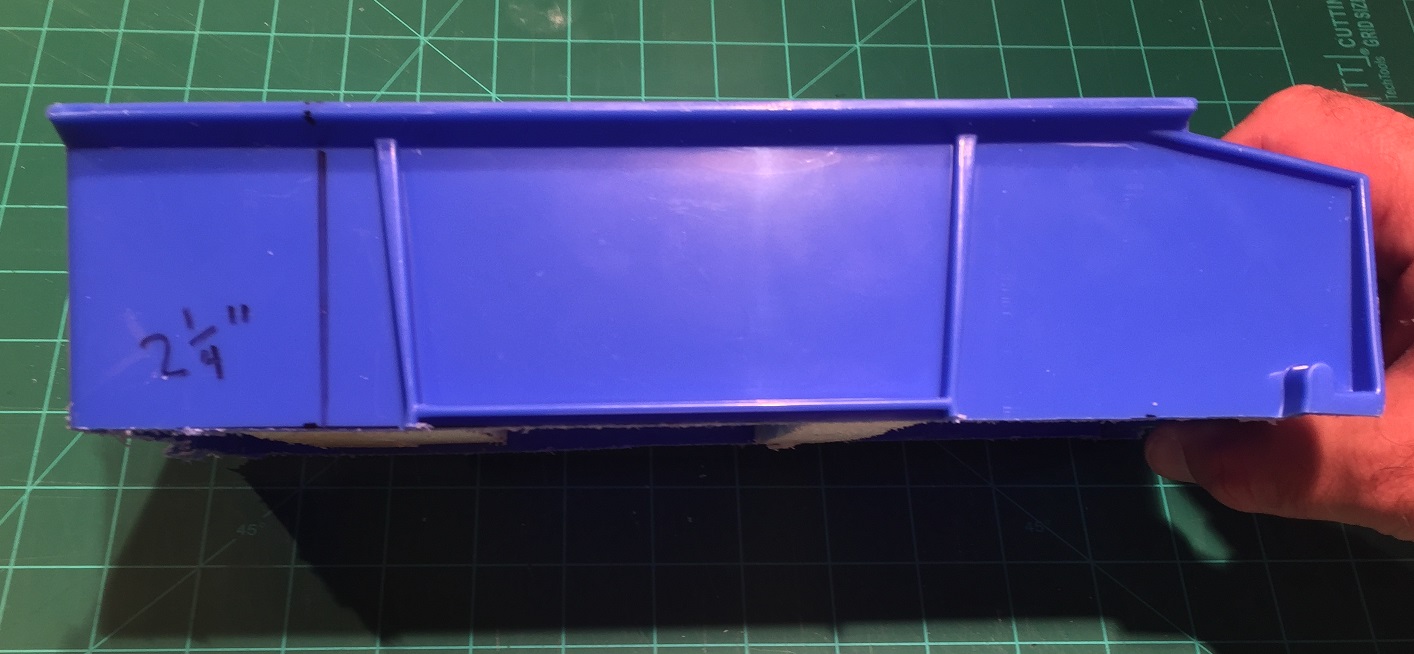
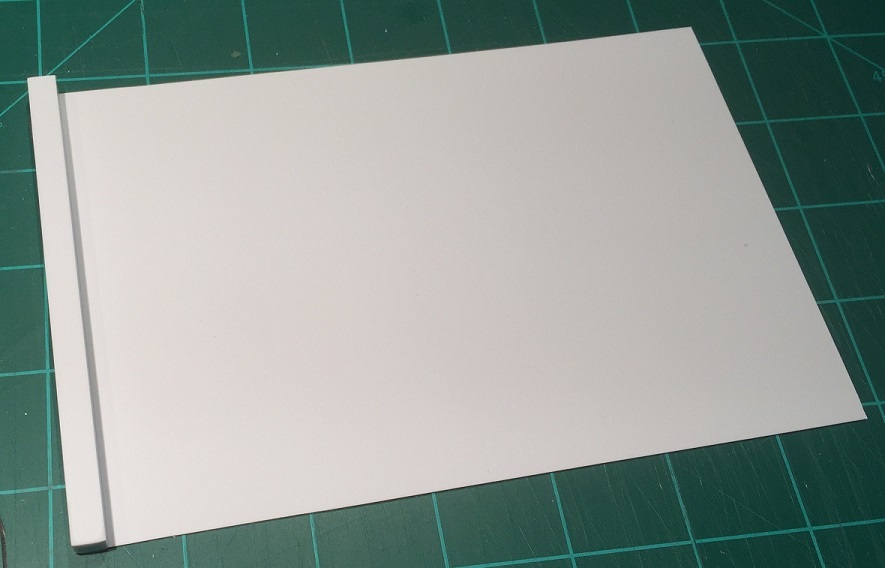
The storage bin used is specifically* a Rhino Tuff Bin ARTB-30˝ manufactured by Alkon Plastics. It measures 10-7/8˝ (L) x 5-½˝ (W) x 5˝(H). It’s sold under various trade names, including VISIPLAS AR230 in the United States.
* Well, as far as I can tell. It is technically possible that Danny used a different brand. But…I think I got it right.
These bins are surprisingly difficult to source in the U.S.; readers in the UK/EU and elsewhere in the world will actually have a much easier time locating this exact bin. It seems to be sold under the Rhino Tuff brand outside the U.S.
Note, too, that these bins are usually sold in bulk. You may have to buy a few more than you need in order to get this specific bin. If that’s the case, just make lots of bunkers.

However, many other storage bin suppliers sell bins reasonably equivalent to this specific bin, although the surface details will be different. But man oh man…did I mention just how pretty the original bunker looks?
You’ll need the following tools and materials in addition to that pretty, pretty storage bin:
-Sandpaper, various
- 120 grit
- 400 grit
- 600–800 grit
-Rigid Foam Board Insulation Foam (commonly known as “pink foam,” though it may be green or blue, depending on your region)
-Construction adhesive
-Evergreen Sheet Styrene, Item No. 9020, .020˝ Thick (0.5mm)—two sheets
-Evergreen Styrene Strip, Item No. 196, .250˝ x .250˝ (6.3mm x 6.3mm)—two 12˝ strips
- The same .250˝ x .250˝ strips are available from Plastruct, item number 90810, Cat. No. MS-250
-Two (2) 30mm round-lipped bases
-Two (2) ¾˝ diameter PVC 90° elbow
-Super glue
-Styrene glue, plastic cement, or similar
-Hacksaw (for bonus points, a bandsaw)
-Razor saw
-Snap-blade knife
-Hobby knife
-L-square
- I recommend both a 3˝x 4˝ square for most cuts, as well as a larger (at least 7˝ on one side) square for some of the larger pieces
-Rotary leather punch
-Respirator
-Eye protection
Not strictly required, but incredibly useful:
-Easy Cutter Ultimate cutting tool
-Fashionable eye patch for after you ignore my advice about eye protection
Extra Bonus Value-Add!
What’s that? You like to have pretty styrene details and you want a cutting machine to do the work for you? Why, that sounds not only great but doable!
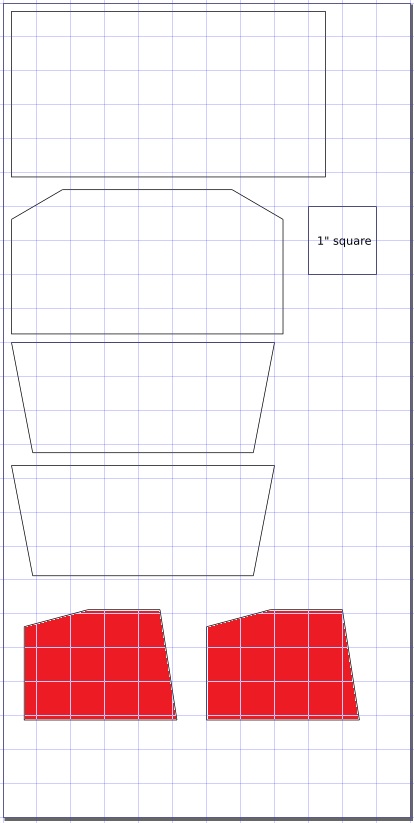
Here are a number of files that can be used in cutting machines:
Inkscape SVGs


Plain SVG files


![]()
PNG Files


NOTE: Different machines have slightly different settings and behaviors. Different resolutions, different scales, and so forth can affect the final outcome. I’m not an expert on all the possibilities, and a full discussion of these settings is beyond the scope of this article. You’ll be able to, and will probably need to, modify the files as necessary for optimal print/cut behavior on your hardware.
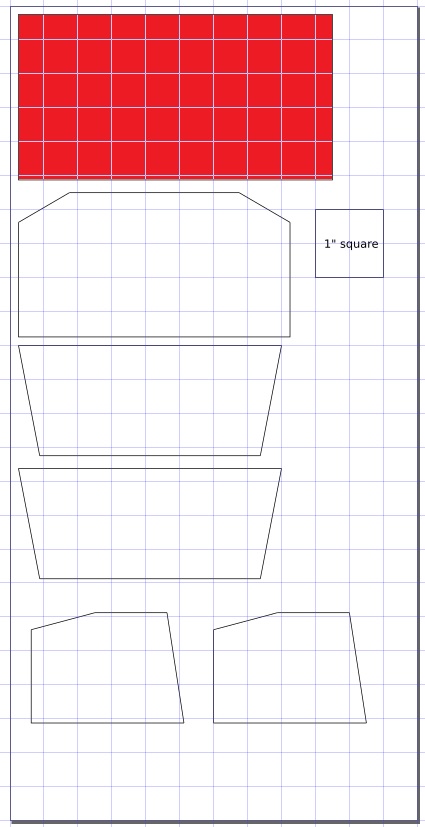
NOTE REGARDING SCALE: I tried to keep this simple. Scale the SVG files so the square marked “1-inch square” is a one-inch square!
Now, with all that up front, let’s get to it!
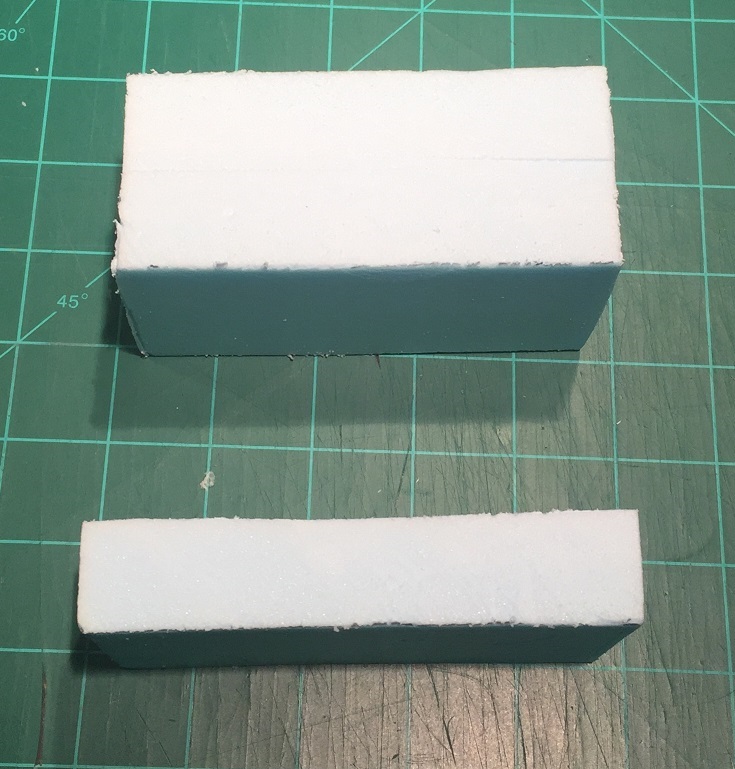
Cutting the Foam
Cut two pieces of foam 4-7/16˝ long by 2-¼˝ in height. The width doesn’t matter too much, although I recommend using at least 1˝ thick foam. The foam provides structural support during cutting and as a base for the rear wall, so it can’t be too flimsy.
I used 2˝-width foam because I happened to have plenty on hand from previous projects.
I like using the razor saw to make very precise cuts. I personally find I get better results than when using the snap-blade knife, but both work well. It’s all a matter of which quick tool you prefer! The foam block can be sanded down to fit if you’ve cut it slightly too large. (Sand gently; it’s easy to remove more material than you might realize and go from “too tight of a fit” to “doesn’t touch the sides anymore” quite quickly.)
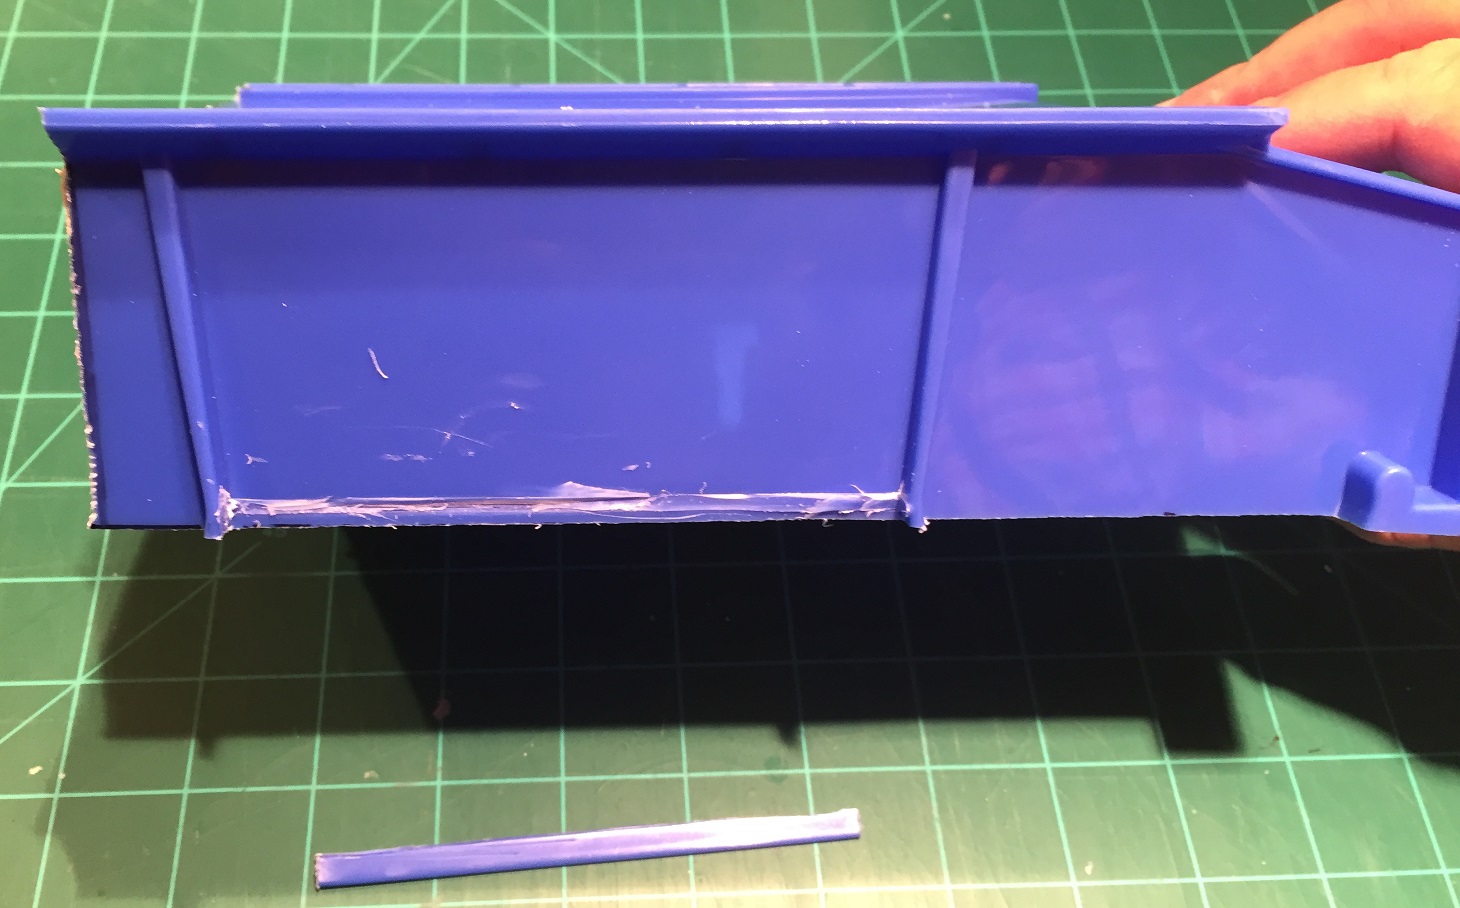
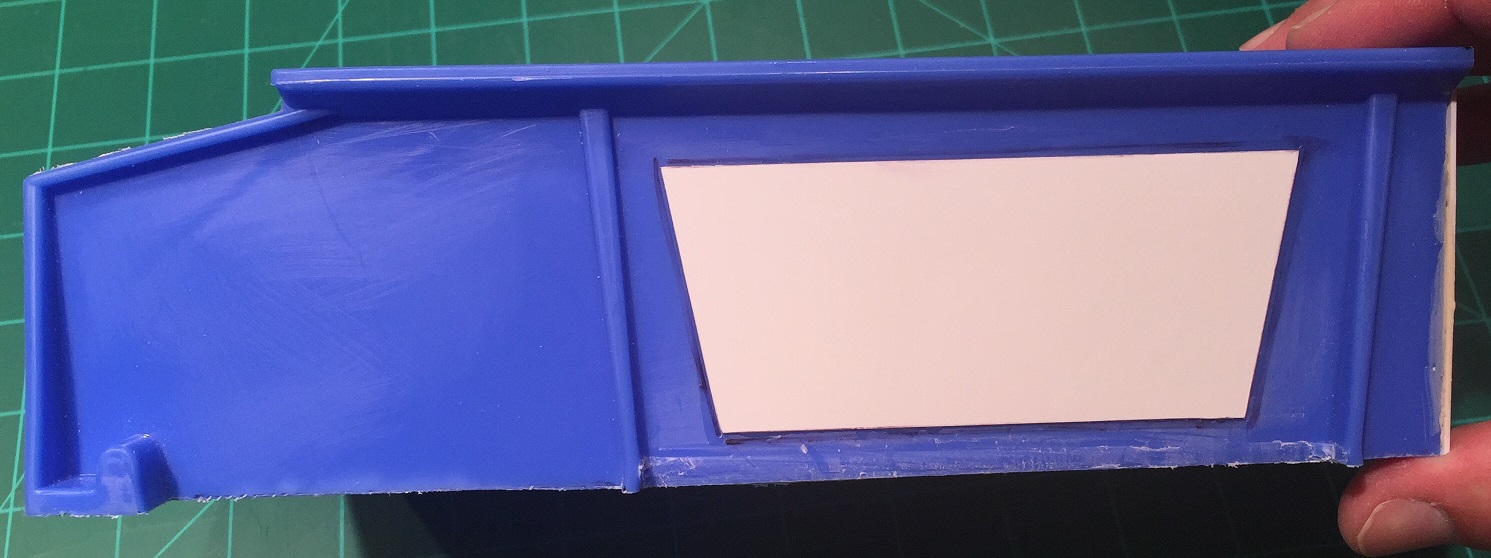
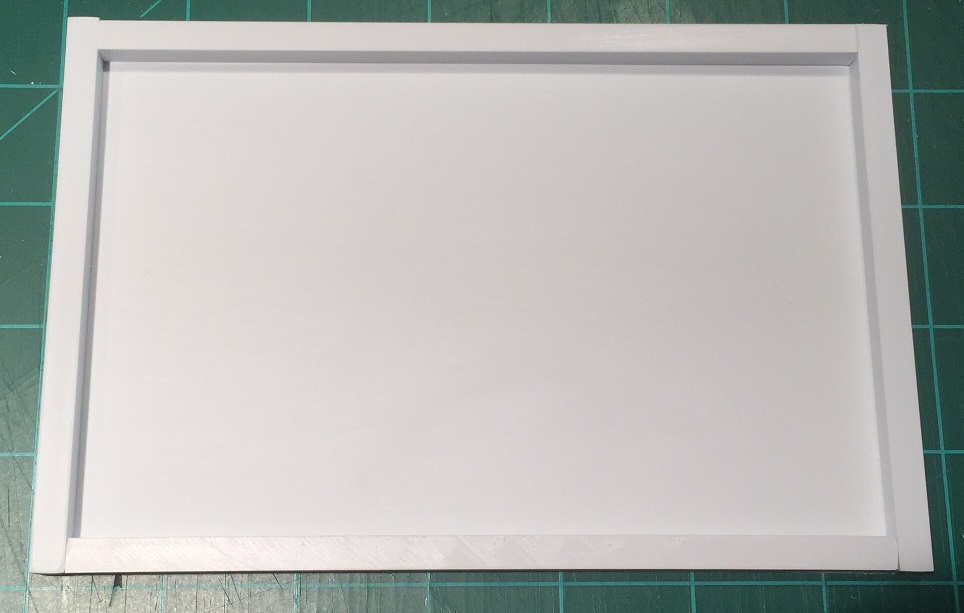
Cutting the Storage Bin
Measuring and cutting the storage bin is, quite honestly, the hardest and most time-consuming part of this project.
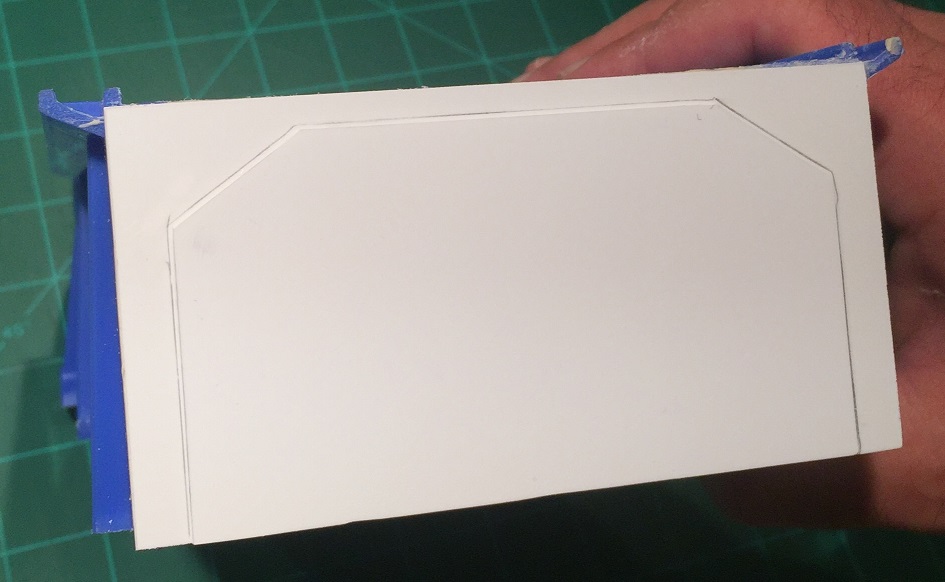
Start by removing the divider holders from the bottom of the bin. This is necessary for the foam blocks to rest flush.
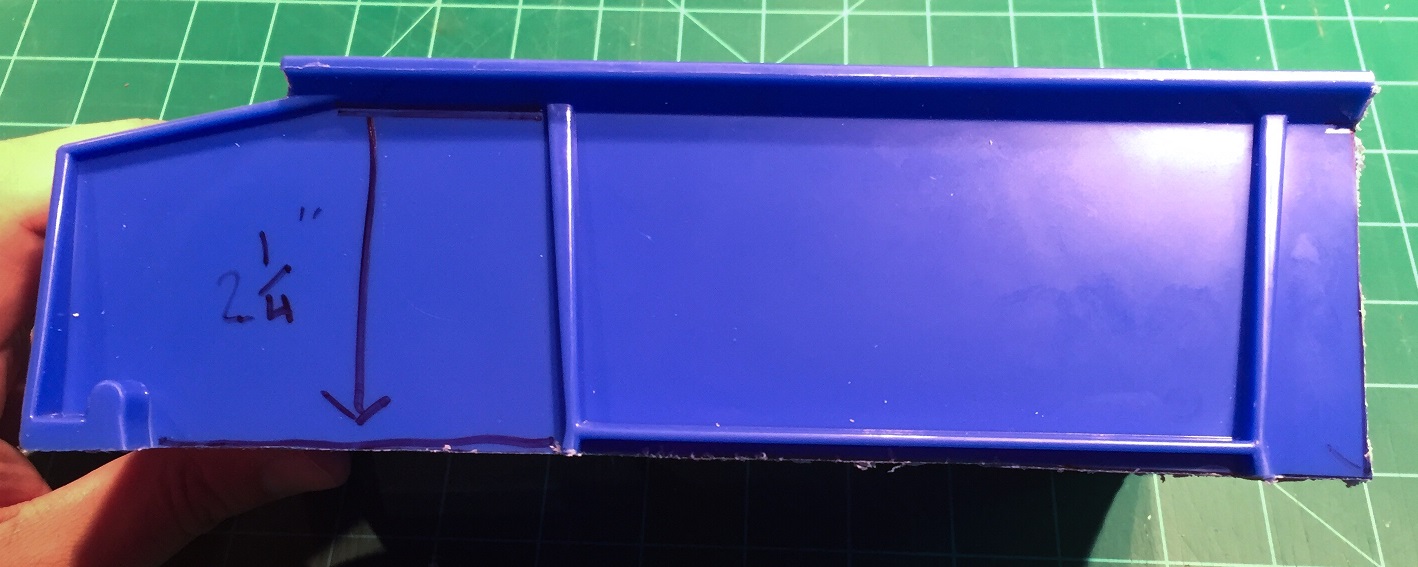
Using construction adhesive, glue the cut blocks of foam into the bottom of the storage bin. The bin will be 2-¼˝ deep, so be sure to glue the block in the correct way.
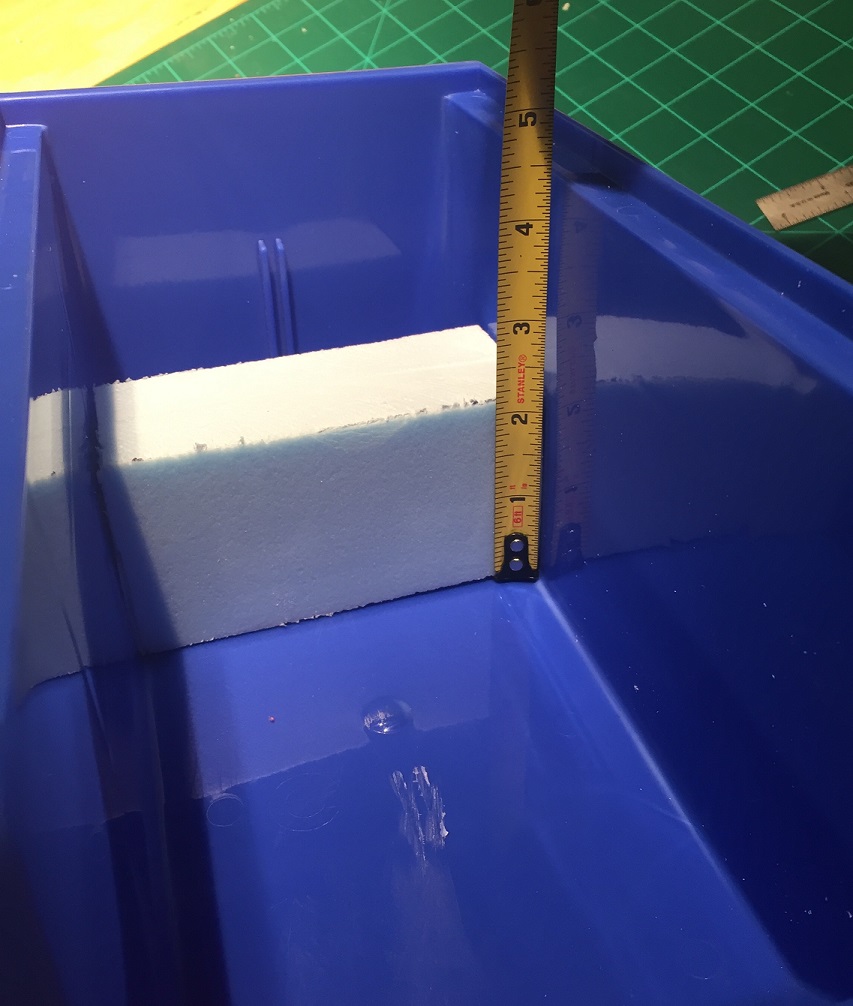
Glue one block near the rear rib, touching your vertical cut line. The foam must be flush with the rear cut. We’ll be adding plasticard here to make the rear wall later.
Glue one block near the front rib. This will give us some stability while we cut.

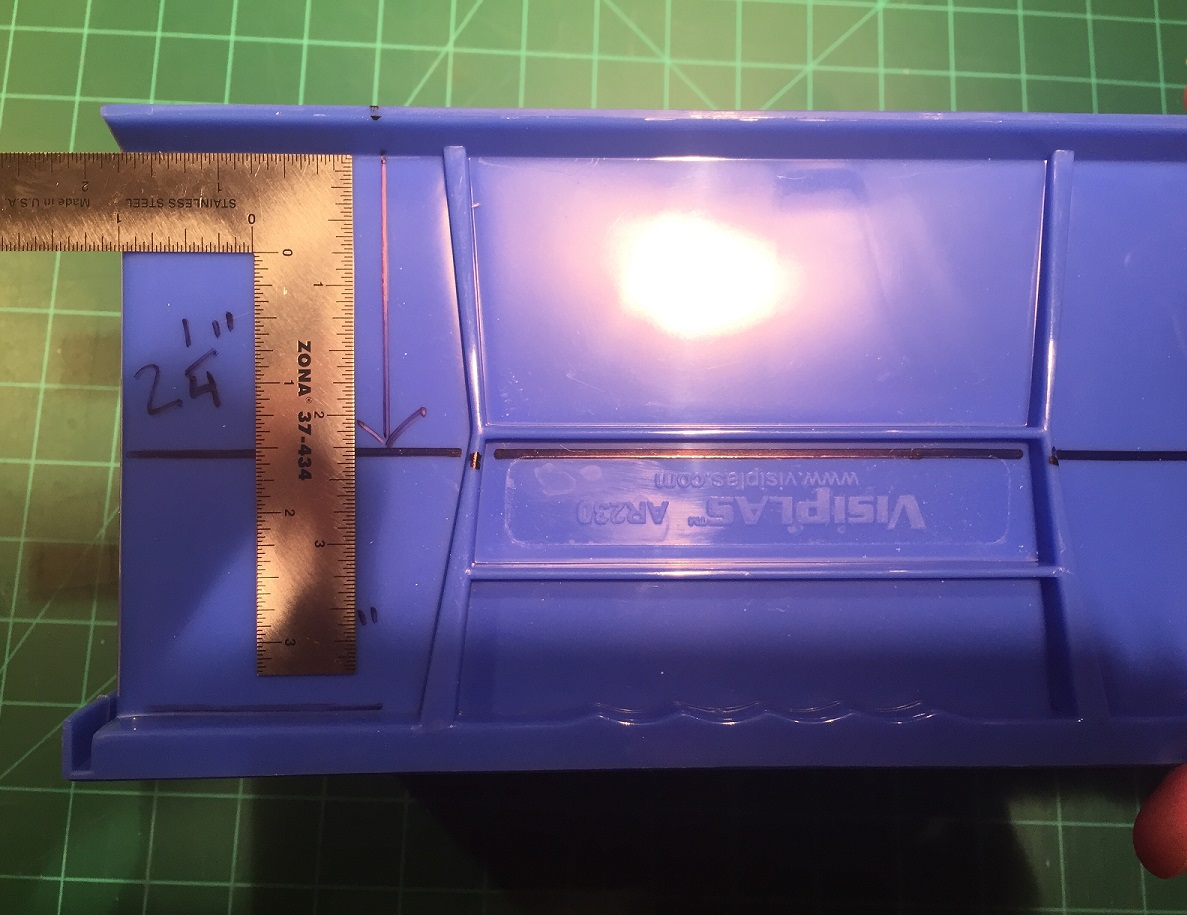
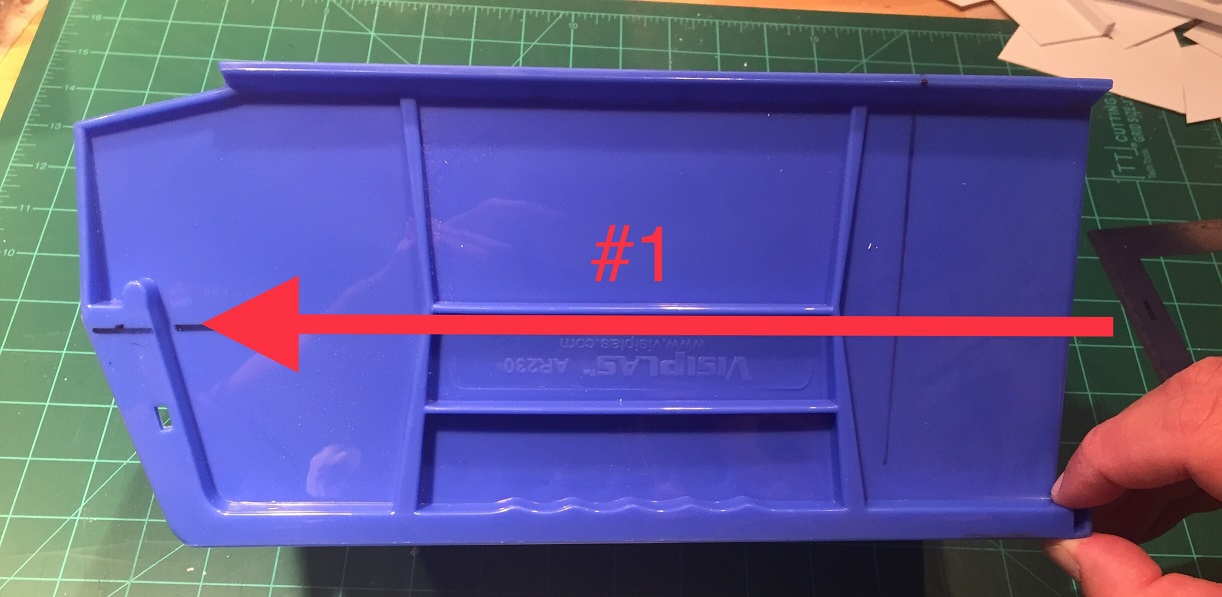
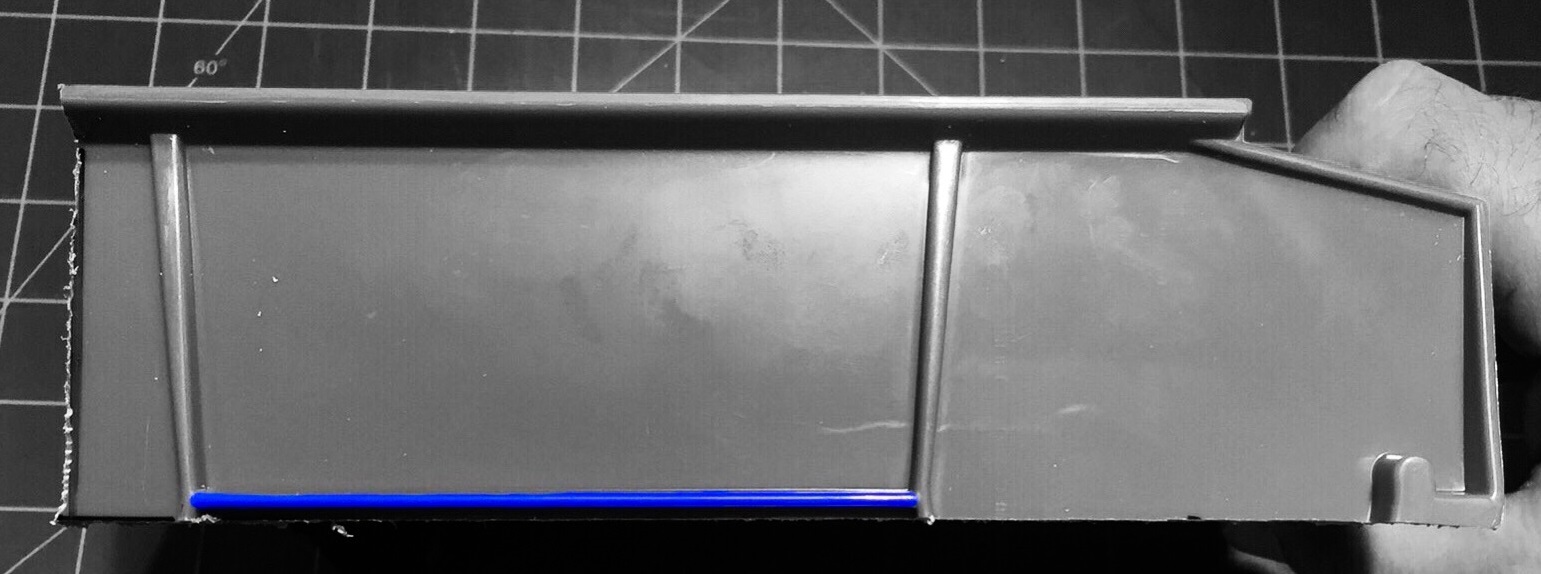
Mark three cut lines: one on the top and one down each side.
Measure 7˝ back from the front of the upper ribs.
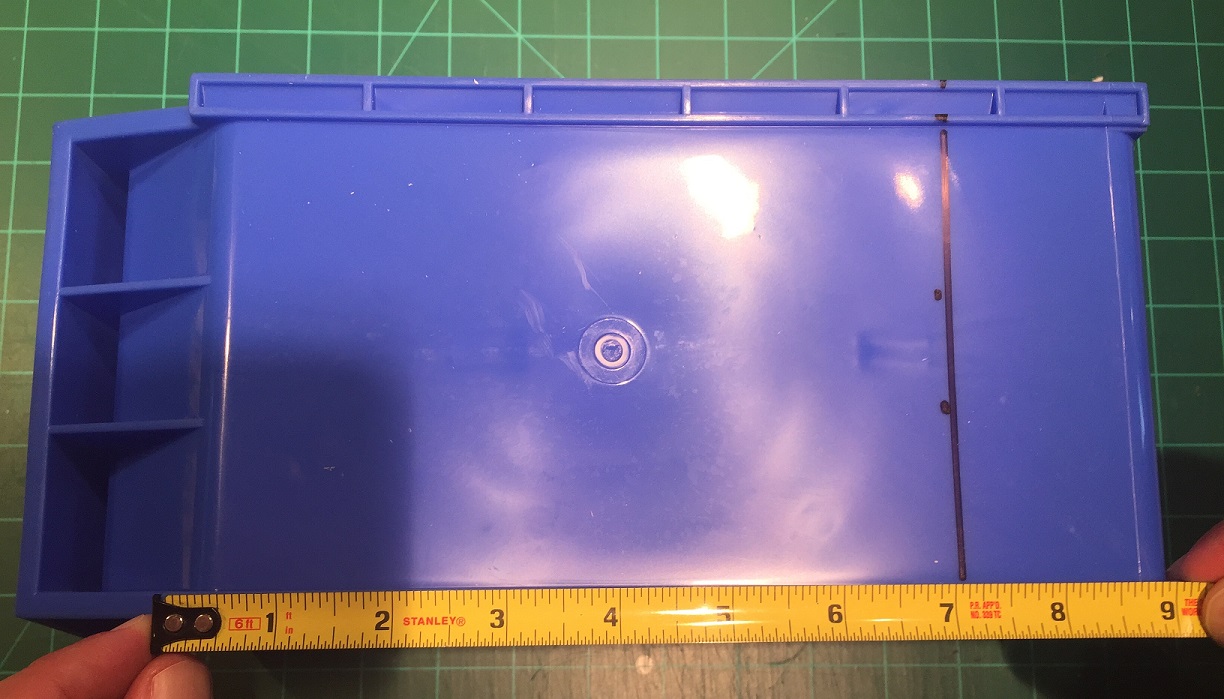
On each side, measure 2-¼˝ down from the base of the upper ribs and mark your cut lines on each side. You’ll be cutting through this line, slightly below the first longitudinal rib.
Now, grab that hacksaw and get to work. Make the horizontal cut first and the vertical cut second. The bin is very wobbly once the rear is removed, making it difficult to cut clean lines.

Okay! The hard part is done!
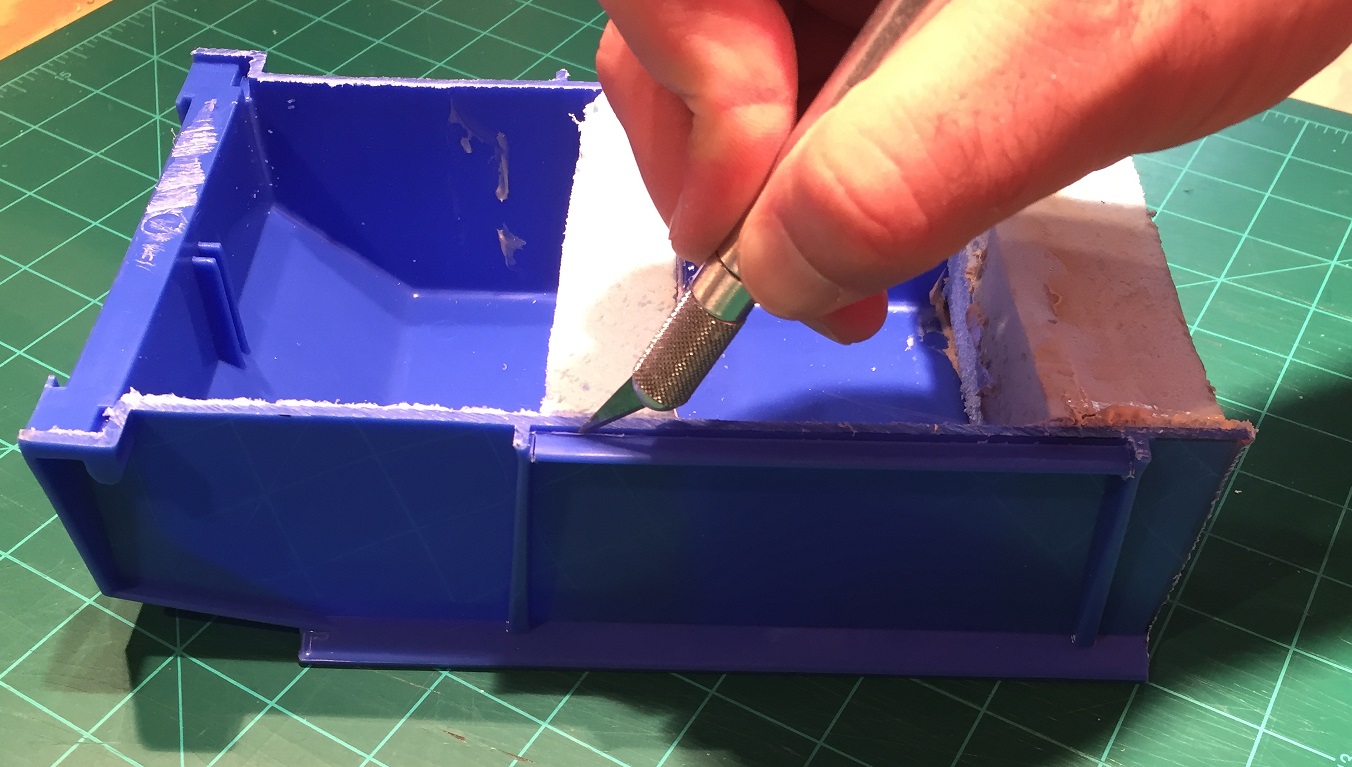
Sand down the sides if necessary in order to level the bunker.
Use your hobby knife to remove the horizontal rib on each side. Then, use your hobby knife or razor saw to cut the horizontal rib loose from the two vertical ribs.
Draw the hobby knife across the bottom of the ribs. Score the ribs repeatedly until they cut through. Try to cut as closely to the wall as possible. Scrape off any remaining part of the rib and use some sandpaper to sand it smooth.
Detailing the Bunker
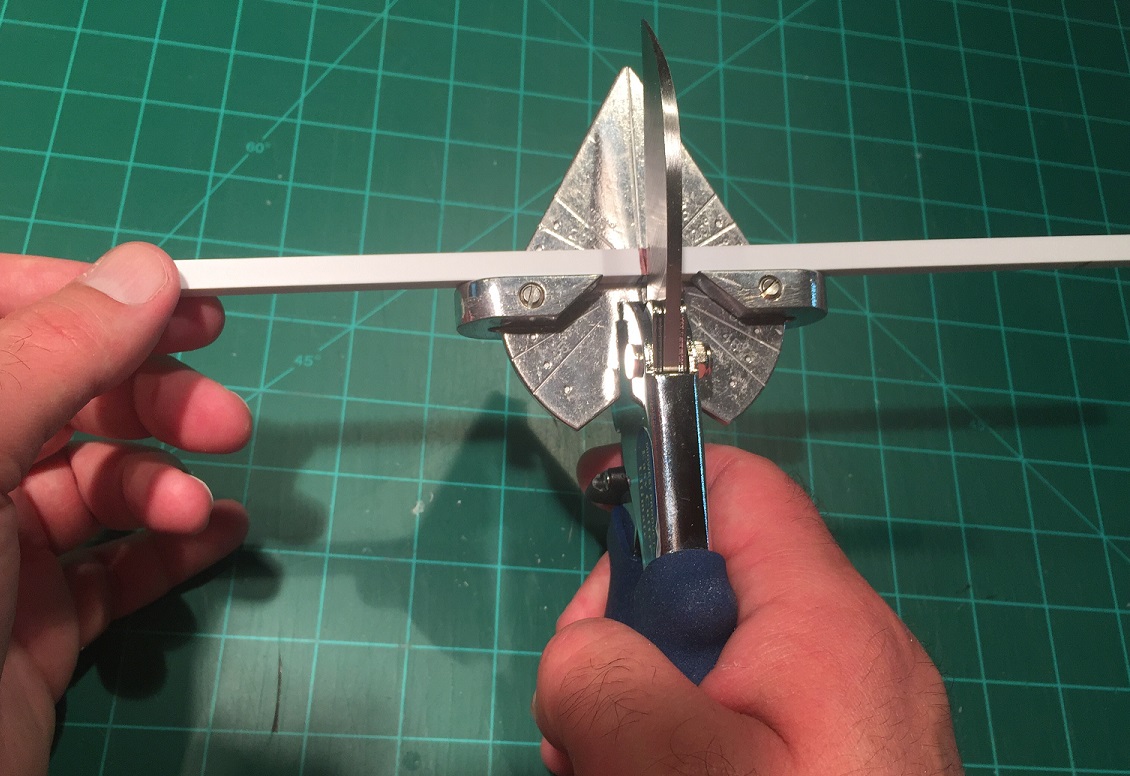
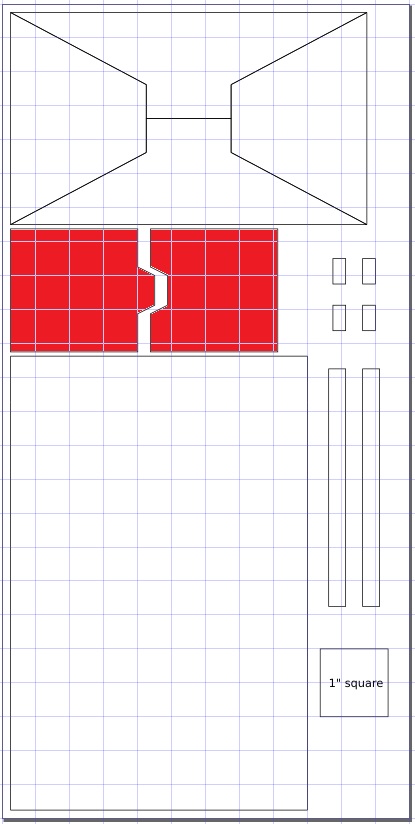
Cut four styrene bars using the Evergreen Styrene Strip, Item No. 196.
The two cross bars measure 4-3/16˝.
Cut the longer bars to just a hair over 6-1/8˝ in length; this should be slightly longer than required. We’ll cut them slightly too long and sand the bar down to length to ensure we do not end up with difficult-to-correct short cuts and wasted material.
We’ll start by cutting all the styrene shapes shown in the file “Marcher_Worlds_Bunker_sides_and_rear.”
NOTE ON CUTTING STYRENE: Some machines may not be able to cut fully through thick styrene. When cutting by hand, remember: Don’t try to cut completely through the material in a single pass. Score the sheet and cut a little deeper with each pass. Eventually, you’ll be able to flex the sheet and snap the pieces out. Use sandpaper to smooth any rough edges for a clean, professional look.
As a reminder, lightly sand all your styrene parts first. A few passes with 400-grit sandpaper will give the smooth styrene a bit of tooth and help when both gluing and priming.
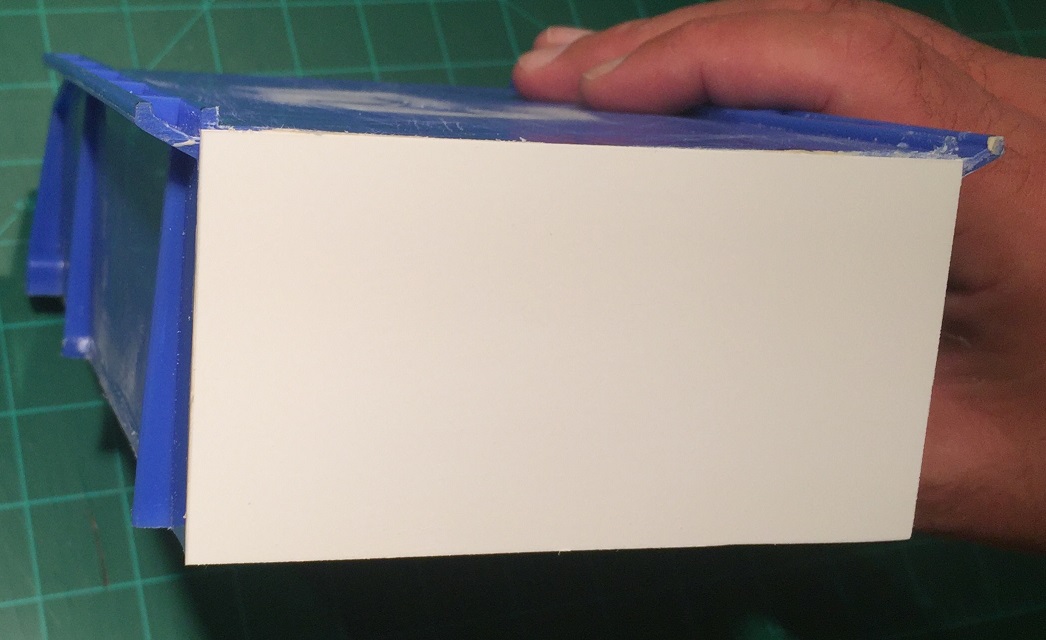
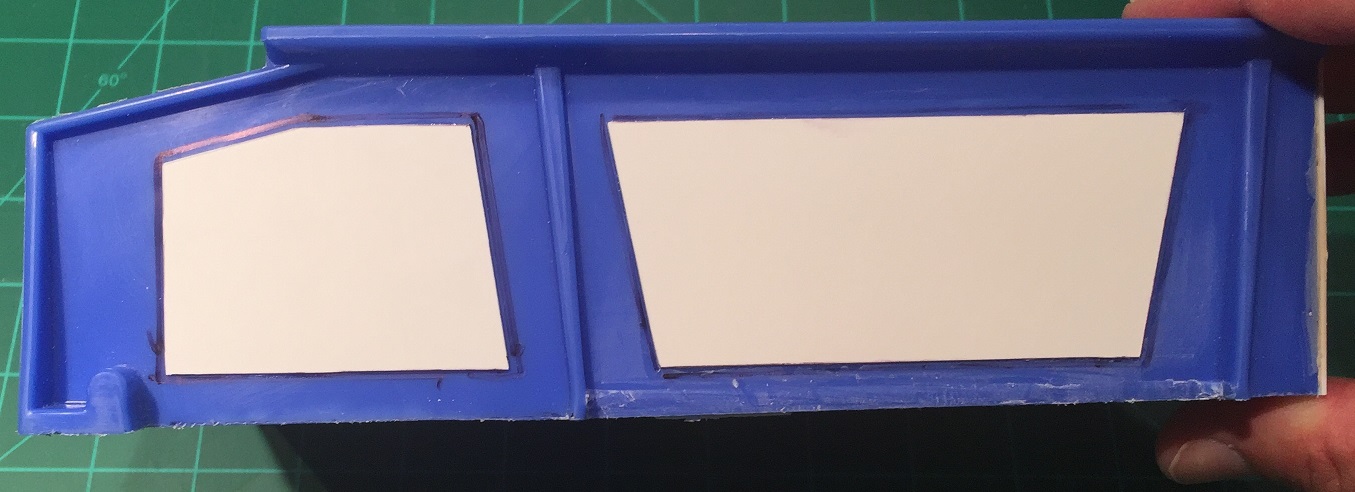
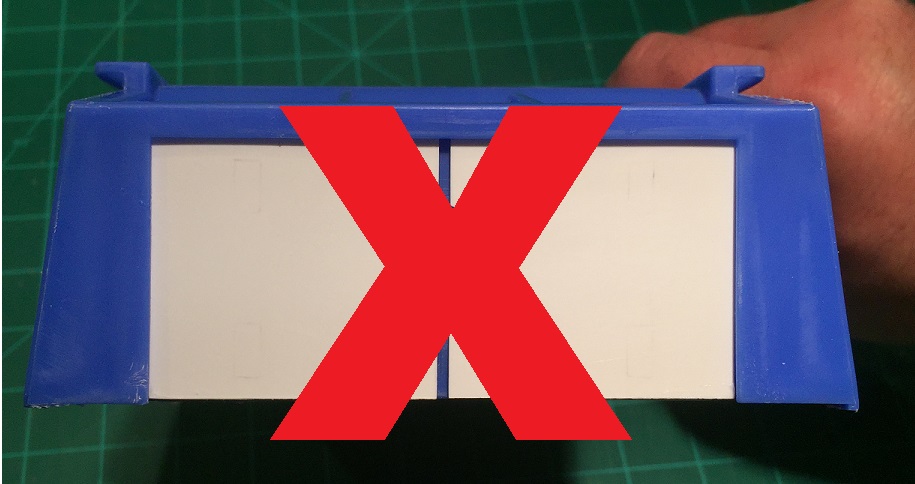
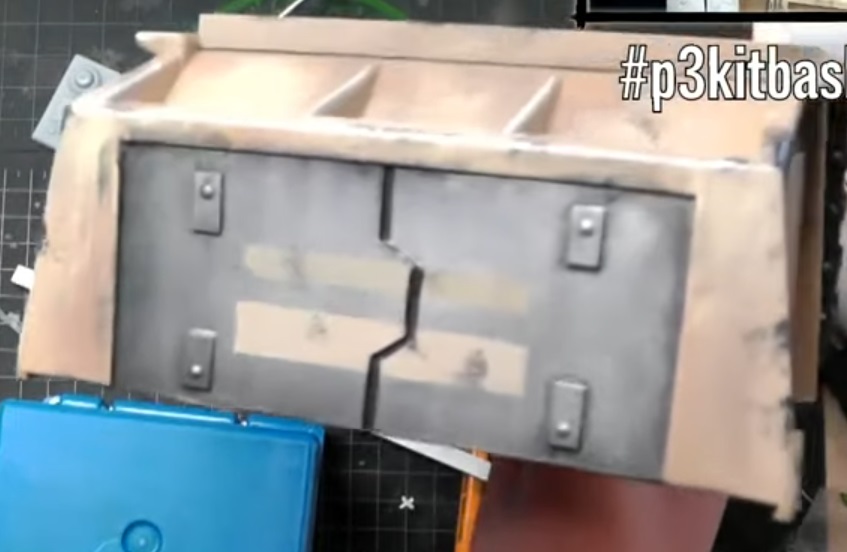
We’ll make the rear wall of the bunker first. Cut the 4-5/8˝ x 2-7/16˝ rectangle from the sheet.
Glue this part to the rear of the bunker. This makes the rear wall.
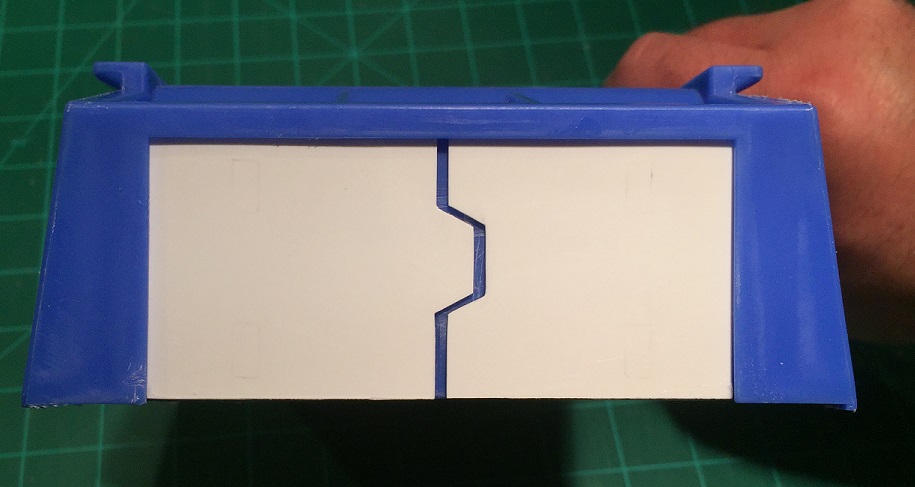
We’ll add the detail part to the rear wall. Cut this piece from your sheet:
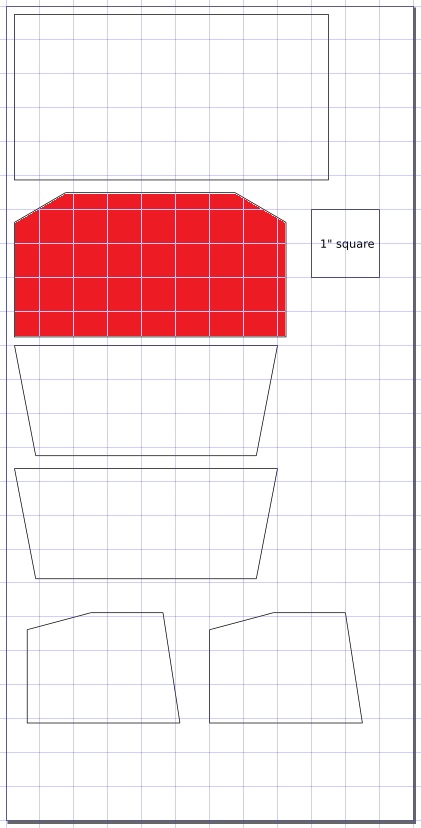
Center and glue it on the rear wall as shown.
Next, cut the two trapezoids from the sheet.
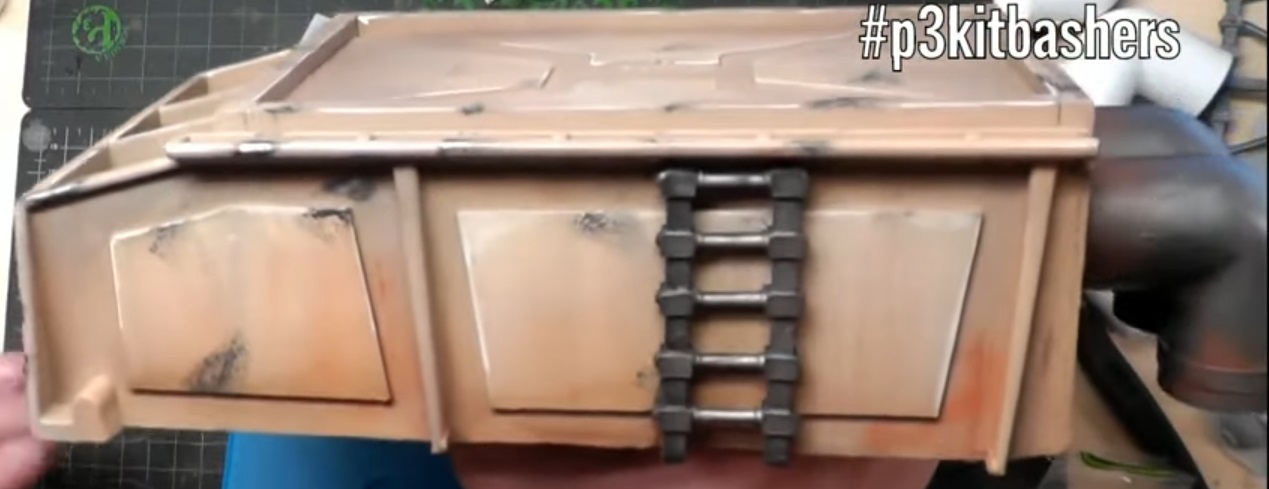
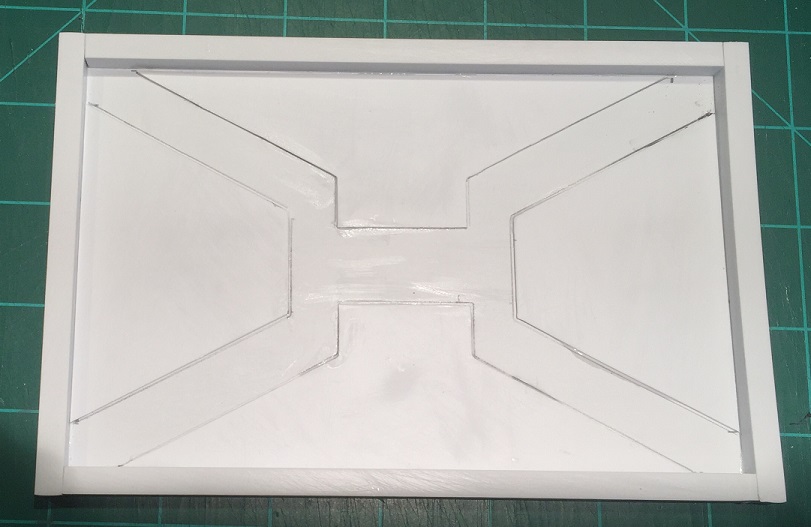
Here’s a good close-up of this detail from Danny’s terrain stream.
Center the trapezoid as shown on each side and glue them in place. The bottom of the trapezoid should be 7mm above the bottom of the bunker.
You may be able to guess what’s next…
Cut out those parts from the sheet and glue them in place. They’re also elevated 7mm from the bottom.
We’re getting close now!
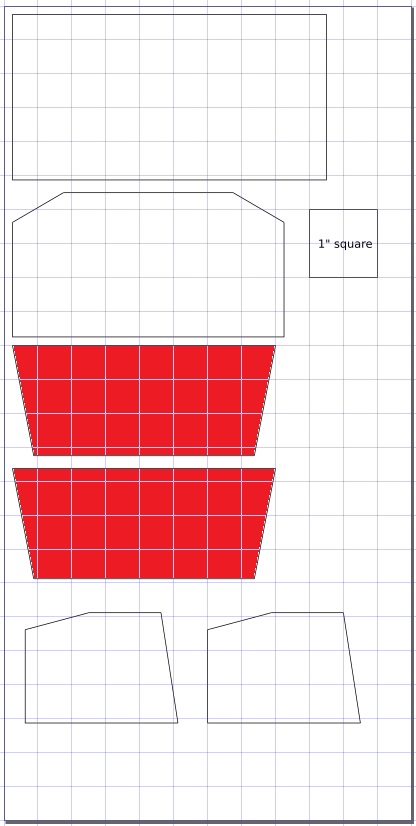
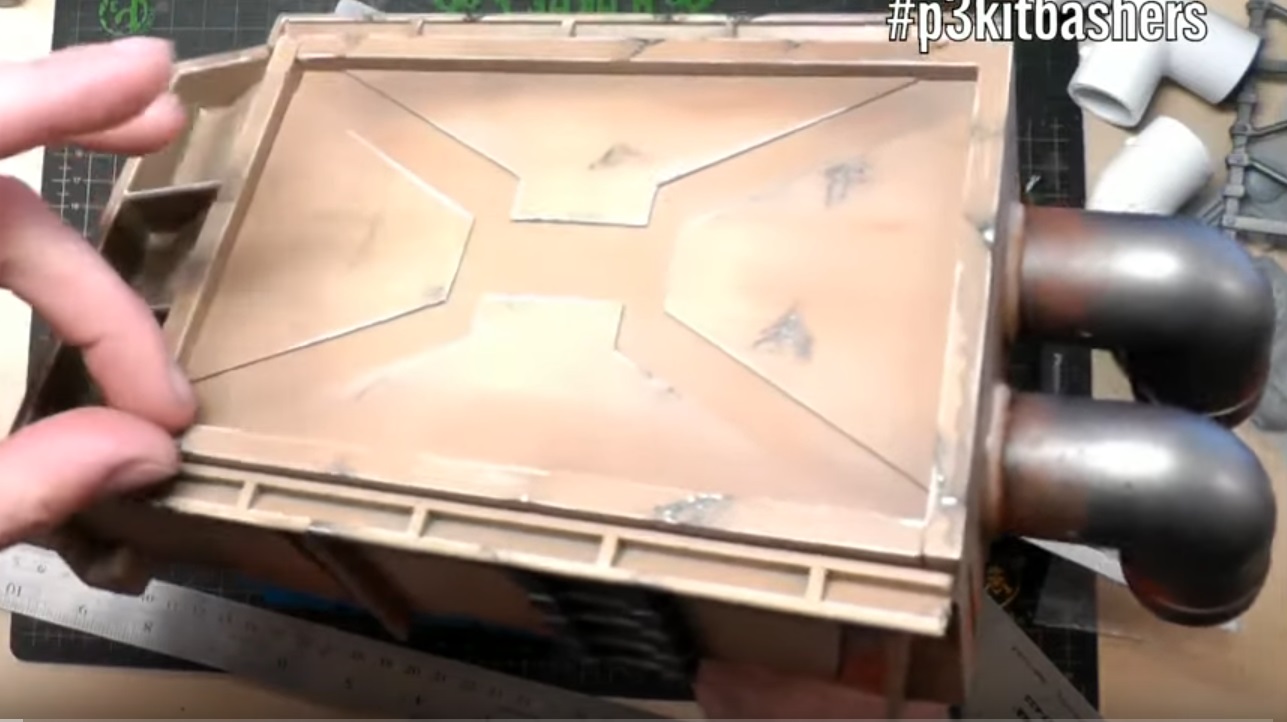
Go ahead and cut all the shapes in the file “Marcher_Worlds_Bunker_top_and_front.”
The parts on this sheet are fairly close together. Making the cuts on the upper details can be a little tricky. I’m using 6˝ x 12˝ styrene sheets, but Evergreen makes multiple sizes. I laid out the designs to use the fewest number of sheets, but, of course, you are free to change things as you see fit.
Cut the large rectangle out of the sheet. This will be used to cover the roof of the bunker and disguise the injection-molding site. This sheet, the cutouts forming the X detail, and the bars are a good example of the “three layer” visual language that Danny developed for the Marcher Worlds terrain.
Test fit both 4-3/16˝ bars on the top of the bunker. As with all the other bars, you can lightly sand them down so they fit correctly. (You can see that one of these bars needs a little sanding to fit.)
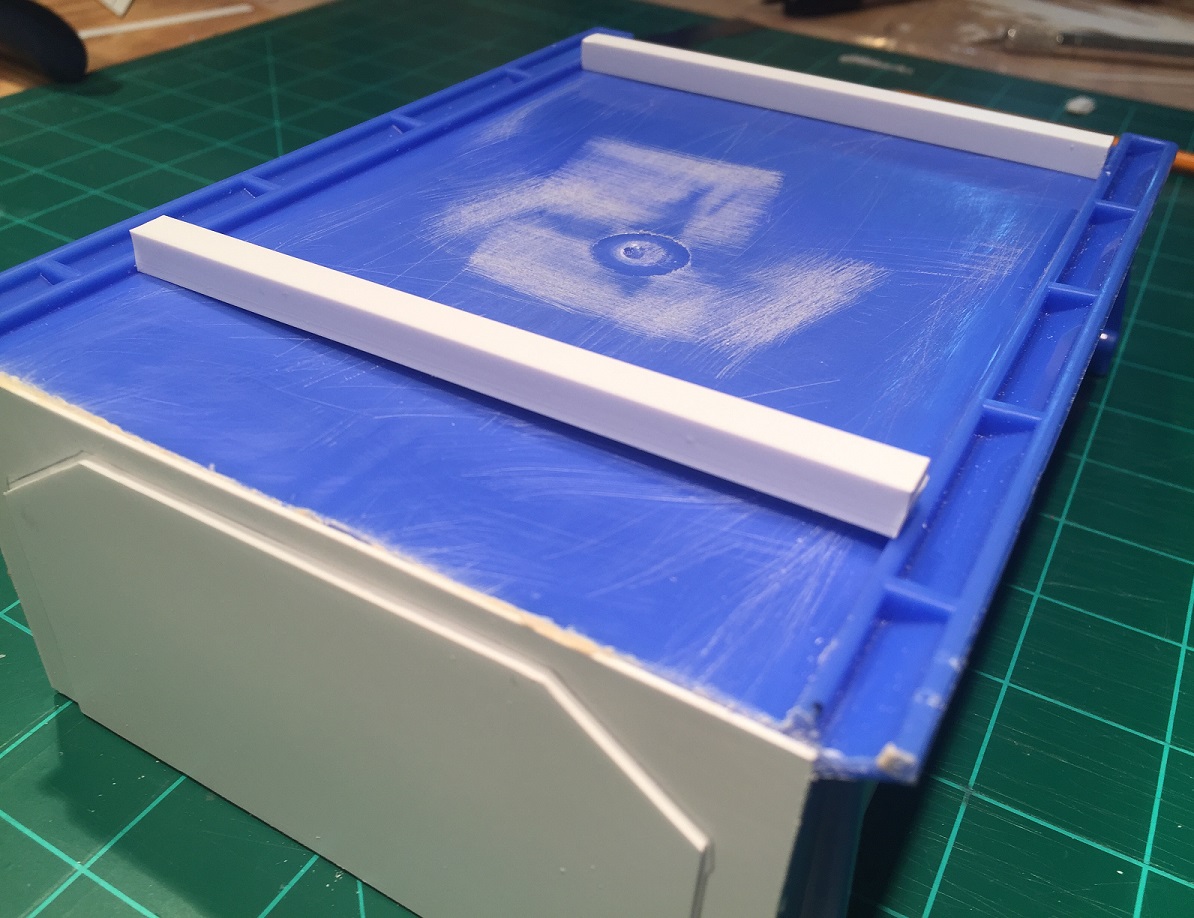
Start by placing the large rectangle down first.
Glue one of the 4-3/16˝ bars flush with one end of the rectangle sheet. Test fit the two longer bars on the sheet. Sand the longer strips as necessary and glue them down, then glue the shorter cross strip. The four bars should frame the sheet without overhang.
The rest of the top detail is pretty straightforward. Bring up the screencap of Danny’s terrain. Sector 7G. Zoom! Enhance!
Take a pencil and trace the outline of the shapes, so you’ll be able to glue them in place. Grab your small L square, and we’ll center these on the sheet. Each shape is 10mm from each corner.
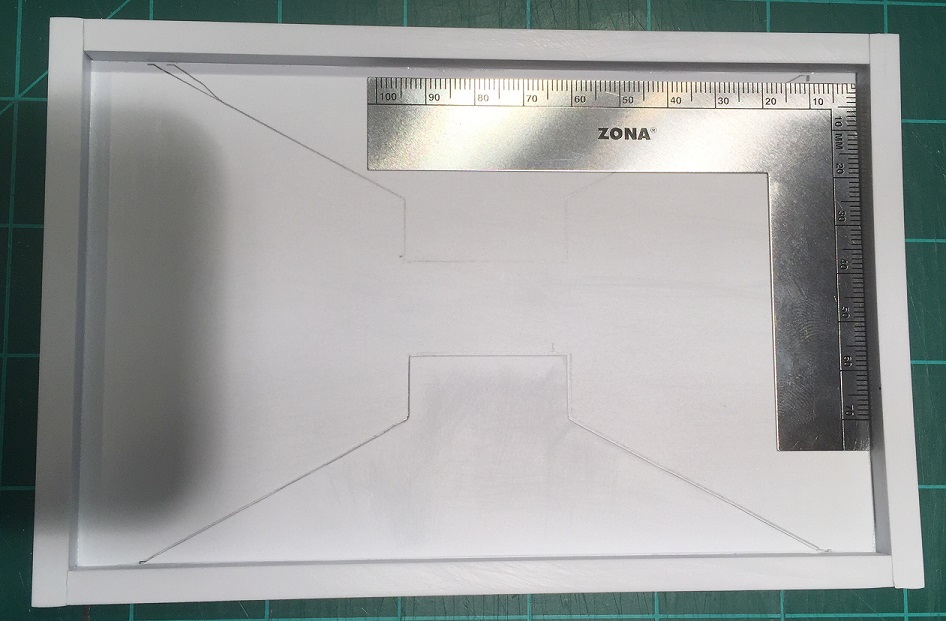
Center the sheet on top of the bunker, with the rear flush with the styrene sheet that forms the rear wall, and glue the full top detail in place.
I bet you’d like to see a picture of that.
Well…sorry. I can’t show you that. Why? Uh…the Coriolis effect. Yeah.
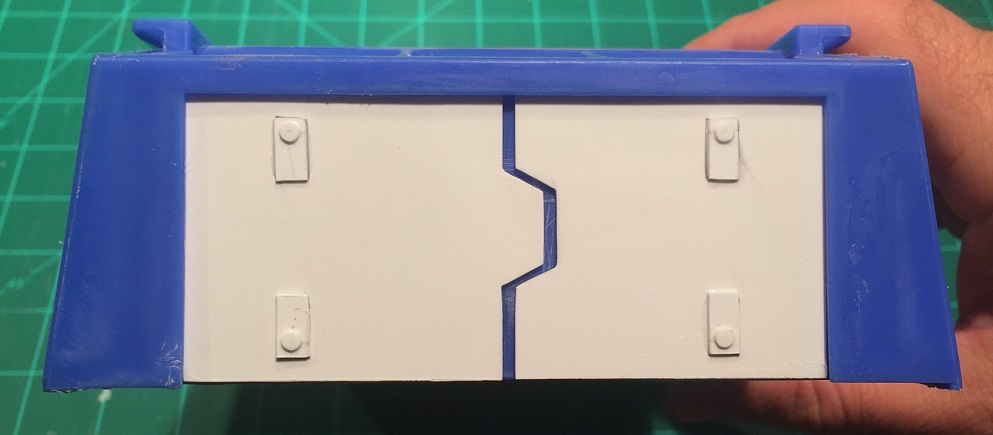
Anyway, grab the bunker doors. These:
Got them? Good.
Throw them out.
Putting a door on your bunker means your enemy might get in. I mean, that’s, like, Fighting 101, man. Duh.
Okay, okay… glue the doors on the bunker. (It’s pretty straightforward.) Dry fit the pieces until you’ve lined up the interlocking details. Use a pencil to trace the outline where each piece belongs before applying glue.
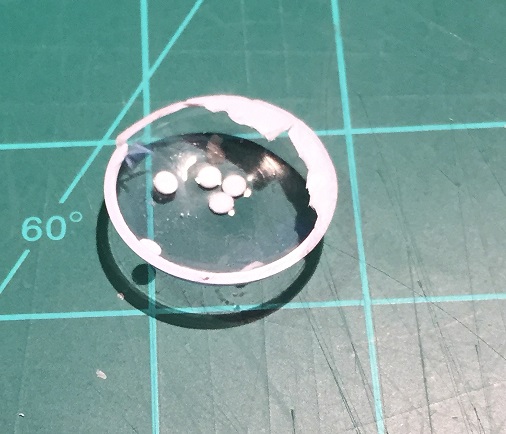
Next. get your leather punch and some styrene scraps. Using the #3 punch, punch out approximately 168,000 circles. Or at least four. Four is good. Four is the minimum.
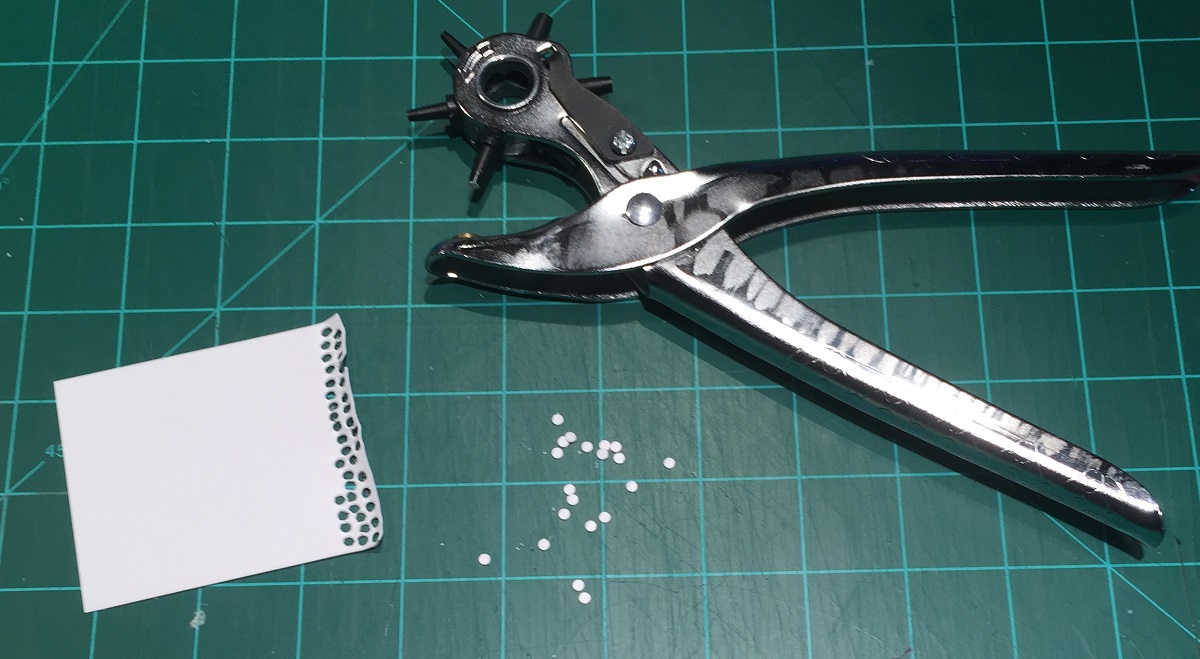
NOTE: Gluing small details like this is difficult, so I’ll tell you the easy way: I cut open a large googly eye (Danny strikes again…?) and filled it with a little pool of super glue. With a pencil in my other hand, I used a sharp hobby knife to gently stab one of the circles to pick it up. I then dipped it gently into the pool of super glue, dabbed the excess glue off with a paper towel, and then guided it into place onto the rectangle.
You’re going to lose a few of the circles to the scourge of capillary action. See? I had a good reason for telling you to cut extras. But you didn’t believe me.
But where do all these circle-covered rectangles go?
Zoom! Enhance!
Now we just have to glue those on.
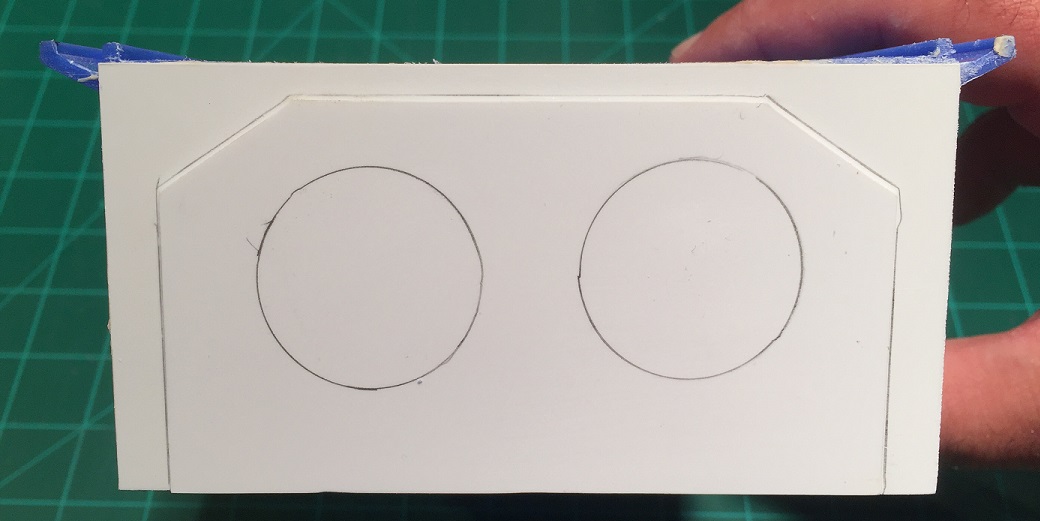
A bonus template for you to use?
FILES:


This file contains two templates that can be cut out of paper or cardstock. One of the shapes will fit inside the door cavity and help you easily line up the rectangles on the doors. The second shape is used later when gluing the pipes on the rear of the building.
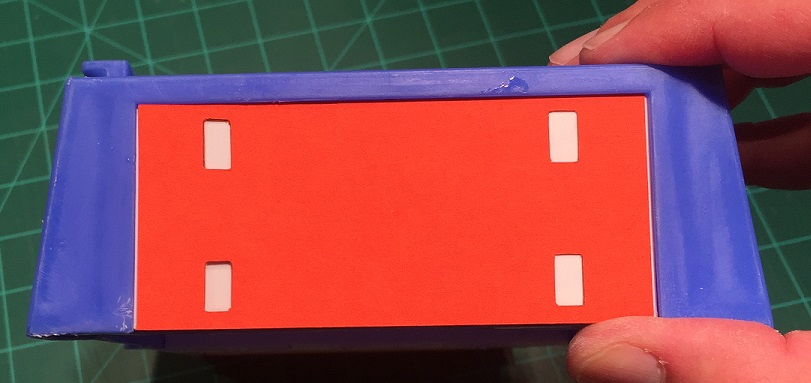

Glue the punched-out circles onto the small rectangles, and glue the rectangles onto the doors as shown.
Grab your PVC 90° elbows and 30mm bases. Sand off all the mold lines and manufacturer information using sandpaper (120 grit) or a rotary tool. Be sure to sand the surface lightly all over just like we did with the styrene.
Glue the 30mm base to one end of the elbow.
Cut out one of the ¼˝ x 3-5/8˝ styrene strips and make a collar on the other end.
Do this on both elbows.
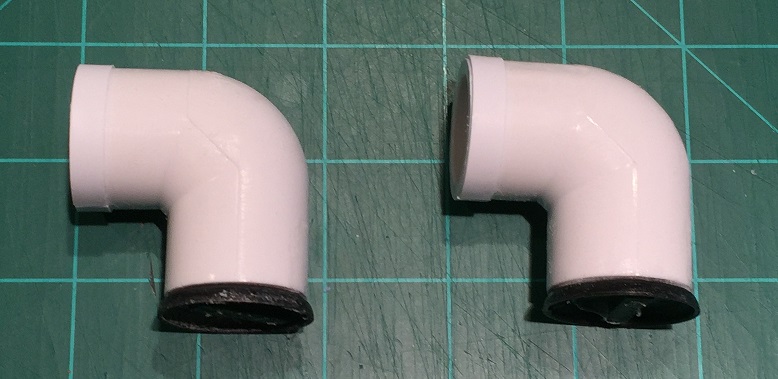
NOTE: Keep a small thumb-sided rectangle of scrap styrene handy while you’re gluing the strips on the elbows. Pressing the strip down with the rectangle will save your skin from getting glued to the parts.
Center the elbows on the rear of the bunker with the 30mm base touching the rear wall. Take care to place your bunker on a level surface and ensure the elbows touch the ground and are level. You can use the second template in the template file to help you space and center the pipes. Test fit and sanity check before gluing!
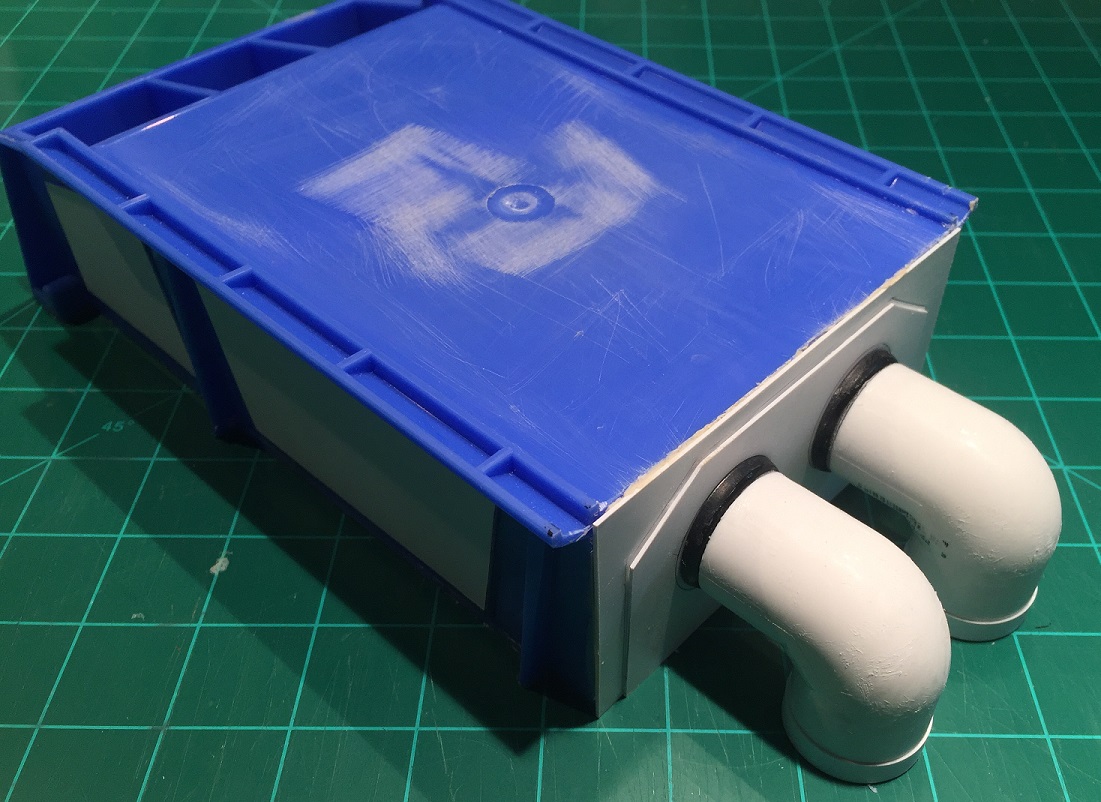
Wrap Up
We now have almost an exact duplicate of Danny’s original piece! All that is missing from the construction is a ladder.
Danny’s piece used the custom resin-cast ladders originally built for various Crucible Guard terrain in 2017. Both Evergreen and Plastruct sell various ladder kits that would work here. Alternate types of ladders, such as stacks of sci-fi crates or some sort of gravity lifts could work, too! Everybody building along at home can use the final details to make this terrain their own. (For example, I plan to add a greeble scavenged from a tank model kit as a door control panel.)
And with that, construction is complete! All that is left now is to wash, prime, and paint this pretty thing. I personally plan to follow the studio scheme. Now if only Danny would write an Insider about that….

The first wave of Warcaster models started shipping recently, so you should have some shiny new models to use with your shiny new terrain by the time this Insider goes live.
Now, if only we had some other Marcher Worlds terrain to go with our bunker and smokestack.
Hmm…
Until next time, stay safe out there!
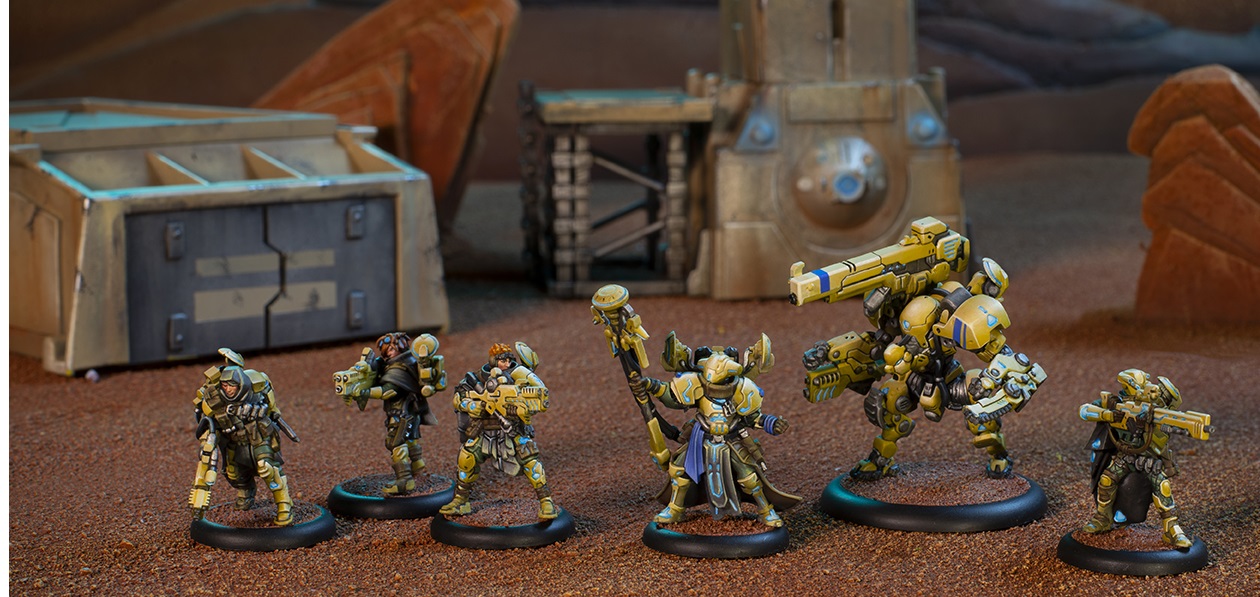
Pictured: Playing a 300-point game of Unbound on homemade terrain
Not pictured: Michael Kessler